
Subscribe to Our Youtube Channel
Related Manuals for Medion LIFEBEAT MD 43059


Summary of Contents for Medion LIFEBEAT MD 43059
- Page 1 Bedienungsanleitung Instruction Manual Kullanım Kılavuzu WLAN-Multiroom-Lautsprecher WLAN multi-room speaker WLAN-Multiroom hoparlör LIFEBEAT ® P61074 (MD 43059)
-
Page 2: Table Of Contents
Inhaltsverzeichnis Hinweise zu dieser Anleitung ..............5 1.1. Verwendete Symbole und Signalwörter ............5 Bestimmungsgemäßer Gebrauch .............. 6 Sicherheitshinweise ..................6 3.1. Nicht zugelassener Personenkreis ..............6 3.2. Das Gerät sicher aufstellen .................. 7 3.3. Netzanschluss ......................8 3.4. Gewitter ........................8 3.5. - Page 3 Impressum ....................28 4 von 80...
-
Page 4: Hinweise Zu Dieser Anleitung
1. Hinweise zu dieser Anleitung Lesen Sie vor der ersten Inbetriebnahme diese Bedienungsanleitung gründ- lich durch und befolgen Sie vor allen Dingen die Sicherheitshinweise! Bewahren Sie diese Bedienungsanleitung für den weiteren Gebrauch auf. Falls Sie das Gerät einmal weitergeben, legen Sie bitte auch diese Bedienungsanleitung dazu. -
Page 5: Bestimmungsgemäßer Gebrauch
2. Bestimmungsgemäßer Gebrauch Das Gerät dient zum Abspielen von Audiodaten, die über ein WLAN- Netzwerk empfangen werden. Außerdem können Sie mit dem Gerät Audiosignale externer Geräte wiedergeben, sowie USB-Geräte aufla- den. Benutzen Sie das Gerät zu keinem anderen Zweck. Betreiben Sie das Gerät nur in Innenräumen. -
Page 6: Das Gerät Sicher Aufstellen
und älter und werden beaufsichtigt; • Kinder jünger als 8 Jahre sollen vom Gerät und der Anschlusslei- tung ferngehalten werden. • GEFAHR! Halten Sie auch die Verpackungsfolien von Kindern fern. Es besteht Erstickungsgefahr! 3.2. Das Gerät sicher aufstellen • Stellen und betreiben Sie alle Komponenten auf einer stabilen, ebenen und vibrationsfreien Unterlage, um Stürze des Gerätes zu vermeiden. -
Page 7: Netzanschluss
anderen Ort auf. • Bei großen Temperatur- oder Feuchtigkeitsschwankungen kann es durch Kondensation zur Feuchtigkeitsbildung innerhalb des Gerä- tes kommen, die einen elektrischen Kurzschluss verursachen kann. 3.3. Netzanschluss • Schließen Sie das Netzteil nur an eine gut erreichbare Steckdose (AC 100–240 V~ 50/60 Hz) an, die sich in der Nähe des Aufstellorts befindet. -
Page 8: Vorbereitung
4. Vorbereitung 4.1. Lieferumfang prüfen Entfernen Sie sämtliches Verpackungsmaterial, auch die Folie auf dem Display. GEFAHR! Lassen Sie kleine Kinder nicht mit Folie spielen. Es besteht Erstickungsgefahr! Bitte überprüfen Sie die Vollständigkeit der Lieferung und benachrichtigen Sie uns bitte innerhalb von 14 Tagen nach dem Kauf, falls die Lieferung nicht komplett ist. Mit dem von Ihnen erworbenen Produkt haben Sie erhalten: •... -
Page 9: Anschlüsse
4.2. Anschlüsse Betrieb im WLAN-Modus: Eine WLAN-Antenne ist im Gerät integriert. Netzadapter: Verbinden Sie den Gerätestecker des mitgelieferten Netzadapters mit dem Anschluss D C I N und den Netzstecker mit einer Steckdose (AC 100–240 V~ 50/60 Hz). LINE-IN: Schließen Sie ein 3,5 mm Stereoklinkenkabel an die Buchse LINE-IN an, um den Stereoton anderer Audiogeräte mit dem WLAN-Lautsprecher wiederzuge- ben. -
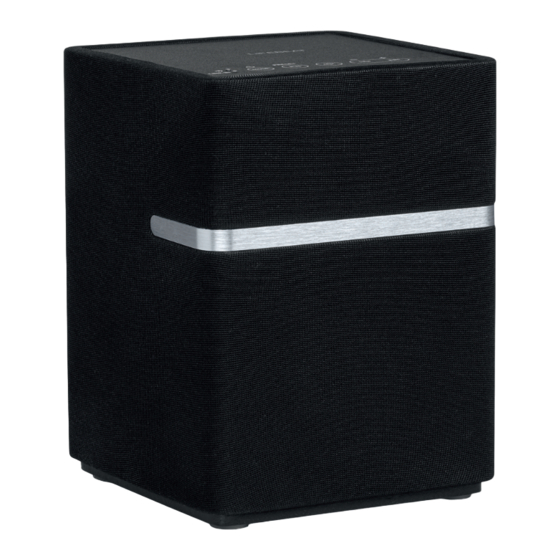
Page 10: Übersicht Wlan-Lautsprecher
5. Übersicht WLAN-Lautsprecher 5.1. Oberseite W I F I L E D : Blinkt gelb Wartet auf WLAN-Verbindung Blinkt schnell gelb Betriebsart WLAN (Suche Verbindung) Leuchtet gelb Betriebsart WLAN (Verbunden) Standby Modus L I N E I N L E D : Leuchtet grün bei Wiedergabe über LINE IN. M O D E / S TA N D B Y: In den Standby-Modus schalten/ Gerät einschalten;... -
Page 11: Rückseite
5.2. Rückseite D C I N : Buchse für Steckernetzteil W P S : WPS-Funktion verwenden L I N E - I N : Audioeingang 3,5 mm Stereobuchse Ethernet: LAN-Anschluss (RJ45 Buchse) USB: USB-Anschluss zum Aufladen externer Geräte 12 von 80... -
Page 12: Led-Anzeigen
6. LED-Anzeigen Anzeige Status L I N E I N Leuchtet grün Betriebsart LINE IN W I F I Blinkt gelb Wartet auf WLAN-Verbindung Blinkt schnell gelb Betriebsart WLAN (Suche Verbindung) Leuchtet gelb Betriebsart WLAN (Verbunden) Standby Modus 7. Netzwerkkonfi guration Der WLAN-Lautsprecher wird über WLAN oder LAN mit dem Netzwerk verbunden. -
Page 13: Lautsprecher Ein- Und Ausschalten
9. Lautsprecher ein- und ausschalten Lautsprecher einschalten Drücken Sie die Taste M O D E / S TA N D B Y , um den Lautsprecher einzuschal- ten. Der Lautsprecher schaltet sich in der zuletzt eingestellen Betriebsart ein. Standby-Modus ... -
Page 14: Wlan-Lautsprecher Zum Netzwerk Hinzufügen
11. WLAN-Lautsprecher zum Netzwerk hinzufü- Schalten Sie den Lautsprecher ein und warten Sie, bis das System vollständig hochgefahren ist (Begrüßungston ist zu hören. Schalten Sie den Lautsprecher in den WLAN-Modus. Die W I F I -LED blinkt gelb. ... -
Page 15: Musik Wiedergeben
HINWEIS Ihr mobiles Gerät (Smartphone oder Tablet-PC), muss im WLAN Netz- werk des Routers angemeldet sein. 12. Musik wiedergeben Sie können auf Ihrem WLAN-Lautsprecher Musik aus dem Netzwerk, Musik von ei- nem über WLAN angemeldeten Gerät (Direkt-Modus) oder das Stereosignal eines extern angeschlossenen Gerätes wiedergeben. -
Page 16: Wlan Direktverbindung Über Lifebeat P Herstellen
12.2. WLAN Direktverbindung über LIFEBEAT P herstellen Besteht keine Möglichkeit zum Aufbau einer Netzwerkverbindung über WPS, ver- wenden Sie die APP LIFEBEAT P Ihres Smartphones oder Tablets, um eine Ver- bindung mit dem Internet bzw. dem WLAN-Lautsprecher herzustellen. Schalten Sie den Lautsprecher ein und warten Sie, bis das System vollständig hochgefahren ist (Begrüßungston). -
Page 17: Über Spotify® Musik Hören
12.3. Über Spotify® Musik hören Sie können Audiodaten vom Musikstreaming-Dienst Spotify® über den WLAN-Lautsprecher abspielen. Voraus- setzung ist, dass Sie auf Ihrem Smartphone oder Tablet PC die Premium-Version der Spotify-App installiert haben und dass den WLAN-Lautsprecher und das Gerät mit der Spo- tify-App im selben Netzwerk angemeldet sind. -
Page 18: Wiedergabe Über Lifebeat P App
13. Wiedergabe über LIFEBEAT P App Schalten Sie den Lautsprecher ein und warten Sie, bis das System vollständig hochgefahren ist (Be- grüßungston ist zu hören. Schalten Sie den Lautsprecher in den WLAN-Mo- dus. Die W I F I -LED blinkt gelb. ... -
Page 19: Wiedergabe Von Einem Externen Audiogerät
Um einen WLAN-Lautsprecher von einer Gruppe zu lösen, „ziehen“ Sie einfach einen gewünschten WLAN-Lautsprecher aus der Gruppe raus. Nun können Sie über jeden einzelnen WLAN-Lautspre- cher eine andere Musik abspielen. HINWEIS Sie können die Wiedergabe auf anderen Lautspre- chern auch in den Wiedergabearten (LINE IN oder BLUETOOTH) verwenden! 14. -
Page 20: Zurücksetzen Bei Fehlerhafter Funktion
16. Zurücksetzen bei fehlerhafter Funktion Sollte Ihr Gerät nicht reagieren, ziehen Sie das Steckernetzteil aus der Steckdose und stecken Sie es nach ein paar Sekunden wieder ein. 16.1. Gerät über die App auf Werkseinstellungen zurücksetzen Schalten Sie den WLAN-Lausprecher ein ... -
Page 21: Gerät Manuell Werkseinstellungen Zurücksetzen
Tippen Sie nun auf Bestätigen. 16.2. Gerät manuell Werkseinstellungen zurücksetzen Für den Fall, dass der Lautsprecher sich nicht mehr mit dem WLAN-Access Point ver- bindet oder sie die WLAN-Verbindung erneut ausführen wollen, können Sie den Lautsprecher manuell auf die Werkseinstellungen zurücksetzen. ... -
Page 22: Software-Update
17. Software-Update • Sie können die Software des WLAN-Lautsprecher über die App aktualisieren. Die App sucht ob ein Software-Update verfügbar ist und lädt dieses über das Inter- net auf den WLAN-Lautsprecher. Schalten Sie den WLAN-Lausprecher ein Starten Sie die LIFEBEAT P App. ... -
Page 23: Fehlerbehebung
18. Fehlerbehebung Bei einer Störung des Geräts prüfen Sie bitte zunächst, ob Sie das Problem mit Hilfe der folgenden Übersicht selbst beheben können. Versuchen Sie auf keinen Fall, die Geräte selbst zu reparieren. Wenn eine Reparatur notwendig ist, wenden Sie sich bitte an unser Service Center oder eine andere ge- eignete Fachwerkstatt. -
Page 24: Reinigung
19. Reinigung Schalten Sie das Gerät aus, bevor Sie es reinigen. Verwenden Sie ein weiches, trockenes Tuch, ab es abzuwischen. Benutzen Sie keine rauen Tücher, keine scharten Reinigungsmittel, keine Verdünner oder alko- holische Lösungen für die Reinigung. Solche Mittel können das Gerät beschädi- gen. -
Page 25: Technische Daten
21. Technische Daten Netzadapter Modell: OH-1024A1801200U-VDE Hersteller: ORIENTAL HERO ELE. FTY. Eingangsspannung: AC 100 – 240 V ~ 50/60 Hz, 500 mA max Ausgangsspannung: 18 V 1,2 A Gerät Lautsprecher: 20 W RMS Abmessungen: ca. 132 x 174 x 132 cm Gewicht: ca. -
Page 26: Konformitätsinformationen
22. Konformitätsinformationen Mit diesem Gerät wurden folgende Funkausstattungen ausgeliefert: • Wireless LAN Hiermit erklärt die Medion AG, dass das Produkt mit den folgenden europäischen Anforderungen übereinstimmt: • R&TTE Richtline 1999/5/EG • EMV-Richtlinie 2014/30/EU • Öko-Design Richtlinie 2009/125/EG • RoHS-Richtlinie 2011/65/EU. - Page 27 Vervielfältigung in mechanischer, elektronischer und jeder an- deren Form ohne die schriftliche Genehmigung des Herstellers ist verboten Das Copyright liegt bei der Firma: Medion AG Am Zehnthof 77 45307 Essen Deutschland Die Anleitung kann über die Service Hotline nachbestellt werden und steht über das Serviceportal www.medionservice.de zum Download zur Verfügung.
- Page 28 Table of contents Notes on how to use these instructions ........... 31 1.1. Symbols and keywords used in these instructions ........31 Proper use ....................32 Safety information ..................32 3.1. People not permitted to use this device ............32 3.2. Setting up the device safely ................33 3.3.
- Page 29 Disposal ...................... 51 Technical data .................... 52 Compliance information ................53 Legal notice ....................54 30 of 80...
-
Page 30: Notes On How To Use These Instructions
1. Notes on how to use these instructions Before using the device for the first time, read these operating instruc- tions thoroughly and follow the safety advice! Please keep these instructions in a safe place for future reference. Al- ways include these instructions if you pass the device on to a new own- 1.1. -
Page 31: Proper Use
2. Proper use This device is used for playing audio files streamed over a WLAN net- work. In addition, you can use the device to play audio signals from external devices, as well as to charge USB devices. Never use the device for any other purpose. Only use the device in- doors. -
Page 32: Setting Up The Device Safely
3.2. Setting up the device safely • Set up and operate all the components on a stable, level and vibra- tion-free surface to prevent the product from falling. • Do not subject the product to knocks and vibrations. Knocks and vibrations may damage the sensitive electronics. -
Page 33: Thunderstorms
connect the mains adapter to other connectors as this may cause damage. • If the product has been moved from a cold room to a warm room, wait before connecting it to the power supply. The resulting con- densation may damage the device. The device can be operated safely as soon as it has reached room temperature. -
Page 34: Connections
• Mains adapter (model OH-1024A1801200U-VDE) • These operating instructions • Warranty card 4.2. Connections WLAN mode: The device has an integrated WLAN antenna. Mains adapter: Connect the connector plug on the supplied mains adapter to the DC IN socket and plug the mains plug into an AC 100–240 V ~ 50/60 Hz socket. -
Page 35: Overview Of The Wlan Loudspeaker
5. Overview of the WLAN loudspeaker 5.1. Top WIFI LED: Flashes in yellow Waiting for a WLAN connection Flashes quickly in yellow WLAN operating mode (searching for connec- tion) Lights up yellow WLAN operating mode (connected) Standby mode LINE IN LED: Lights up green for playback via LINE IN. MODE/STANDBY: Switch to standby mode/switch on device;... -
Page 36: Rear
5.2. Rear D C IN : Socket for power cable WPS: Use WPS function LINE-IN: Audio input, 3.5 mm stereo socket Ethernet: LAN socket (RJ45 socket ) USB: USB port for charging external devices 37 of 80... -
Page 37: Led Displays
6. LED displays Display Status LINE IN Green light LINE IN operating mode WIFI Flashes yellow Waiting for WLAN connection Flashes quickly yel- WLAN operating mode (searching for connection) Lights up yellow WLAN operating mode (connected) Standby mode 7. Network confi guration The WLAN loudspeaker is connected to the network via WLAN or LAN. -
Page 38: Switching The Loudspeaker On And Off
9. Switching the loudspeaker on and off Switching on the loudspeaker Press the MODE/STANDBY button on the loudspeaker to turn it on. The loudspeaker switches to the last mode set. Standby mode Press and hold down the MODE/STANDBY button until the Bluetooth and WIFI LEDs go out to switch the loudspeaker to standby mode. -
Page 39: Control Using The Lifebeat P Application
11.2. Installation via Google Play or the Apple App Store Open Google Play or the Apple App Store and search for the term "MEDION Lifebeat P" Install the "Lifebeat P" app from Medion. Follow the installation instructions on the screen. -
Page 40: Adding The Wlan Loudspeaker To A Network
12. Adding the WLAN loudspeaker to a network Switch on the loudspeaker and wait until the system has completely powered up (you will hear a welcome tone). Switch the loudspeaker to WLAN mode. The WIFI LED flashes in yellow. ... -
Page 41: Playing Back Music
13. Playing back music You can use your WLAN loudspeaker to play music from the network, play music from a device registered via WLAN (direct mode) or play stereo signals from an ex- ternally connected device. The following section describes the operating modes on the WLAN loudspeaker and the different audio sources. -
Page 42: Establishing A Direct Wlan Connection Via Lifebeat P
13.2. Establishing a direct WLAN connection via LIFEBEAT P If it is not possible to establish a network connection via WPS, use the LIFEBEAT P app on your smartphone or tablet to establish a connection with the Internet or the WLAN loudspeaker. ... -
Page 43: Listening To Music Via Spotify
13.3. Listening to music via Spotify® You can play back audio files from the music streaming ser- vice Spotify® via the WLAN loudspeaker. The prerequisite is that you have the premium version of the Spotify app installed on your smartphone or tablet PC and the WLAN loud- speaker and the device with the Spotify app are registered on the same network. -
Page 44: Playback Via The Lifebeat P App
14. Playback via the LIFEBEAT P app Switch on the loudspeaker and wait until the sys- tem has completely powered up (you will hear a welcome tone). Switch the loudspeaker to WLAN mode. The WIFI LED flashes in yellow. ... -
Page 45: Playback From An External Audio Device
In order to delete a WLAN loudspeaker from a group, simply "pull" the desired WLAN loudspeaker out of the group. You can now play different music via each individual WLAN loudspeaker. NOTICE You can also use the playback modes (LINE IN or BLUE- TOOTH) to play music on other loudspeakers! 15. -
Page 46: Resetting The Device In Case Of Malfunction
17. Resetting the device in case of malfunction If the device fails to react, disconnect the mains plug from the mains socket and then plug it in again after a few seconds. 17.1. Resetting the device to factory settings via the app ... -
Page 47: Manually Resetting The Device To Factory Settings
Now tap on Confirm. 17.2. Manually resetting the device to factory settings If the loudspeaker no longer connects to the WLAN access point or you want to re-establish the WLAN connection, you can manually reset the device to the facto- ry settings. -
Page 48: Software Update
18. Software update • You can update the software for the WLAN loudspeaker via the app. The app searches to see if a software update is available and then downloads the update onto the WLAN loudspeaker from the Internet. Switch the WLAN loudspeaker on. ... -
Page 49: Troubleshooting
19. Troubleshooting If the product malfunctions, please check first if you can remedy the problem your- self with the help of the following hints. Never try to repair the product yourself. Please contact our Service Centre or anoth- er professional repair shop if a repair is necessary. Problem Possible cause Solution... -
Page 50: Cleaning
20. Cleaning Switch off the device before cleaning it. Use a soft, dry cloth to wipe the device. Never use rough cloths, abrasive de- tergent, thinners or solutions containing alcohol to clean the device. These can damage the device. 21. -
Page 51: Technical Data
22. Technical data Mains adapter Model: OH-1024A1801200U-VDE Manufacturer: ORIENTAL HERO ELE. FTY. Input voltage: AC 100 – 240 V ~ 50/60 Hz, 800 mA max Output voltage: 18 V 1.2 A Device Speakers: 20 W RMS Dimensions: approx. 132 x 174 x 132 cm Weight: approx. -
Page 52: Compliance Information
23. Compliance information This device is supplied with the following wireless features: • Wireless LAN Medion AG hereby declares that the product conforms to the following European requirements: • R&TTE Directive 1999/5/EC • EMC Directive 2014/30/EC • Low Voltage Directive 2014/35/EC •... -
Page 53: Legal Notice
Germany The operating manual can be reordered via the service hotline and is available for download via the service portal at www.medion.com/gb/service/start/. You can also scan the QR code above and download the operating manual onto your mobile device via the service portal. - Page 54 İçindekiler Bu kılavuz ile ilgili açıklamalar ..............57 1.1. Kullanılan simgeler ve uyarı sözcükleri ............57 Amaca uygun kullanım ................58 Güvenlik uyarıları ..................58 3.1. Müsaade edilmeyen kişiler ................58 3.2. Cihazın güvenli kurulumu .................59 3.3. Elektrik bağlantısı....................59 3.4. Fırtına ........................60 3.5.
- Page 55 Bertaraf etme ..................... 77 Teknik bilgiler .................... 78 Uygunluk bilgileri ..................79 56/80...
-
Page 56: Bu Kılavuz Ile Ilgili Açıklamalar
1. Bu kılavuz ile ilgili açıklamalar Cihazı ilk kez işletime almadan önce bu kullanım kılavuzunu özenle oku- yun ve güvenlik uyarılarına mutlaka uyun! Bu kullanım kılavuzunu bir başvuru kaynağı olarak muhafaza edin. Ciha- zı başka bir kullanıcıya vermek istediğinizde, lütfen beraberinde bu kul- lanım kılavuzunu da verin. -
Page 57: Amaca Uygun Kullanım
2. Amaca uygun kullanım Cihaz, WLAN ağı üzerinden alınan audio verilerini çalmak içindir. Ayrı- ca cihazı kullanarak harici cihazların audio sinyallerini çalabilir ve USB cihazları şarj edebilirsiniz. Cihazı başka bir amaçla kullanmayın. Cihazı sadece kapalı ortamlarda çalıştırın. • Cihaz endüstriyel/ticari kullanım için değil, sadece kişisel kullanım için tasarlanmıştır. -
Page 58: Cihazın Güvenli Kurulumu
3.2. Cihazın güvenli kurulumu • Cihazın düşmesini önlemek için tüm bileşenleri sağlam, düz ve tit- reşimsiz bir zemin üzerine koyup çalıştırın. • Cihazı sarsıntılara maruz bırakmayın. Sarsıntılar, hassas elektronik sisteme hasar verebilir. • Cihazı doğrudan ısı kaynaklarına (örn. kalorifer) maruz bırakmayın. •... -
Page 59: Fırtına
bileceği için prize kolayca erişebilmeniz gerekmektedir. • Sadece ürünle birlikte gelen elektrik adaptörünü kullanın. Asla elektrik adaptörünü başka yuvalara bağlamaya çalışmayın, aksi hal- de hasara sebep olabilirsiniz. • Cihaz soğuk bir ortamdan sıcak bir ortama alındığı zaman elektrik adaptörünü hemen takmayın. Bu esnada oluşan yoğuşma suyu ci- haza zarar verebilir. -
Page 60: Bağlantılar
ürünle birlikte şunlar teslim edilmiştir: • WLAN hoparlör • Elektrik adaptörü (Model OH-1024A1801200U-VDE) • Bu kullanım kılavuzu • Garanti kartı 4.2. Bağlantılar WLAN modunda işletim: Cihaza bir WLAN anteni entegre edilmiştir. Elektrik adaptörü: Ürünle birlikte verilen elektrik adaptörünün fişini DC IN bağ- lantı... -
Page 61: Wlan Hoparlörüne Genel Bakış
5. WLAN hoparlörüne genel bakış 5.1. Üst taraf WİFİ LED: Sarı yanıp sönüyorsa WLAN bağlantısını bekliyor Hızlı sarı yanıp sönüyorsa Çalışma modu WLAN (Bağlantı aranıyor) Sarı yanıyorsa Çalışma modu WLAN (Bağlı) Kapalı Bekleme modu LINE IN LED: LINE IN üzerinden çalındığında, yeşil yanar. MODE/STANDBY: Bekleme moduna alma/ Cihazı... -
Page 62: Arka Taraf
5.2. Arka taraf D C IN : Fişli elektrik adaptörü için yuva WPS: WPS işlevinin kullanımı LINE-IN: 3,5 mm stereo yuva audio girişi Ethernet: LAN bağlantısı (RJ45 yuvası) USB: Harici cihazları şarj etmek için USB bağlantısı 63/80... -
Page 63: Led Göstergeler
6. LED göstergeler Gösterim Durum LINE IN Yeşil yanıyorsa Çalışma modu LINE IN WIFI Sarı yanıp sönü- WLAN bağlantısı bekleniyor yorsa Hızlı sarı yanıp sö- Çalışma modu WLAN (Bağlantı aranı- nüyorsa yor) Sarı yanıyorsa Çalışma modu WLAN (Bağlı) Kapalı Bekleme modu 7. -
Page 64: Hoparlörü Açma Ve Kapatma
9. Hoparlörü açma ve kapatma Hoparlörü açma Hoparlörü açmak için MODE/STANDBY tuşuna basın. Hoparlör, en son ayarlanmış olan çalışma modunda açılır. Bekleme modu Hoparlörü bekleme moduna almak için Bluetooth ve WIFI LED'leri kapanana dek MODE/STANDBY tuşunu daha uzun süre basılı tutun. Hoparlör bekleme modunda ağ... -
Page 65: Lifebeat P Uygulaması Üzerinden Kumanda
11.2. Google Play veya Apple App Store üzerinden yükleme Google Play veya Apple App Store'u açın ve "MEDION Lifebeat P" sözcüğü ile arama yapın Medion'un "Lifebeat P" uygulamasını yükleyin. Bu esnada ekranda yükleme işle- mine yönelik talimatları izleyin. -
Page 66: Wlan Hoparlörü Ağa Ekleme
12. WLAN hoparlörü ağa ekleme Hoparlörü açın ve sistemin komple açılmasını bekleyin (karşılama sesi duyulur). Hoparlörü WLAN moduna ayarlayın. WIFI LED'i sarı yanıp söner. Mobil cihazınızı WLAN ağınıza bağlayın. LIFEBEAT P uygulamasını başlatın ve Add Device üze- rine tıklayın. -
Page 67: Müzik Çalma
13. Müzik çalma WLAN hoparlörünüz ile ağdan müzik çalabilir, WLAN üzerinden kayıtlı cihazdan (di- rekt mod) müzik çalabilir veya harici bağlı bir cihazın stereo sinyalini çalabilirsiniz. Aşağıda WLAN hoparlörün çeşitli ses kaynaklarıyla çalışma modları açıklanmaktadır. BİLGİ! Akıllı telefon veya tablet bilgisayar ile ağdan müzik çalmayı kontrol et- mek için UPNP özellikli bir uygulama gerekmektedir. -
Page 68: Lifebeat P Üzerinden Doğrudan Wlan Bağlantısı Kurma
13.2. LIFEBEAT P üzerinden doğrudan WLAN bağlantısı kurma WPS üzerinden ağ bağlantısı kurulamıyorsa İnternet'e veya WLAN hoparlöre bağ- lanmak için akıllı telefonunuzdaki veya tabletinizdeki LIFEBEAT P uygulaması- nı kullanın. Hoparlörü açın ve sistemin komple açılmasını bekleyin (Karşılama sesi). Hoparlörü WLAN moduna ayarlayın. WIFI LED'i sarı yanıp söner. -
Page 69: Spotify® Üzerinden Müzik Dinleme
13.3. Spotify® üzerinden müzik dinleme Spotify® müzik yayınlama hizmetinin audio verilerini WLAN hoparlör üzerinden çalabilirsiniz. Bunun için akıllı telefonu- nuza veya tablet bilgisayarınıza Spotify uygulamasının Pre- mium versiyonunu yüklemiş olmanız gerekmekte ve WLAN hoparlör ile cihaz aynı ağda Spotify uygulamasına kayıtlı ol- malıdır. -
Page 70: Lifebeat P Uygulaması Üzerinden Çalma
14. LIFEBEAT P uygulaması üzerinden çalma Hoparlörü açın ve sistemin komple açılmasını bek- leyin (karşılama sesi duyulur). Hoparlörü WLAN moduna ayarlayın. WIFI LED'i sarı yanıp söner. LIFEBEAT P uygulamasını başlatın. Uygulamanın başlangıç sayfası açılır. Burada çalma listelerini açabilir, sonraki ve önceki parçalara geçe- bilir, ses seviyesini değiştirebilir veya favoriler seçe- bilirsiniz. -
Page 71: Harici Audio Cihazından Çalma
Bir WLAN hoparlörü bir gruptan kaldırmak için iste- diğiniz WLAN hoparlörü grubun dışına "çekin". Şimdi her bir WLAN hoparlör üzerinden farklı müzikler çalabilirsiniz. BİLGİ Başka hoparlörlerde çalma işlevini, çalma türlerinde (LINE IN veya BLUETOOTH) de kullanabilirsiniz! 15. Harici audio cihazından çalma ... -
Page 72: Hatalı Çalışmada Sıfırlama
17. Hatalı çalışmada sıfırlama Cihazınız çalışmıyorsa fişli elektrik adaptörünü prizden çekin ve birkaç saniye sonra geri takın. 17.1. Cihaza uygulama üzerinden fabrika ayarlarını yükleme WLAN hoparlörü açın LIFEBEAT P uygulamasını başlatın. Uygulamanın başlangıç sayfasında parmağınızı sağdan sola doğru sürükleyerek cihaz listesini açın. ... -
Page 73: Cihaza Manüel Olarak Fabrika Ayarlarını Yükleme
Şimdi Confirm üzerine tıklayın. 17.2. Cihaza manüel olarak fabrika ayarlarını yükleme Hoparlör, WLAN-Access Point ile bağlantı kurmazsa veya WLAN bağlantısını yeniden uygulamak istiyorsanız, hoparlöre manüel olarak fabrika ayarlarını yükleyebilirsiniz. Bunun için hoparlörün arka tarafındaki WPS tuşunu yaklaşık 10 saniye basılı tu- tun. -
Page 74: Yazılım Güncellemesi
18. Yazılım güncellemesi • WLAN hoparlörün yazılımını uygulama üzerinden güncelleyebilirsiniz. Uygula- ma, yazılım güncellemesi olup olmadığını arar ve varsa güncellemeyi İnternet üzerinden WLAN hoparlöre yükler. WLAN hoparlörü açın LIFEBEAT P uygulamasını başlatın. Uygulamanın başlangıç sayfasında parmağınızı sağdan sola doğru sürükleyerek cihaz listesini açın. -
Page 75: Hata Giderme
19. Hata giderme Cihaz arızalandığında önce sorunu aşağıdaki genel bakış yardımıyla kendiniz giderip gideremeyeceğinizi kontrol edin. Hiçbir surette cihazları kendi başınıza tamir etmeye çalışmayın. Tamir edilmesi gere- kiyorsa lütfen servis merkezimize ya da uygun olan başka bir servise başvurun. Sorun Olası... -
Page 76: Temizlik
20. Temizlik Cihazı temizlemeden önce kapatın. Silmek için yumuşak ve kuru bir bez kullanın. Temizlemek için sert bezler, aşın- dırıcı temizlik maddeleri, inceltici veya alkol içeren çözeltiler kullanmayın. Bu tür maddeler cihaza zarar verebilir. 21. Bertaraf etme Ambalaj Cihazınız, nakliye hasarlarına karşı... - Page 77 22. Teknik bilgiler Elektrik adaptörü Model: OH-1024A1801200U-VDE Üretici: ORIENTAL HERO ELE. FTY. Giriş gerilimi: AC 100 – 240 V ~ 50/60 Hz, 800 mA maks Çıkış gerilimi: 18 V 1.2 A Cihaz Hoparlör: 20 W RMS Ölçüler: yakl. 132 x 174 x 132 cm Ağırlık: yakl.
- Page 78 23. Uygunluk bilgileri Bu cihaz ile birlikte aşağıdaki telsiz donanımları teslim edilmiştir: • Kablosuz LAN Medion AG işbu belgeyle ürünün aşağıdaki Avrupa yönergeleri ile uyumlu olduğu- nu beyan eder: • R&TTE Yönergesi 1999/5/AT • EMC Yönergesi 2014/30/AB • Alçak Gerilim Yönetmeliği 2014/35/AB Ekolojik Tasarım Yönergesi 2009/125/AT •...
- Page 79 80/80...
- Page 80 MSN 5005 1976...
Need help?
Do you have a question about the LIFEBEAT MD 43059 and is the answer not in the manual?
Questions and answers