V-ZUG Perfect 60i eco Operating Instructions Manual
Hide thumbs
Also See for Perfect 60i eco:
- Service manual (55 pages) ,
- Instructions for use manual (49 pages) ,
- Operating instructions manual (28 pages)

Related Manuals for V-ZUG Perfect 60i eco


Summary of Contents for V-ZUG Perfect 60i eco
- Page 1 Operating instructions Perfect 60i | Perfect 60i eco | Optima 2 Refrigerator/freezer...
- Page 2 Size system Perfect 60i EK12M12-EA 51083 Euro 60 Perfect 60i eco EK12M12-EE 51084 Euro 60 Optima 2 EK1212-EA 51085 SMS 55 / Euro 60 Variations depending on the model are noted in the text. © V-ZUG Ltd, CH-6302 Zug, 2023...
-
Page 3: Table Of Contents
Contents Warning and alarm signals......... 18 Safety precautions 4 Trouble-shooting 19 Symbols used............ 4 General safety precautions........ 4 Tips and tricks 21 Appliance-specific safety precautions .... 5 11.1 General information on using the appliance ... 21 Appliance installation .......... 5 11.2 Notes on saving energy ........ -
Page 4: Safety Precautions
Safety precautions Symbols used Denotes important safety precau- ▪ This appliance can be used tions. Failure to observe said precautions by children aged 8 and above can result in injury or in damage to and by persons with reduced the appliance or fittings! physical, sensory or mental Information and precautions that capabilities, or lack of experi-... -
Page 5: Appliance-Specific Safety Precautions
1 Safety precautions ▪ Refer to the identification plate for in- turer or its Customer Services formation on the required mains or a similarly qualified person voltage, current type and fuse protec- in order to avoid hazard. tion. ▪ All plastering, plasterboarding, wall pa- Appliance-specific safety pering and painting work is to be car- precautions... - Page 6 1 Safety precautions ▪ WARNING: Do not locate multiple port- the appliance and fittings, as well as af- able socket-outlets or portable power fect the functioning of the appliance. If supplies at the rear of the appliance. the appliance is not working properly or ▪...
- Page 7 1 Safety precautions ▪ Store oils and fats upright in closed Caution: Risk of injury! containers. They must not come into ▪ Be careful not to put fingers in the door contact with the plastic parts or the hinges, as there is otherwise a risk of door seal.
-
Page 8: Using For The First Time
Using for the first time Before operating the newly installed appliance for the first time, the following steps should be taken: ▸ Remove packaging and transport materials as well as any protective film from the in- terior. ▸ Clean the interior and accessories with lukewarm water or a mild soapy solution (wa- ter and washing-up liquid) and dry thoroughly. -
Page 9: Operating And Display Elements
3 Appliance description Temperature zones Freezer compartment Unfrozen compartment Refrigerator compartment Features Door tray with cover Defrost drainage channel Door trays Temperature sensor Door tray with bottle holder Rack (bottles up to max. 1.5 litres) Refrigerator compartment door LED illumination Vegetable drawer Half-shelf Shelf over vegetable drawer (do not... -
Page 10: Operation
4 Operation Operation Switching the appliance on ▸ Plug in the appliance at the mains socket. – «off» is shown in the right-hand side of the display for 30 seconds. ▸ Hold the button depressed for 3 seconds. – The appliance is switched on. An appliance that has been started up for the first time takes around 15 hours (with food inside) to reach its normal operating temperatures. -
Page 11: Appliance Functions
5 Appliance functions Appliance functions Activating/Deactivating the appliance functions Function Description Fast cooling Preparing the unfrozen compartment ideally for loading food and food items after a shopping trip. Activating ▸ Hold the button depressed for 3 seconds. – flashes in the display. ▸... -
Page 12: Description Of Functions
5 Appliance functions Function Description Sabbath mode The illumination is not affected by opening or closing the door. Activating ▸ Preparing for the Sabbath: Hold the button depressed for 3 seconds. flashes in the display. – ▸ Touch the button. –... -
Page 13: Interior Fittings
6 Interior fittings Interior fittings The height of the glass shelves in the refrigerator compartment and the door trays on the inside of the refrigerator compartment door can be adjusted. The half-shelf enables taller vessels to be stored. Always place the half-shelf at the top to ensure optimum air circulation. -
Page 14: Storing Food
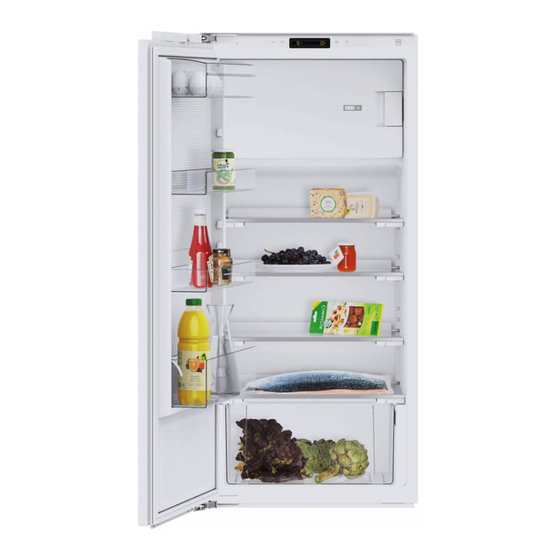
7 Storing food Storing food How to arrange food in the appliance The example arrangement (from top to bottom) shows the zones and areas in the appli- ance that are generally suitable for certain food and food items. In the freezer compartment: Freezing and storing food and making ice On the glass shelves:... -
Page 15: Packaging And Containers
7 Storing food Packaging and containers ▸ Wrap or cover food in the refrigerator compartment to prevent it from drying out and flavours from transferring. ▸ Transfer the contents of opened tins to sealable containers. ▸ Store raw meat and fish in suitable containers in the refrigerator, so that they do not come into contact with or drip onto other food. -
Page 16: Care And Maintenance
8 Care and maintenance Care and maintenance For the hygienic storage of foodstuffs, the interior should always be kept clean. Do not use any abrasive cleaning agents or scouring cloths to clean the appliance. Take care not to press too hard when cleaning the plastic surfaces. Risk of causing damage to the appliance. -
Page 17: When The Appliance Is Not In Use
8 Care and maintenance ▸ Clean the defrost drainage channel with the green cleaner that is in it with an up- and-down and circular motion. If milk has been spilt accidentally and has ended up in the defrost drainage chan- nel: ►... -
Page 18: Noises And Alarms
9 Noises and alarms Noises and alarms Operating noise The appliance can make various noises during operation. Although the appliance is noise-optimized, some noise cannot be eliminated completely. This noise depends on the size of the appliance, how it is installed and the cooling requirements (e.g. fast cool- ing), the ambient temperature and the installation conditions. -
Page 19: Trouble-Shooting
10 Trouble-shooting Cancelling alarm ▸ Touch any button. ▸ Resolve problem, see Trouble-shooting. When the Sabbath mode is activated, there are no visual warning signals. Trouble-shooting This section lists faults that can be solved simply by following the instructions given. If the fault cannot be remedied, please contact Customer Services. - Page 20 10 Trouble-shooting Malfunction Possible cause Solution Temperature display ▪ The refrigerator compart- ▸ Do not place warm foods right is flashing. ment temperature is 10 °C next to the temperature sensor. higher than the set temper- ▸ If there is no warm food in the ature.
-
Page 21: Tips And Tricks
11 Tips and tricks Tips and tricks 11.1 General information on using the appliance ▪ When closing an appliance door make sure that it forms a proper seal all the way round. The self-closing hinges help keep it closed: the appliance doors close by them- selves if the opening angle is between 20–30°. - Page 22 ▸ See identification plate Spare parts V-ZUG Ltd provides spare parts for 15 years after the making available on the market of the last appliance with this type designation. Deviations from this are subject to consider- ation of and compliance with the applicable ecodesign regulations on the availability of spare parts.
- Page 23 13 Disposal Disposal 13.1 Packaging Never allow children to play with packaging material due to the danger of injury or suffocation. Store the packaging material in a safe location or dispose of it in an environmentally-friendly way. 13.2 Safety Render the appliance unusable to prevent accidents caused by improper use (e.g. through children playing): ▸...
- Page 24 Index Operating and display elements....9, 16 Operating the appliance functions ....11 Alarm ..............18 Operation............10 Appliance Disposal............ 23 Switching off .......... 10 Preselection ..........9, 28 Switching on .......... 10 Product data ............. 22 Appliance installation ......... 5 Queries ..............
- Page 25 Notes...
- Page 27 Your repair order Call the free service number 0800 850 850 to contact your nearest V-ZUG service centre. You can arrange an on-site visit by us by phone if you wish. General queries, accessories and service agreement V-ZUG will be happy to help you with any general administrative or technical queries, to accept your orders for accessories and spare parts and to inform you about our pro- gressive service agreements.
- Page 28 Preselection Select special functions Display elements Fast cooling Fast freezing Sabbath mode Value and/or status display Appliance switched off 1051080-06 V-ZUG Ltd, Industriestrasse 66, CH-6302 Zug Tel. +41 58 767 67 67 info@vzug.com, www.vzug.com Service Centre: Tel. 0800 850 850...
Need help?
Do you have a question about the Perfect 60i eco and is the answer not in the manual?
Questions and answers