Advertisement
- 1 PARTS DESCRIPTION
- 2 IMPORTANT SAFEGUARDS
- 3 BEFORE THE FIRST USE
- 4 ASSEMBLY
- 5 CORRECT POSITION
- 6 INCORRECT POSITION
- 7 RECOMMENDED FRYING TIMES AND TEMPERATURES
- 8 CHOOSING THE RIGHT COOKING OIL
- 9 COOKING WITH OIL
- 10 OIL FILTRATION
- 11 STORING OIL
- 12 HINTS AND TIPS
- 13 GET MORE OUT OF YOUR PRODUCT
- 14 CLEANING AND MAINTENANCE
- 15 CLEANING THE FILTRATION SYSTEM
- 16 STORAGE
- 17 TROUBLESHOOTING
- 18 Documents / Resources
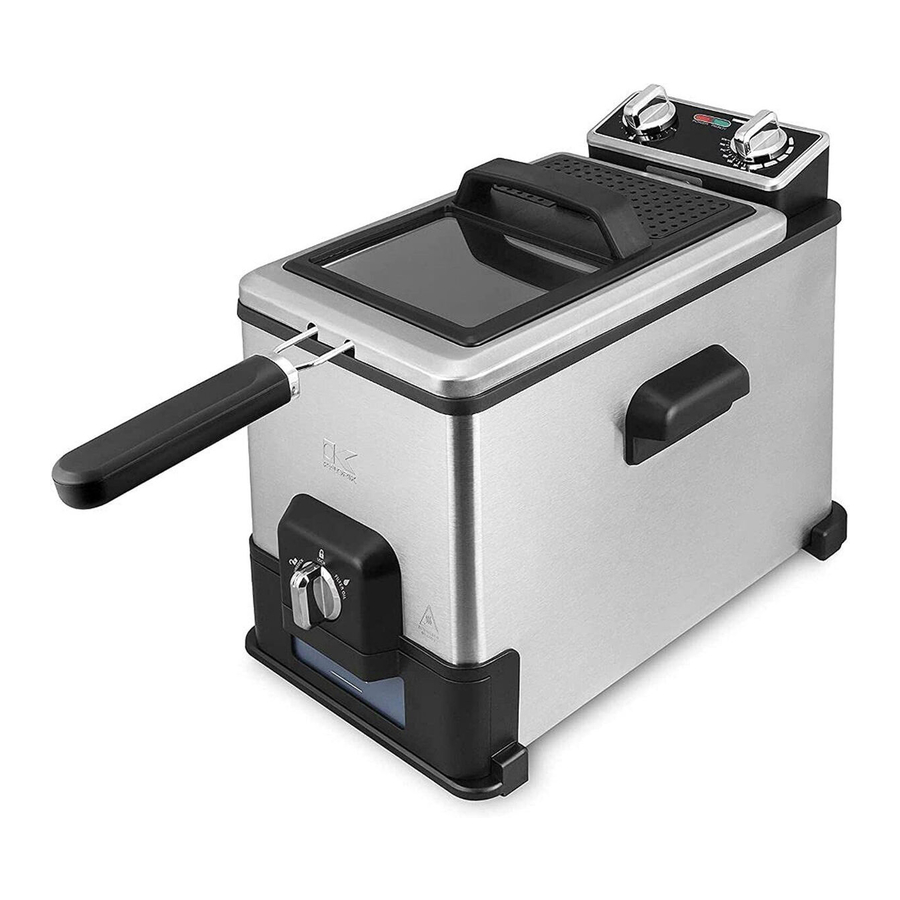
PARTS DESCRIPTION


- Lid handle
- View window
- Lid
- Control panel
- Enameled oil reservoir
- Side handles
- Housing
- Oil filtration control knob
- Removable oil container
- Anti-slip feet
- Timer knob
- POWER Light
- READY light
- Temperature knob
- Basket handle
- Frying Basket
- Reset switch (unit)
- Safety switch
- Immersion heater
- Cap
IMPORTANT SAFEGUARDS
When using electrical appliances, basic safety precautions should always be followed, including the following:
- Read all instructions before use.
- Do not touch hot surfaces. Use handles or knobs.
![]()
to protect against electric shock, fire and personal injury: do not immerse cord, plug or motor unit in water or other liquids;- do not immerse the appliance or any electrical components in water or any other liquids;
- always switch off and unplug the appliance before cleaning.
- Close supervision is necessary when any appliance is used by or near children.
- Unplug from wall outlet when not in use and before cleaning. Allow to cool before handling, putting on or taking off parts, and before cleaning the appliance.
- Do not operate any appliance with a damaged cord or plug, or after the appliance malfunctions or has been damaged in any manner. Call our toll-free customer assistance number for information on examination, repair, or adjustment.
- The use of accessory attachments not recommended by the appliance manufacturer may result in fire, electric shock or injuries to persons.
- Do not use outdoors or in a damp area.
- Do not let power cord hang over edge of table or counter, or touch hot surfaces.
- Do not place on or near a hot gas or electric burner or in a heated oven.
- Extreme caution must be used when moving a fryer containing hot oil or other hot liquids.
- Always attach plug to appliance first, then plug cord in the wall outlet. To disconnect, press the power button to turn off, then remove plug from wall outlet.
- Do not use appliance for other than intended use.
- Be sure handle is properly assembled to basket and locked in place.
- Remove excess surface moisture from foods prior to cooking to prevent heated oil from foaming out when food is added.
- Ensure both the lid and oil reservoir are completely dry after washing and before use.
- Never leave the appliance unattended during operation.
- A fire may occur if the appliance is covered or touches flammable material, including curtains, draperies, walls, and the like, when in operation. Do not store any item on top of the appliance when in operation.
- In the event of fire, never try to extinguish the flames with water. Unplug the appliance from the wall outlet. Place the lid on the appliance, if it can be done safely. Smother the flames with a damp cloth, or use a fire extinguisher.
- Use only heat resistant tools. Do not use metal tools as they may become hot.
- Never pull on the power cord to disconnect the appliance from the wall outlet; instead, grasp the plug and pull on the plug.
- Do not clean with metal scouring pads. Pieces can break off the pad and touch electrical parts involving a risk of electric shock.
- Do not attempt to defeat the safety switch.
![]()
Always wait 3 to 4 hours until the oil has cooled down completely, before draining or filtering. Failure to do so may damage the deep fryer.

SAVE THESE INSTRUCTIONS HOUSEHOLD USE ONLY
ADDITIONAL SAFEGUARDS
This appliance is for HOUSEHOLD USE ONLY.

- Over tightening can result in stripping of screws or nuts or cracking of handle, lid or control panel assembly.
Periodically check for looseness and retighten screws or nuts in accordance with manufacturer's instructions.
- SERIOUS HOT OIL BURNS MAY RESULT FROM A DEEP FRYER BEING PULLED OFF A COUNTERTOP. DO NOT ALLOW THE CORD TO HANG OVER THE EDGE OF THE COUNTER WHERE IT MAY BE GRABBED BY CHILDREN OR BECOME ENTANGLED WITH THE USER.
- DO NOT USE WITH AN EXTENSION CORD.
- DO NOT OPERATE THIS APPLIANCE, IF THE POWER CORD SHOWS DAMAGE OR IF APPLIANCE WORKS INTERMITTENTLY OR STOPS WORKING ENTIRELY.
POLARIZED PLUG
This appliance has a polarized plug (one blade is wider than the other). To reduce the risk of electric shock, this plug is intended to fit into a polarized outlet only one way. If the plug does not fit fully into the outlet, reverse the plug. If it still does not fit, contact a qualified electrician. Do not attempt to modify the plug in any way.
Do not let children handle or put the electrical cord into their mouths.
SHORT CORD INSTRUCTIONS
A short power supply cord is provided to reduce the hazards resulting from becoming entangled in, or tripping over a longer cord.
BEFORE THE FIRST USE
- Remove all packaging materials and/or other transportation means.
- Check package content to verify it is complete and undamaged. Do not operate the appliance if the content is incomplete or appears damaged.
Danger of suffocation!
- Packaging materials are not toys. Always keep plastic bags, foils and foam parts away from babies and children. Packaging material could block airways and prevent breathing.
NOTE:
- The appliance may produce an odor and/or emit smoke when switched on for the first time, as residues from the production process are eliminated. This is normal and does not indicate a defect or hazard. Ensure ample ventilation.
- Clean the appliance thoroughly before using for the first time (see Cleaning and Maintenance).
ASSEMBLY
- Place the appliance on a clean, flat and heat resistant surface.
- Before using your appliance make sure:
- the oil reservoir is secured in the correct position with the oil filter cover and oil valve are on the same side than the oil filtration control knob. Ensure the oil filter cover is in place inside the oil reservoir.
- the control panel assembly is placed on the connecting plate on the back of the housing. Ensure the grooves of the connecting plate are in the guides of the control panel assembly.
- the basket handle is locked in place in the basket. To lock the basket handle in place, press the bars together and slide them between the slots. Insert the ends of the bars into the bracket on the basket and push the handle backwards. Do not assemble any other way.
Make sure the handle is securely attached to the frying basket.
Follow the below instructions to make sure the handle is properly attached.
CORRECT POSITION

- Place the pegs into the two holes in the basket bracket. (The pegs are the ends of the two basket handle bars)
- Rotate the handle towards the basket rim, allowing the handle bars to lock into place on the outer sides of the basket's bracket.
- The handle is now in the locked position.
INCORRECT POSITION

NOTE:
- YOUR APPLIANCE IS EQUIPPED WITH A SAFETY SWITCH LOCATED ON THE CONTROL PANEL ASSEMBLY. IF THE CONTROL PANEL ASSEMBLY IS NOT PLACED PROPERLY IN ITS POSITION, THE APPLIANCE WILL NOT OPERATE.
- Incorrect assembly may lead to an unstable setup and might cause injuries.
USING THE APPLIANCE
This appliance can be used for frying food such as French fries, chicken or fish pieces (see Recommended Frying Times and Temperatures).
NOTE:
- The appliance has a rated power of 1800W. Before plugging it into the wall outlet, ensure that the electrical circuit is not overloaded with other appliances. This appliance should always be operated on a separate 120V ~ 60Hz wall outlet.
- Make sure the appliance is switched off before connecting it to a wall outlet.
- Place the appliance on a clean, flat and heat-resistant surface. When using the appliance on wooden surfaces, use a heat resistant mat to protect the wood from damages. Ensure a minimum distance around the appliance of at least 4 inches to other objects, cupboards and walls.
- Ensure the oil container is assembled, empty and in place inside the appliance, the oil filtration control knob is in the LOCKED position and the oil filter cover is in place inside the oil reservoir. Then, pour suitable cooking oil into the oil reservoir.
Danger of burns!
- Never refill the oil reservoir during use or while hot. Always allow the appliance to cool down completely. Do not mix new oil with old oil.
- DO NOT OVER OR UNDER FILL. The minimum oil capacity is 3.2L (MIN), the maximum oil capacity is 4L (MAX). Ensure the oil level always remains between the MIN and MAX marking.
- Spread a little oil on the inside of the view window to prevent condensation.
- Place the lid onto the housing.
NOTE:
- The magnetic plug is designed to only fit one way. Ensure the side stating THIS SIDE UP is facing up and the magnetic plug is properly attached.
- Insert the plug into a wall outlet. The 'Power' and 'Ready' indicators will light up.
- Only use accessories recommended by the manufacturer. Do not place any other materials in the appliance.
- Never let the power cord come in contact with the lid or appliance housing during use.
Danger of burns!
- Do not touch the lid or appliance housing during or after use). Only use the handles provided.
- Always pay special attention when adding or removing accessories and food from the appliance. Never touch the lid or appliance housing when the appliance is plugged in and switched on or immediately after use. It is recommended to always use oven mitts.
- Escaping steam can burn.
- Turn the temperature knob to the required temperature (see Recommended frying times and temperatures) and then turn the timer knob to adjust the cooking time. The unit will automatically start the heating process and the Power light will turn on. Once the set temperature has been reached, the READY indicator will turn on.
Note: The timer countdown will begin as soon as the unit starts heating up. We recommend setting a starting time of 10 minutes, and then adjusting the time to your desired cooking time when the READY light turns on and food is added.
Approximate time durations until set temperature is reached:
| Temperature setting (°F / °C) | Time (minutes) |
| 270 / 130 | About 7 |
| 300 / 150 | About 8 |
| 340 / 170 | About 10 |
| 375 / 190 | About 13 |
- After the oil has been preheated, remove the lid
- Place the basket on a clean, flat and heat resistant surface.
- Fill the basket with food. Do not overfill the basket.
- Do not fry food without the basket.
- Do not fill the basket over half way. Too much food can cause excess foaming and could cause the oil to overflow during operation.
- Food added to the appliance must be dry. If frying frozen foods such as French fries or chicken wings, remove all ice particles from the frozen foods prior to frying to prevent oil from overflowing.
- Always remove excess moisture from food by patting with paper towel before frying. Even a small amount of water can cause severe splattering of hot oil.
- After immersing the basket in the oil, immediately place the lid on the appliance. Danger of hot oil splashing out.
- Carefully lower the basket into the oil reservoir.
- Cover the oil reservoir with the lid. Ensure the recessed parts of the lid fit properly over the basket handle.
NOTE:
- When frying fresh cut potatoes and high moisture content food, lower the basket slowly into the oil. If the oil boils or foams too rapidly, raise the basket for a few seconds and lower again. Do this until the basket can be lowered without excess foaming.
- Do not place the lid on the appliance when frying fresh cut potatoes or other high moisture content foods.
- For frying times, see Recommended frying times and temperatures or follow the instructions from the food manufacturer.
- After time has elapsed, the unit will beep. The heating element will turn off when the time has elapsed.
- After the frying time has elapsed, remove the lid.
- Use the handle to lift out the basket and hang it onto the basket hook onto the rim of the oil reservoir.
- Let the food drain in the basket for a few seconds to remove excess oil and retain crispness.
- Use the handle to carefully lift the basket and pour the food onto a heat resistant dish that has been covered with a paper towel to collect remaining oil.
Never place the hot basket directly on a tabletop or countertop to avoid damage to surfaces. It is recommended to use a heat resistant trivet or cutting board.
- Place the basket on a clean, flat and heat resistant surface.
- Wait for the oil to cool down before filtering the oil. See the 'Oil Filtration' section for more details.
- This appliance generates heat and steam during use. Proper precautions must be taken to prevent the risk of burns, fires or other injuries to persons or damage to property. Do not leave the appliance unattended while in use.
- The surfaces of the appliance become hot. Do not touch while in use. Allow the appliance to cool at least 30 minutes before handling.
- Always disconnect the plug from the wall outlet before removing the magnetic plug from the control panel assembly.
- The brake-away power cord is for accidental disconnection. Do not remove during normal operation. If the magnetic plug is disconnected, immediately remove the plug from the wall outlet. Reconnect the magnetic plug to the control panel assembly and then reconnect the plug to the wall outlet.
RECOMMENDED FRYING TIMES AND TEMPERATURES
NOTE:
The frying times in the chart below are approximate and should be adjusted to suit your own tastes, different food quantities and food manufacturer's instructions.
| Food | Temperature setting (°F / °C) | Time (minutes) |
| Frozen French fries | 375 / 190 | 8 - 12 |
| French fries | 375 / 190 | 8 - 10 |
| Meat strips | 375 / 190 | 10 - 14 |
| Chicken wings | 375 / 190 | 10 - 14 |
| Fish (battered) | 340 / 170 | 3 - 5 |
| Seafood | 340 / 170 | 3 - 5 |
CHOOSING THE RIGHT COOKING OIL
| As a general rule, choose cooking oils with a high smoke point and avoid flavored oils. |
| Suitable: Pure corn oil, blended vegetable oil, soybean oil, sunflower oil, grape seed oil, peanut oil |
| Not suitable: Olive oil, walnut oil, lard |
COOKING WITH OIL
Cooking oil can enhance the food's flavor – or spoil its taste. As with any other food component, freshness and correct handling of the oil is the key to successful deep-frying results.
The quality of the oil decreases with use at high temperatures. Food particles, water and other liquids will further lower its quality, therefore:
- Do not mix different cooking oils.
- Only use fresh and clean cooking oils:
- Regularly remove burnt food particles while frying. Always use utensils that are safe to immerse into hot oils without damaging the utensil or the appliance, and always wear oven mitts when removing any burnt food particles.
- After use and before storage, filter oil with the integrated filtration system (see Oil Filtration)
- Do not reuse oil that has been used to fry fish or other strongly flavored food.
- Some meats, such as chicken wings, will release large amounts of liquids when frying, thus watering down the oil. Do not reuse this oil.
| Do not use the cooking oil anymore if you notice the following: |
| Before use: oil smells rancid or its color has visibly darkened. |
| While frying: oil is foaming strongly or smoke appears on the oil's surface at normal operating temperature. |
OIL FILTRATION
NOTE:
- Filter the oil after each use. Store filtered oil properly (see Storing oil).
- Discard of oil on a regular basis depending on oil quality (see Cooking with oil).
- After appliance is off, wait for the oil to cool
- Filtering the oil after each use will help prolong the life of the cooking oil, but it should still be discarded if the oil is deteriorated after multiple use. We estimate that oil, in normal use, should be changed at least after every 10 uses.
- Ensure the oil container is assembled, empty and in place inside the appliance.
- Once the oil has cooled down to room temperature, turn the oil filtration control knob to the FILTER OIL position. The oil will start dripping inside the oil container. The oil filter cover will keep food residues from being transferred to the oil container.
- When all oil has been filtered:
- Turn the oil filtration control knob to the LOCK position if the container will remain inside the appliance.
- Turn the oil filtration control knob to UNLOCK position if the container is to be removed from the appliance.
NOTE:
- Wait 3 to 4 hours until the oil has cooled down completely before draining or filtering.
- Extreme caution must be used when moving the appliance while the oil reservoir and oil container are not both empty.
- When removing the oil container from the appliance, handle with care. Keep the oil container flat and hold it with both hands.
Emptying the oil container
Filtered oil can be stored in a suitable container (see Storing oil) or reused for frying a new batch of food (see Cooking with oil).
- Unscrew the cap on top of the oil container.
- Slowly pour the oil container content into a suitable container or the oil reservoir, if required.
NOTE:
- Ensure the oil filtration control knob is on UNLOCK position before pouring oil into the oil reservoir.
- Tilt the oil container upwards (vertical position) gradually to avoid leaks from the side of the container.
- Oil can be stored in the oil reservoir, inside the deep fryer or in another cool dry place (see Storing oil).
- Screw the cap back on top of the oil container.
- Insert the oil container back into the appliance and turn the oil filtration control knob to the LOCK position to secure the oil container in place.
STORING OIL
- Do not store used cooking oil in the refrigerator. Choose a cool place that is not subject to sunlight. Generally, oil may be stored for a period of 3 months, once the bottle is opened. Please observe the oil manufacturer's storage directions as well.
HINTS AND TIPS
- Smaller quantities of food normally require a slightly shorter cooking time than larger quantities of food.
- To reduce cooking time, defrost food prior to cooking. It is recommended that some foods should not be thawed/defrosted prior to cooking, such as frozen fish, and frozen French fries.
- It is recommended to use a meat thermometer to check the cooking progress.
- In the event of food flare-ups, do not remove the lid, do not remove the basket; unplug the appliance.
- When the food you are cooking requires shaking, it is recommended to use a timer set for half of the suggested cooking time. This way a bell will ring and remind you to shake the basket.
- It is recommended to only use nylon, heat-proof plastic or wooden cooking utensils. Metal utensils may become hot and damage the non-stick surface. Always remove utensils from the appliance. Do not leave them in the appliance during use.
GET MORE OUT OF YOUR PRODUCT
Browse Chef-created recipes specifically made for your Kalorik product. Visit our website www.kalorik.com to see our extensive recipe library and start cooking. Sign up for the Kalorik email mailing list to receive special offers and recipes, and connect with us on social media for daily inspiration.
CLEANING AND MAINTENANCE
Proper maintenance will ensure many years of service from your appliance. Clean the appliance after every use. The appliance contains no user serviceable parts and requires little maintenance.
Leave any servicing or repairs to qualified personnel.
- Always turn the unit off, disconnect the plug from the wall outlet and then the magnetic plug from the control panel assembly before cleaning. Allow all parts of the appliance to cool down completely.
NOTE:
- Do not immerse the power cord with plug, magnetic plug or appliance into water or any other liquids. Do not use abrasive cleaners, steel wool or scouring pads. Dry all parts thoroughly after cleaning, before using or storing the appliance. Ensure that no water enters the appliance housing.
- Do not attempt to attach the magnetic plug permanently to the appliance.
- Ensure the oil container is in place, then turn the oil filtration control knob to FILTER OIL position to empty the oil reservoir (see Oil filtration).
- Place the basket on a clean, flat and heat resistant surface.
Danger of burns!
- Ensure the basket cooled down completely before touching its surface and attempting to remove the basket handle.
- Ensure the oil cooled down completely before emptying the oil reservoir into the oil container.
- Remove the basket handle from the basket.
- Remove the control panel assembly from the oil reservoir. Carefully clean the control panel assembly and immersion heater with a damp cloth.
- Pull the oil filter cover from the oil reservoir and then remove the oil reservoir from the housing.
- Open the lid filter cover and remove both black and white filters.
- Clean the appliance housing with a damp cloth.
- Wash the lid, basket, basket handle, oil reservoir and oil filter cover with hot soapy water or in a dishwasher. Rinse and dry carefully.
- Dry all parts thoroughly after cleaning and before using the appliance again.
NOTE:
- If the oil container needs to be cleaned, ensure it is empty before attempting to clean (see Emptying the oil container). Wash with hot soapy water or in a dishwasher. Rinse and dry carefully.
- Clean the filters every 3 months or after every 12 uses with hot soapy water. Do not clean in a dishwasher.
- Dry all parts and surfaces thoroughly before use. Make sure that all parts and surfaces are completely dry before connecting the appliance to a wall outlet. Even a small amount of water can cause severe splattering of hot oil.
CLEANING THE FILTRATION SYSTEM
The oil filter cover and filtration system should be cleaned regularly for optimal filtration performance.
Twist and pull the filter cover to remove it from the bottom of the oil reservoir and clean it thoroughly in warm, soapy water to remove any hardened grease, crumbs or other food debris.

Using a screwdriver or your finger, push the screw located underneath the clean oil container. This will allow the filtration system to open.

DO NOT UNSCREW the screw holding the filtration system!


DO NOT UNSCREW
With the filtration valve open, rinse the filtration system under warm water. If necessary, use a brush to remove any lodged crumbs or food debris.
Press the filter cover back in place in the oil container after cleaning. See user manual for details.
STORAGE
- Before storage, always make sure the appliance is completely cool, clean and dry.
- It is recommended to store the appliance in a dry place.
- Store the appliance on a stable shelf or in a cupboard. To avoid accidents, ensure that both the appliance and its power cord are beyond reach of children or pets.
TROUBLESHOOTING
| Problem | Cause | Solution |
| The appliance is not working | Magnetic plug not properly fitted | Connect the magnetic plug to the electrical outlet before connecting the plug to the wall outlet |
| Control panel assembly not installed correctly | Install the control panel assembly correctly by pushing it completely down so that the safety switch is activated | |
| Appliance not plugged in | Insert the plug into the wall outlet | |
| Wall outlet not energized | Check fuses and circuit breaker | |
| Malfunctioning appliance | Unplug the appliance from the wall outlet and contact qualified personnel to check and repair the appliance | |
| Overheated oil or appliance | Unplug the appliance from the wall outlet and allow the appliance / oil to cool down. Then press the reset switch closest to the safety switch. | |
| Oil is spilling over the rim | Overfilled oil reservoir | Unplug the appliance from the wall outlet and allow the appliance / oil to cool down. Then, remove excess of oil |
| Overfilled basket | Lift out the basket by its handle and hang it onto the basket hook into the notch. Remove excess of food with suitable utensils | |
| The appliance is working but the POWER indicator does not light up | Damaged POWER indicator | Unplug the appliance from the wall outlet and contact qualified personnel to check and repair the appliance |
| The POWER indicator lights up but the appliance does not heat up | Preheat time too short | Allow the appliance to preheat for a longer time |
| Malfunctioning appliance | Unplug the appliance from the wall outlet and contact qualified personnel to check and repair the appliance | |
| The basket cannot be removed from the oil reservoir | Basket handle not attached properly | Remove fried food using suitable utensils and allow the appliance / oil to cool down completely before removing the basket |
| The appliance produces an odor and emits smoke | Oil has been overused or oil is not suitable | Unplug the appliance from the wall outlet and allow the appliance / oil to cool down. Then, remove oil and replace with fresh, new suitable oil |
| Cooking oil is foaming | Overfilled basket | Lift out the basket by its handle and hang it onto the basket hook into the notch. Remove excess of food with suitable utensils |
| Excess moisture in the food | Raise the basket for a few seconds and lower again. Repeat until the basket can be lowered without excess foaming | |
| Remaining ice particles not removed from frozen foods | Raise the basket for a few seconds and lower again. Repeat until the basket can be lowered without excess foaming | |
| Oil is leaking from the appliance | Oil filtration control knob in the FILTER OIL position without oil container in place | Unplug the appliance from the wall outlet and clean the appliance. Insert the oil container and turn the oil filtration control knob on the LOCK position before using the appliance again |
| Overfilled oil container | Unplug the appliance from the wall outlet. Ensure the oil filtration control knob is on the UNLOCK position and remove the oil container from the appliance. Empty and clean before using the appliance again | |
| Damaged oil container | Unplug the appliance from the wall outlet. Ensure the oil filtration control knob is on the LOCK position and contact qualified personnel to check and repair the appliance | |
| Damaged oil filter assembly | Unplug the appliance from the wall outlet and contact qualified personnel to check and repair the appliance |
If additional assistance is needed, please contact our Customer Assistance at 1-888-521-TEAM.

Documents / Resources
References
Download manual
Here you can download full pdf version of manual, it may contain additional safety instructions, warranty information, FCC rules, etc.
Advertisement


Need help?
Do you have a question about the FT 44466 and is the answer not in the manual?
Questions and answers