Advertisement
Quick Links
Support and E-Warranty Certificate
https://www.vevor.com/support
POTTERY WHEEL MACHINE
USER MANUAL
We continue to be committed to offering tools at competitive prices. "Save Half", "Half Price",
or any other similar expressions used by us only represent an estimate of savings you might
benefit from buying certain tools with us compared to the major top brands and do not
necessarily mean to cover all categories of tools offered by us. You are kindly reminded to
verify carefully when placing an order with us if you are saving half in comparison with the top
major brands.
Advertisement

Subscribe to Our Youtube Channel
Related Manuals for VEVOR LSST-515


Summary of Contents for VEVOR LSST-515
- Page 1 Support and E-Warranty Certificate https://www.vevor.com/support POTTERY WHEEL MACHINE USER MANUAL We continue to be committed to offering tools at competitive prices. "Save Half", "Half Price", or any other similar expressions used by us only represent an estimate of savings you might benefit from buying certain tools with us compared to the major top brands and do not necessarily mean to cover all categories of tools offered by us.
- Page 3 CustomerService@vevor.com This is the original instruction, please read all manual instructions carefully before operating. VEVOR reserves a clear interpretation of our user manual. The appearance of the product shall be subject to the product you received. Please forgive us that we won't inform you again if...
-
Page 4: Safety Instructions
SAFETY INSTRUCTIONS WARNING:Read all safety warnings, instructions, illustrations and specifications provided with this electrical equipment. Failure to follow all instructions listed below may result in electric shock, fire and/or serious injury. Save all warnings and instructions for future reference. Warning - To reduce the risk of injury, user must read instructions manual carefully. -
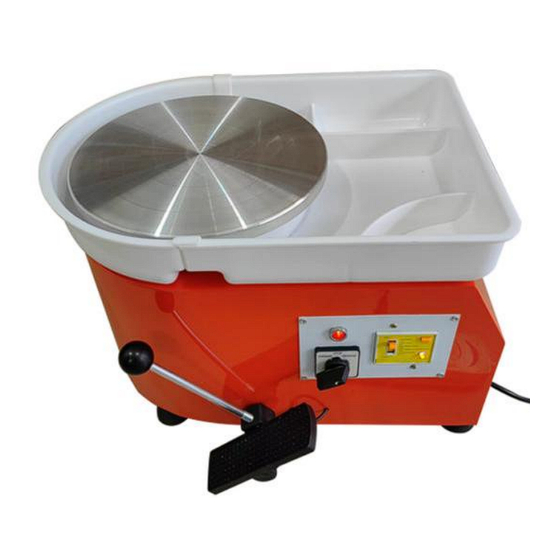
Page 5: Structure Diagram
9.Periodically check whether the power cable is damaged and the connector is loose. 10.Press button(10A) on the leakage protector once a month to check whether the leakage protection can work normally! MODEL AND PARAMETERS Model LSST-515 Maximum Payload(Clay) 5 KG Voltage 100-240V~ 50/60Hz... - Page 6 3.Equipment body 4.Manual adjusting lever 5.Speed regulating pedal 6.Foot Pad 7.Forward/reverse switch 8.Power light 9.Leakage protector 10.Power line 10A.Leakage protection test switch TOOL ACCESSORIES AND USE 1.Apron(x1): Prevent clothes from getting dirty. 2. 8-Piece Tool Set(x1)
- Page 7 A(Clay cutting line): Assist in precisely cutting clay (cutting surface is very smooth)/repairing and leveling the mouth of the work/taking away the finished product. B(Small yellow sponge): Add water or absorb water/trim the surface or mouth edge to make it smooth. C(Wooden knife): Trim the bottom for later removal/trimming.
- Page 8 E(Stainless steel scraper): Remove the excess clay on the surface to make it smooth. F(Circular large flat wire knife): Trim the surface of the vessel/ control the thickness/trim out the bottom ring foot. G(Steel needle): Scrape off excess clay from the mouth edge/remove air bubbles/punch holes.
- Page 9 3. Stainless steel clay-repair knife 8-piece Set(x1): Repair clay molds as shown below.
-
Page 10: Operating Steps
4.Aluminium turntable(Φ280mm):The size of the turntable depends directly on the maximum diameter we can achieve. (Loosen the bolt with a wrench and replace it) OPERATING STEPS Step1:Take out a proper amount of clay, throw the mud ball in the center of the wheel, and press it (wet your hands). - Page 11 Step3:Turn on the leakage protection switch upward and choose the direction of forward (clockwise)/reverse (counterclockwise) rotation according to your needs. Step4:Push the lever/pedal to adjust the speed and start clay molding with tools. Step5:Clay-mold repairs with tools. Step6:Creative painting and coloring can be carried out according to their own needs. After the work is completed,stop the machine in reverse order.
- Page 12 pressure with even force. The opening is uneven and 1.The center is not found The opening of the middle off-center. correctly. tip of the left finger or thumb 2.Not opening in the center. must be assisted by the 3.Hands shake when right finger and must be pressing down, uneven pressed down vertically...
- Page 13 Bottom break 1.Knead clay is not uniform, 1.Knead the clay evenly. clay dry and wet is not 2.Sponge up the water uniform. inside the vessel when 2.Water at the bottom, no finished. water absorption after 3.Let dry on a solid board. forming.
- Page 14 CLEAN AND CARE RULES 1. After finishing the equipment operation, it is necessary to clean the clay on the surface of the turntable and wipe the water stains on the surface of the turntable (Do not rinse directly with water). 2.
- Page 16 Support and E-Warranty Certificate https://www.vevor.com/support...
Need help?
Do you have a question about the LSST-515 and is the answer not in the manual?
Questions and answers