
Subscribe to Our Youtube Channel
Related Manuals for TMG TMG-GH1020R


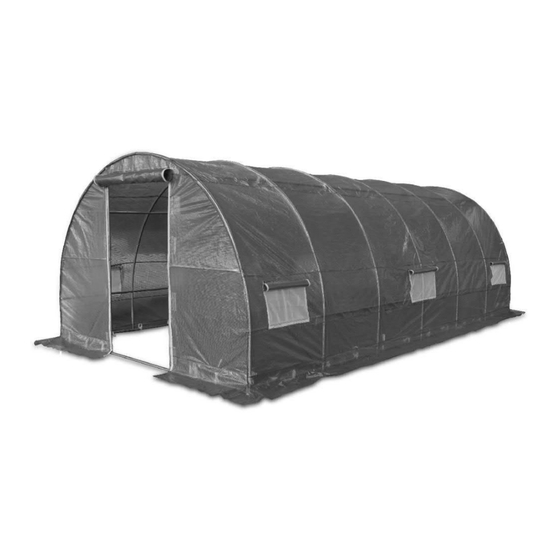
Summary of Contents for TMG TMG-GH1020R
- Page 1 Main Specifications: W W W . T M G I N D U S T R I A L . C O M P 0 / 12 T o l l F r e e : 1 - 8 7 7 - 7 6 1 - 2 8 1 9...
-
Page 2: Main Specifications
Main Specifications : - Assembly size : W3 x L6 x H2 (m) / 10 x 20 x 07 (ft) Front roll up door : 1.86 x 1(m) / 6.1 x 3.3 (ft) Prior to assembly Please read the instructions carefully before installation. It is important to follow your local safety regulations and industry standards during installation. - Page 3 TMG-GH1020R Part List Parts Graphical Description Qty BOX code Peak arch tube Middle rafter tube Lower rafter tube (middle truss) Lower rafter tube (front and rear truss) Diagonal bracing bar (1st and last span) Roof purlin (horizontal tube) Roof purlin...
- Page 4 Bottom tension bar (rear cover) Ceiling cross bar (front truss) Door frame lower tube (front and rear truss) Door frame upper tube (front truss) Upper tube (rear truss) Tube clamp Mushroom head hexagon socket head bolt M6x65mm Mushroom head hexagon socket head bolt M6x40mm Mushroom head hexagon socket head bolt M6x30mm...
- Page 5 Step 2 : Assemble all trusses The building includes 7 trusses : (1) Front truss, (1) rear truss, and (5) middle trusses. The front truss fabric panels and the top fabric (#15) have been connected as a whole. Parts used to install the front truss in this step (refer to Figure 1) : - (1) Peak arch tube (#1) - (2) Middle rafter tube (#2)
- Page 6 Figure 2 Parts used to install (5) middle trusses in this step (refer to Figure 3). - (1x5) Peak arch tube (#1) - (2x5) Middle rafter tube (#2) - (2x5) Lower rafter tube ( #3) - (2x5) Mushroom head hexagon socket head bolt (#10) - (2x5) Mushroom head hexagon socket head bolt (#11) Figure 3 W W W .
- Page 7 Lay down all (7) trusses on the ground as Figure 4 when the assembly is all completed and before moving to next step. Figure 4 Step 3 : Put up the front (1 ) truss First, erect the front truss. We suggest two or three people. One to two people hold the truss and keep it upright and stable, while the other person installs the roof purlin (#5).
- Page 8 Step 4 : Put up the rest middle trusses Repeat the previous step to erect the second span truss, and then connect the other end Roof purlin (#5) with the truss with bolts (#10), and complete the installation of the second truss to the sixth truss in turn.
- Page 9 Step 6 : Install the diagonal bracing bars (#4) Connect diagonal bracing bar (#4) on the first and last span between the Lower rafter tube (#3A) and (#3) with tube clamp (#9), use bolt (#12) and ( #10) (Figure ...
- Page 10 Figure 9 Step 8 : Install the remaining parts on the rear truss (Figure 10) Parts used in this step : (2) Bottom tension bar (#6) (1) Frame horizontal tube (#6B) (1) Frame horizontal tube (#6C) (1) Bottom tension bar (#7A) (1) Door frame lower tube (#8) (1) Upper tube (#8B) (1) Mushroom head hexagon socket head bolt (#10)
- Page 11 Step 9 : Install the waterproof plug and fix the truss The ends of rafters (#3A) and (#3) at the lower part of the truss, as well as the outer roof purlin (#5) and (#5A) at the front and rear truss, shall be provided with waterproof plugs.
- Page 12 Step 11 : Installing fabric panel Lift cover or panel (#15) to fully cover the truss, noting that the side with the door needs to be placed on the front door arch. Then adjust the four sides evenly (refer to Figure 13) Figure 13 Step 12 : Knitted fabric...
-
Page 13: After The Installation
Fasten the fabric front door. Use the Velcro on the fabric to tie the fabric tightly to the bottom tension bar (#6) at the lower part of the front truss door frame lower tube (#8) and door frame upper tube (#8A) Figure 15 After the Installation Inspect the building periodically to make sure the parts are firmly fixed and the whole...
Need help?
Do you have a question about the TMG-GH1020R and is the answer not in the manual?
Questions and answers