Table of Contents
Advertisement
Quick Links
Advertisement
Table of Contents
Troubleshooting

Related Manuals for Idexx SNAP Pro


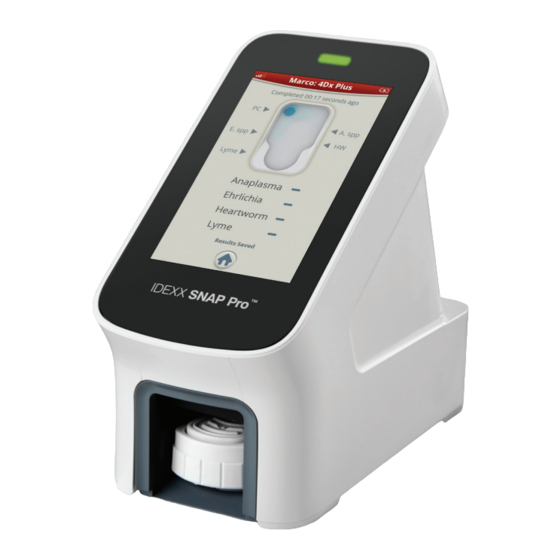
Summary of Contents for Idexx SNAP Pro
- Page 1 SNAP Pro Analyser Operator’s Guide...
- Page 2 IDEXX Laboratories. © 2023 IDEXX Laboratories, Inc. All rights reserved. • 06-0039243-00 *IDEXX VetLab, SNAP Pro, SNAP , VetConnect, and SmartService are trademarks or registered trademarks of IDEXX Laboratories, Inc. in the United States and/or other countries. All other product and company names and logos are trademarks of their respective holders.
-
Page 3: Table Of Contents
Charging the Analyser ...........................7 Using the SNAP Pro Analyser ......................8 Running a SNAP Test (When Connected to an IDEXX VetLab Station) ..........8 Running a SNAP Test (When NOT Connected to an IDEXX VetLab Station) ........8 Confirming Results ..........................9 Viewing Test Results ..........................9 Modifying the Preferences ...................... -
Page 4: Getting Started
The SNAP Pro Analyser is for veterinary use only. IDEXX VetLab* Station Connectivity The SNAP Pro Analyser can be connected to the IDEXX VetLab* Station (the IDEXX laboratory information management system). Connecting multiple analysers to the IDEXX VetLab Station helps you attain a comprehensive picture of your patient’s health, with the ability to view test results from multiple analysers on a single report, determine disease progression with parameter-trending capabilities, and more. -
Page 5: Setting Up The Snap Pro Analyser
CAT5 cable (provided). 5. Press the Power button at the top of the back of the SNAP Pro Analyser to switch it on. After the startup screen, follow the on-screen instructions. -
Page 6: Interpreting The Status Light
Icon Description Wireless signal status (5 grey bars = best signal; 5 red bars = no signal) Connected and communicating with the IDEXX VetLab* Station via a wired connection (red icon indicates the analyser is offline) Battery at 100% power... -
Page 7: Switching The Analyser On/Off
Warning notification (grey icon indicates the warning has been viewed and is unresolved) Error notification (grey icon indicates the error has been viewed and is unresolved) Lost communication with IDEXX VetLab Station Lost Wi-fi communication Lost Ethernet connection Switching the Analyser On/Off To Switch the Analyser On Hold the power button until you hear a beep. -
Page 8: Using The Snap Pro Analyser
Running a SNAP Test (When NOT Connected to an IDEXX VetLab Station) 1. Tap New Patient on the SNAP Pro Home screen to enter the patient’s name and client ID. When you have finished entering the information, tap the Tick icon. -
Page 9: Confirming Results
2. Select the result that you want to view. Note: If your analyser is connected to an IDEXX VetLab Station, you can view, print, and trend the results on the IDEXX VetLab Station or in VetConnect* PLUS. -
Page 10: Modifying The Preferences
Changing the Connection Settings 1. At the bottom of the Home screen, tap More and then tap Connections. 2. Tap Yes if you want to connect the analyser to an IDEXX VetLab* Station. Then, tap Change Network and select the IDEXX network. - Page 11 Modifying the Preferences To Change the Date Settings 1. At the bottom of the Home screen, tap More, tap Settings, and then tap Date. 2. If you want to change the date format, tap the current format (underneath the current date display) and then select a new date format.
-
Page 12: Maintenance And Troubleshooting
Maintenance and Troubleshooting Upgrading the Software IDEXX will provide you, at no charge, updated analyser software on a periodic basis. Be sure to read the software notes sent with each new release. The instructions for upgrading your software will vary depending on whether the analyser is connected to an IDEXX VetLab* Station with SmartService* Solutions. - Page 13 Maintenance and Troubleshooting 3. Remove the base from the analyser. 4. Clean the entire base using a lint-free wipe or cotton swab dampened with 70% isopropyl alcohol, mild liquid soap and water, or a 10% bleach solution. activator axle lens reflectors 5.
-
Page 14: Cleaning The Case And Screen (To Be Performed As Needed)
Two 3.7 V DC, 2,600 mAh batteries • One 3 V DC, 48 mAh button cell battery Note: IDEXX recommends replacing all batteries at the same time. Contact IDEXX Laboratories to obtain replacement batteries. This symbol is placed in accordance with the European Union Directive 2002/96 on the Waste Electrical and Electronic Equipment (the WEEE Directive). -
Page 15: Troubleshooting
7. Close the battery compartment. Troubleshooting Having trouble with the SNAP Pro* Analyser? First, ensure your software is up-to-date— SNAP Pro upgrades include many behind-the-scenes improvements. We also recommend rebooting the analyser weekly. If your software is up to date and rebooting did not resolve your issue, consult this section for more information. - Page 16 Not cleaning the analyser—it is recommended that you clean the internal components and base of the analyser weekly as dried blood falling on tests can creating streaking. For more information, see Cleaning the SNAP Pro Analyser at idexx.com/library. • The SNAP test was activated too late—if the SNAP test was inserted after the sample reached the test’s activation circle, streaking, speckling, and/or a blue background may...
- Page 17 Maintenance and Troubleshooting The analyser doesn’t activate the test This may be because: • The analyser base isn’t properly locked into place—ensure the base is secure and that both fasteners on the base are in the locked position. • The batteries are in backwards or missing (see photo D showing correct placement).
-
Page 18: Appendix
Appendix Appendix Technical Specifications Power Supply Adapter External USB power supply adapter Input: 100–240 V AC, 47–63 Hz, 0.3 A Output: 5 V DC, 1 A Consumption Operating: maximum 5 W Batteries Main Batteries Output: 3.7 V DC, 2,600 mAh Chemistry: Lithium-ion Type: Portable/18650 Rechargeable: Yes... -
Page 19: Safety Precautions
• The SNAP Pro Analyser should be placed on a flat surface during operation. Notice: To satisfy Industry Canada (IC) radio frequency (RF) exposure requirements for mobile and base station transmission analysers, a separation distance of 20 cm or more should be maintained between the antenna of this analyser and persons during operation.
Need help?
Do you have a question about the SNAP Pro and is the answer not in the manual?
Questions and answers