Sony ICD-SX813 Operating Instructions Manual
Ic recorder
Hide thumbs
Also See for ICD-SX813:
- Operating instructions manual (166 pages) ,
- Quick start manual (25 pages) ,
- Quick start manual (72 pages)
Table of Contents
Advertisement
Quick Links
Advertisement
Table of Contents

Related Manuals for Sony ICD-SX813


Summary of Contents for Sony ICD-SX813
- Page 1 4-265-039-21(2) IC Recorder Getting Started Basic Operations Operating Instructions Other Recording Operations Other Playback Operations Editing Files About the Menu Function Utilizing Your Computer Additional Information Troubleshooting Index ICD-SX712/SX713/SX813...
- Page 2 WARNING Sony Corporation reserves the right to make any modification to this manual or the information Do not expose the batteries (battery pack or batteries contained herein at any time without notice. installed) to excessive heat such as sunshine, fire or The software described herein may also be governed the like for a long time.
- Page 3 SD-3C, LLC. • “Memory Stick Micro,” “M2” and trademarks or registered trademarks of Sony Corporation. • “MagicGate” is a trademark of Sony Corporation. • US and foreign patents licensed from Dolby Laboratories. All other trademarks and registered trademarks are trademarks or registered trademarks of their ®...
-
Page 4: Table Of Contents
Table of Contents Getting Started Other Recording Operations Step 1: Checking the Contents of the Changing the Recording Settings ....33 Package .............7 Switching the directionality of the Index to parts and controls ....8 built-in microphones ......33 Preventing unintentional operations Selecting a recording scene for each (HOLD) ..........11 situation ..........34 Manual recording ........39... - Page 5 Other Playback Operations Editing Files Changing the Playback Settings .....58 Arranging Files in a Folder .....77 Convenient playback methods ....58 Moving a file to a different folder ..77 Selecting a recording date from the Copying a file to the other memory calendar and playing back ....59 media ...........78 Reducing noise in the playback sound...
- Page 6 Utilizing Your Computer Additional Information Using the IC Recorder with Your Using a USB AC Adaptor .....126 Computer ..........109 Disconnecting the IC recorder from Connecting the IC recorder to your the AC outlet ........127 computer ........... 109 Precautions ..........128 Structure of folders and files ....110 Specifications ........131 Disconnecting the IC recorder from...
-
Page 7: Getting Started
IC recorder. Stereo headphones (1) (for ICD-SX712/SX713 only) Telephone recording microphone Stereo headphones for noise canceling (1) (for ICD-SX813 only) Application software, Sound Organizer (CD-ROM) (1) Carrying pouch (1) NH-AAA (size AAA) rechargeable Earbuds (Size S, L) (1) -
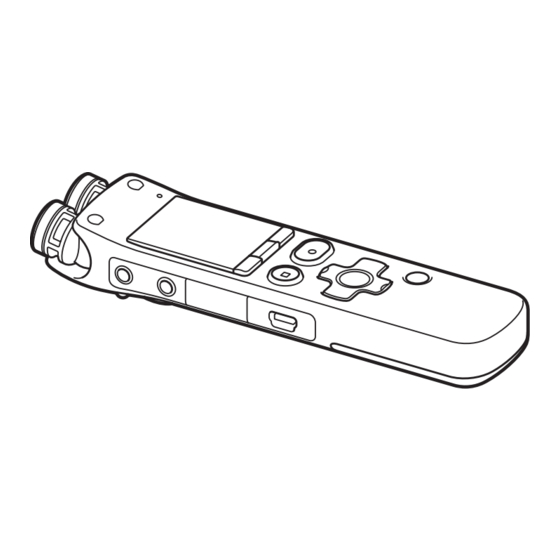
Page 8: Index To Parts And Controls
(4 GB) (1) Index to parts and controls (for ICD-SX813 only) Front This card has a user available area and a management area. The capacity of this card available to the user is approximately 3.6 GB. SD card adaptor (1) - Page 9 O ERASE button Installing the earbuds P Strap hole (A strap is not supplied.) (for ICD-SX813 only) Rear If the earbuds do not fit your ears correctly, the noise canceling effect will not be optimal. To optimize noise canceling and to...
- Page 10 To detach an earbud While holding the headphone, twist and pull the earbud off. If the earbud slips and cannot be detached, wrap it in a dry soft cloth. To attach an earbud Twist and push the inside parts of the earbud into the headphone until the projecting part of the headphone is fully covered.
-
Page 11: Preventing Unintentional Operations (Hold)
Preventing unintentional To release the IC recorder from the HOLD status operations (HOLD) You can disable all the buttons (HOLD) in order to prevent unintentional operations when you carry the IC recorder, etc. To put the IC recorder in the HOLD status Slide the POWER/HOLD switch towards the center. -
Page 12: Step 2: Recharging The Batteries
Step 2: Recharging the Batteries Recharging the batteries (USB) connector of the IC recorder and the USB port of your computer. using a computer IC recorder Remove the film on the display window Computer before you use the IC recorder. Connect the IC recorder to a running To USB port of computer, and charge the batteries until the... - Page 13 When the batteries are fully charged, the Disconnect the IC recorder from the USB port of the computer. battery indicator will indicate “ .” * This is an approximation for the time it takes to charge from no remaining battery Disconnect the IC recorder from your power to full battery power at room computer.
-
Page 14: Recharging The Batteries Using A Usb Ac Adaptor
• When replacing the batteries, the clock continues moving for about 1 day after you remove the batteries. Recharging the batteries using a USB AC adaptor You can also charge the batteries by using an AC-NWUM50 USB AC adaptor, etc. (not supplied) (page 126). -
Page 15: Step 3: Turning The Ic Recorder On
Step 3: Turning the IC Recorder On Turning the power on Tips • When you are not going to use the IC recorder for a long time, we recommend to turn off the IC recorder. • When the IC recorder is in the stop mode, and you leave the IC recorder without attempting an operation for a certain length of time, the auto power off function will take... -
Page 16: Step 4: Setting The Clock
Step 4: Setting the Clock Select the last two digits of the year MENU when you set the year. x STOP N /ENT v , V Press STOP to return to the stop mode display. You need to set the clock to use the alarm Setting the clock using the function or record the date and time. - Page 17 Press on the control button, press Press on the control button to on the control button to select select “10y1m1d,” and then press (IC recorder setting) tab, and ENT. then press /ENT. Press on the control button to select “时钟设定,” and then press /ENT.
- Page 18 To display the current date and time While the IC recorder is in the stop mode, press STOP to display the current date and time for about 3 seconds.
-
Page 19: Step 5: Setting The Language To Be Used In The Display Window
Step 5: Setting the Language to Be Used in the Display Window Press on the control button to x STOP select the language that you want to use, and then press /ENT. N /ENT v , V You can select the language to be used for You can select the following languages. -
Page 20: Basic Operations
Basic Operations Recording P Notes • Before making a recording, be sure to check the battery indicator (page 14). • Noise may be recorded if an object, such as your finger, etc., accidentally rubs or scratches the IC recorder during recording. Before you start recording, we recommend you make a trial recording first, or monitor the recording (page 57). - Page 21 Press to display the folder selection window. Press on the control button, press on the v , V control button to select the (Voice) tab, and then press on the control button. > . , > P Note Only the (Voice) tab will be displayed when you purchase the IC recorder.
- Page 22 Press /ENT. N /ENT Starting to record (Auto (AGC) recording) Turn the built-in microphones in the direction of the source to be recorded. Press REC/PAUSE in the stop mode. Operation indicator The operation indicator lights in red. You do not need to press and hold REC/PAUSE while recording.
- Page 23 To stop recording Press STOP. x STOP The operation indicator flashes in orange and the IC recorder stops at the beginning of the current recording file. Note while accessing The IC recorder is recording data and storing it on the memory media when the operation indicator flashes in orange.
- Page 24 Tips • You can record up to 199 files in each folder. • You can make new folders or erase unwanted folders using the supplied Sound Organizer software (page 120). • When a memory card has been inserted, you can continue recording a file by changing the location of the folder used to store the file from the built-in memory to the memory card automatically after the built-in memory is full (Cross-memory recording) (page 50).
-
Page 25: Listening
Listening Starting playback Slide the POWER/HOLD switch towards the center to release the IC recorder from the HOLD status (page 11). Press Press on the control button, press on the v , V control button to select the (Voice) tab, the (Music) tab, or the (Podcast) tab, and then press . - Page 26 Press on the control button. > > Press on the control button to select the file you want to play. Press /ENT. Operation indicator Playback will start soon, and the operation indicator will light in green. (When “LED” is set to “关” in the menu (page 104), the operation indicator does not light.) N /ENT...
- Page 27 To stop playback Press STOP. x STOP Other operations stop at the current position Press N /ENT. To resume playback from that point, press N /ENT (Playback Pause function) again. Press . on the control button once.* go back to the beginning of the current file Press .
- Page 28 About the tab view The recordable area and the playback-only area of folders stored on the IC recorder are managed separately, and are displayed with tabs. When you choose a folder, you can move to one of those areas by switching a tab. Tabs (Voice): Recordable area.
- Page 29 A File information Press on the control button to check the file information during playback. A file recorded using the IC recorder is displayed as follows. : Folder name: FOLDER01-FOLDER05 : File name: Date_file number (e.g. 100101_001) : Artist name (e.g. My Recording) : Title: Date_file number (e.g.
- Page 30 C Remaining recording time Displays the remaining recording time in hours, minutes, and seconds. If there is more than 10 hours time remaining, the time is displayed in hours. If there is more than 10 minutes and less than 10 hours time remaining, the time is displayed in hours and minutes.
-
Page 31: Erasing
Erasing P Note Once a recording has been erased, you cannot retrieve it. Selecting a file and erasing it Slide the POWER/HOLD switch towards the center to release the IC recorder from the HOLD status (page 11). Select the file you want to erase when the IC recorder is in the stop or playback mode. - Page 32 Press /ENT. N /ENT The “正在删除...” animation appears in the display window and the selected file will be erased. When a file is erased, the remaining files will advance so that there will be no space between files. To cancel erasing Select “取消”...
-
Page 33: Other Recording Operations
Other Recording Operations Changing the Recording Settings Switching the directionality Rotating both capsules of the built-in microphones to face the of the built-in microphones outside (120° position) The built-in microphones are unidirectional. You can change the angle of the built-in microphones manually. Rotating both capsules of the built-in microphones in the same direction (0°... -
Page 34: Selecting A Recording Scene For Each Situation
Selecting a recording scene for each situation SCENE x STOP To record in a variety of (会议) situations, such as recording in N /ENT a spacious conference room. To record dictation with a v , V (语音备忘录) microphone in front of your mouth. - Page 35 Recording a voice note P Notes • You cannot set a scene during recording. Set the angle of the built-in microphones to • When 60 seconds have passed without any 0° (page 33). operation after the 场景选择 window appears in step 1, the stop mode display will be displayed.
- Page 36 To change the 场景选择 settings Recording music using the menu • Set the angle of the built-in microphones to 120° (page 33). (Recording) tab t “场景 Select the • By attaching a tripod (not supplied) using 编辑” in the menu, and then press the supplied stand, you can adjust the ENT.
- Page 37 Press on the control button to Press on the control button to select “编辑当前设置” or “编辑,” and select “编辑完成,” and then press then press /ENT. ENT. Press on the control button to Press STOP to exit the menu mode. select the menu item you want to change, To set the menu item settings of and then press /ENT.
- Page 38 Default settings (音乐) (我的场景) For details on the menu items and settings, 录音模式 LPCM LPCM see pages 94 through 98. 44.1kHz/16bit 44.1kHz/16bit 录音水平 低 (音乐) 手动 (会议) (语音备忘 (采访) 录) 录音级别 – 录音模式 MP3 值 192kbps 128kbps 192kbps 关 关 LCF(Low 录音水平...
-
Page 39: Manual Recording
Manual recording Select a folder. For details, see “Selecting a folder” (page 20). Built-in microphones x STOP Turn the built-in microphones in the z REC/PAUSE direction of the source to be recorded. N /ENT Press and hold REC/PAUSE. . , > The IC recorder enters the recording standby mode. -
Page 40: Adding A Recording To A Previously Recorded File
You can check the recording level value To start recording, press REC/ with the peak meter of the display PAUSE. window. Adjust the level closer to –12 dB, into a range that is appropriate for your sound source. If “ ”... - Page 41 When “添加/覆盖” in the menu is set to Press on the control button to “添加,” you can add a recording to the file select “添加,” and then press /ENT. being played back. The added recording will be placed after the current file, and will be counted as a part of the file.
-
Page 42: Adding An Overwrite Recording During Playback
• You cannot add a recording to an LPCM file The starting point of an overwrite recording or an MP3 file that was not recorded using the IC recorder. Moreover, when you edit File 2 File 3 File 4 files using the supplied Sound Organizer software, adding a recording to the files may not be possible. -
Page 43: Recording A Few Seconds In Advance - The Pre-Recording Function
Press on the control button to the file has reached the maximum size limit (2 GB), when the beginning of the point to select “覆盖,” and then press /ENT. be overwritten has not reached the maximum size limit. • You cannot add an overwrite recording to an LPCM file or MP3 file which was not recorded using the IC recorder. - Page 44 REC/PAUSE. This is useful for Press STOP to exit the menu mode. recording during interviews or when Select a folder. making an open-air recording so that you will not miss an opportunity to start Press and hold REC/PAUSE. recording. The IC recorder enters the recording Sounds for 5 seconds are standby mode.
-
Page 45: Starting To Record Automatically In Response To Sound - The Vor Function
• When the remaining recordable time is less recorder detects sound, and pause when no than 10 seconds, the pre-recording function sound is heard, eliminating recording is disabled. Before starting to use the during soundless periods. pre-recording function, erase unwanted files. •... - Page 46 To cancel the VOR function Set “VOR” to “关” in step 2. P Notes • The VOR function is affected by the sound around you. Set “录音水平” in the menu according to the recording conditions. If recording is not satisfactory after you have changed the “录音水平”...
-
Page 47: Recording On A Memory Card
* When you are inserting a memory Supplier 2 GB 4 GB 8 GB 16 GB 32 GB card with the back side of the IC recorder facing toward you. SONY — — Toshiba — Insert microSD card with the Panasonic —... - Page 48 IC recorder: page 47, securely to the end of the slot http://www.sony-asia.com/support until it clicks into place. Then close the cover. In this manual, M2™ and microSD cards are generally referred to as a “memory...
- Page 49 • Close the cover of the memory card slot then the folder selection window will be firmly. Also, do not insert any liquid, metal, displayed. flammable or any object other than a memory card into the slot. Doing so may cause fire, electric shock, or malfunctions.
-
Page 50: Recording Across Memory Media - Cross-Memory Recording
Recording across memory media – cross-memory recording x STOP “选择存储” is set to “内置内存” when you purchase the IC recorder. N /ENT If the memory card has already been formatted, proceed to step 5. v , V When the memory card is not formatted, select the (IC recorder setting) tab When the memory media currently being... - Page 51 Press on the control button to • Before attempting cross-memory select “开,” and then press /ENT. recording, check to see if the IC recorder can switch the memory media to “存储 “跨内存录音” is set to “关” when you 卡” in advance (page 49). purchase the IC recorder.
-
Page 52: Recording Via Other Devices
“选择输入模式” appears in the display is connected, power is automatically window. supplied to the microphone from the IC If “选择输入模式” is not displayed, set recorder. it in the menu (page 98). Recommended microphones You can use the Sony ECM-CS10 electret condenser microphone (not supplied). -
Page 53: Recording From Other Equipment
To record sound from a Recording from other telephone or a cell phone equipment You can use the supplied telephone recording microphone or the ECM-TL1 m (microphone) jack headphone-type electret condenser microphone (not supplied) to record sound CD player, etc. from a telephone or a cell phone. - Page 54 To record using the recorder using a commercially-available synchronized recording function audio connecting cable. The IC recorder pauses when no sound is “选择输入模式” appears in the display detected for more than 2 seconds. The IC window. recorder starts recording again as a new file If “选择输入模式”...
- Page 55 The synchronized recording pauses when Press on the control button to no sound is detected for more than 2 select “关,” and then press /ENT. seconds, and “ ” begins to flash. “同步录音” is set to “关” when you The IC recorder starts recording again as a purchase the IC recorder.
- Page 56 “选择输入模式” is set to “麦克风” when you purchase the IC recorder. Press STOP to exit the menu mode. Press REC/PAUSE to start recording. The built-in microphones are automatically cut off and the sound from the connected equipment is recorded. Start playback on the piece of equipment connected to the IC recorder.
-
Page 57: Operating During Recording
If you connect the supplied stereo headphones (for ICD-SX712/SX713 only) or stereo headphones for noise canceling (for ICD-SX813 only) to the i (headphone) jack, you can monitor the recording. You can adjust the monitoring volume by pressing VOLUME –/+, but the recording level is fixed. -
Page 58: Other Playback Operations
(for ICD-SX712/SX713 only) or the you wish to resume playback. supplied stereo headphones for noise • To search backward (Review): canceling (for ICD-SX813 only) to the Press and hold on the control button (headphone) jack. The built-in speaker during playback and release it at the point will be automatically disconnected. -
Page 59: Selecting A Recording Date From The Calendar And Playing Back
• If you press and hold . on the control Select the (Display) tab t “日历” button while “FILE END” is lit, the files are in the menu, and then press /ENT. played back rapidly, and normal playback will start at the point you release the button. •... -
Page 60: Reducing Noise In The Playback Sound And Making The Human Voice Clearer - The Noise Cut Function
Press on the control button to files recorded with the IC recorder. For details, see “Structure of folders and files” select a file, and then press /ENT. (page 110). Reducing noise in the playback sound and making the human voice clearer – the noise cut function A confirmation message appears, and the file you selected will be played back. -
Page 61: Adjusting The Playback Sound By Amplifying Inaudible Sound - The Digital Voice Up Function
When you set the NOISE CUT switch to Press on the control button to “ON,” ambient noise other than the human select “强” or “弱,” and then press voice is reduced. A file is played back with ENT. clear sound quality because the noise of all “消除噪音等级”... - Page 62 Select the (Playback) tab t “V-UP” 强 Adjusts the digital voice up in the menu when the IC recorder is in function more effectively. the stop or playback mode, and then 弱 Adjusts the digital voice up press /ENT. function less finely. 关...
-
Page 63: Adjusting The Playback Speed And Tones - The Dpc (Digital Pitch Control) Function, Key Control
Adjusting the playback You can adjust the playback speed in a range from 0.25 times to 3.00 times. The speed and tones – the DPC file is played back in natural tones by (Digital Pitch Control) means of a digital processing function. function, key control Moreover, you can adjust the playback Rear... -
Page 64: Selecting The Sound Effect
Press on the control button to Selecting the sound effect adjust the playback tone. : Adjusts the sounds by a halftone x STOP higher each time this button is pressed (from #1 to #6). v , V : Adjusts the sound by a halftone lower each time this button is pressed (from 21 N /ENT to 26). - Page 65 To set your favorite sound level Press on the control button to select effect you want for the playback, Set “音效” to “自定义” in step 2, and and then press /ENT. then press /ENT. The custom setting window will be displayed.
-
Page 66: Selecting The Playback Mode
Press STOP to exit the menu mode. P Notes • When you are using the built-in speaker, this setting is invalid. • When the NOISE CUT switch is set to “ON,” the effect function does not work. The menu items will be different depending on the model you are using. - Page 67 To resume normal playback: A file is played back. Press /ENT. Files in one folder are played back continuously. To stop A-B repeat playback: Press STOP. All the files are played back continuously. To change the segment specified for A-B One file is played back repeatedly.
-
Page 68: Playing Back A File At A Desired Time With An Alarm
Playing Back a File at a Desired Time with an Alarm x STOP N /ENT v , V The menu items will be different depending on the model you are using. You can sound an alarm and start playback Press on the control button to of a selected file at a desired time. - Page 69 “Step 4: Setting the Clock” on The alarm list is displayed. page 16. When you select a day of the week Press on the control button to or “每天”: select the item you want to change, then Press on the control button to press /ENT.
- Page 70 alarm indicator will disappear from the • If you divide a file you have set an alarm for, the alarm setting remains on only the first display window. part of the divided file. When the set date and time • If you erase a file in which you have set an comes alarm, that alarm will be also canceled.
-
Page 71: Playback Via Other Devices
Playback via Other Devices Recording with other A file from the IC recorder will be recorded on the equipment connected. equipment Press STOP on the IC recorder and the connected equipment at the same time to i (headphone) jack stop recording. Tape recorder, Mini disc recorder, etc. -
Page 72: Using The Noise Canceling Function
Using the Noise Canceling Function (for ICD-SX813 only) • Rubbing noises may occur while wearing stereo headphones for noise canceling. It is not a malfunction. About noise canceling • The noise canceling function mainly reduces ambient noise in the low frequency bands... -
Page 73: Playing Back With The Noise Canceling Function
• Make sure to remove the stereo headphones Connect the supplied stereo headphones for noise canceling from your ears before for noise canceling to the i (headphone) you connect or disconnect the stereo jack. headphones from the headphone jack of the IC recorder. -
Page 74: Changing The Noise Canceling Settings
Changing the noise Select a file you want to play back, and then press /ENT. canceling settings Tips • When the noise canceling function is active, x STOP “ ” appears in the display window. • You can adjust the effect of the noise N /ENT canceling function (page 75). - Page 75 Press on the control button to P Note select “选择降噪环境,” and then press This function is only effective when “开/关” of “降噪” is set to “开” (page 73). /ENT. Adjusting the noise canceling effect The IC recorder is designed to obtain the maximum effect of the noise canceling function (page 72).
- Page 76 The setting can be adjusted in 31 steps from –15 to +15. The center position of the indicator will obtain the maximum effect under normal ambience. Move the position of the indicator to adjust the desired value. Indicator P Notes •...
-
Page 77: Editing Files
Editing Files Arranging Files in a Folder Moving a file to a different Press on the control button, press on the control button to select the folder (Voice) tab or the (Music) tab, and then press > x STOP v , V N /ENT . -
Page 78: Copying A File To The Other Memory Media
To cancel moving the file Select the file you want to copy. Press STOP before step 4. When you want to copy a file from a memory card to the built-in memory, set P Notes the source memory media to “存储卡” •... -
Page 79: Erasing All Files In A Folder
Press on the control button to • You cannot copy the podcast files. select the folder that you want to copy • Do not remove or insert a memory card, or turn off the IC recorder while copying. Files the file into, and then press /ENT. - Page 80 “删除文件夹中的所有文件?” will be displayed. Press on the control button to select “执行,” and then press /ENT. The “正在删除...” animation appears in the display window and all files in the selected folder will be erased. Press STOP to exit the menu mode. To cancel erasing Select “取消”...
-
Page 81: Using A Track Mark
Using a Track Mark Adding a track mark . , > N /ENT P Notes • You can add a track mark only to files recorded using the IC recorder. However, T-MARK when you edit files using the supplied Sound Organizer software, adding a track mark to the files may not be possible. -
Page 82: Erasing A Track Mark
Erasing a track mark The “正在删除...” animation appears in the display window and the selected track mark will be erased. x STOP Stop position N /ENT v , V Erase track mark Stop at a position after the track mark The track mark just before the stop position will be erased. - Page 83 Select a file from which you want to erase the track marks. (Edit) tab t “删除所有 Select the 曲目标记” in the menu, and then press /ENT. “确定删除所有曲目标记?” will be displayed. Press on the control button to select “执行,” and then press /ENT.
-
Page 84: Dividing A File
Dividing a File Dividing a file at the current (Edit) tab t “分割当前 Select the 位置” in the menu, and then press position ENT. x STOP N /ENT v , V A period of approximately 4 seconds from the dividing point will be played back repeatedly. -
Page 85: Dividing A File At All The Track Mark Positions
You can adjust the position to be divided • You cannot divide files other than those recorded using the IC recorder (e.g., a file by approximately 0.3 seconds in a period transferred from a computer). Moreover, of approximately 6 seconds each, both when you edit files using the supplied Sound before and after the current position. - Page 86 Select the (Edit) tab t “分割所有 To cancel dividing 曲目标记” in the menu when the IC Select “取消” in step 3, and then press ENT. recorder is in the stop mode, and then press /ENT. To cancel division during the operation at all the remaining track marks, press x STOP.
-
Page 87: Changing A Folder Name
Changing a Folder Name Press on the control button to x STOP select a favorite folder name, and then press /ENT. N /ENT You can choose a new folder name from the 16 templates below. v , V 会议, 会见, 演讲, 课堂, 音乐, 歌唱, 采 访, 语言课程, 旅游, 户外, 消息, 计划, 购物单, 执行, 语音说明, FOLDER You can change the folder name of folders... - Page 88 • When you choose “FOLDER” from the templates, a suffix made up of a sequential number (01 to 10) is added to each of the folder names. P Note You cannot change a folder name in a tab used for playback only, such as the (Music) tab or the (Podcast) tab.
-
Page 89: Protecting A File
Protecting a File “确定设置保护?” will be displayed. x STOP Press on the control button to N /ENT select “执行,” and then press /ENT. The file is protected. A protected file is v , V marked with the (protect) indicator. Press STOP to exit the menu mode. -
Page 90: About The Menu Function
About the Menu Function Making Settings for the Menu Press on the control button to MENU select the menu item for which you want to make setting, and then press /ENT. x STOP N /ENT v , V Press on the control button to select the setting that you want to set, Press MENU to enter the menu mode. -
Page 91: Menu Settings
LCF(Low Cut) — LIMITER — 添加/覆盖 — — 提前录音 — — 跨内存录音 — — — 同步录音 — — 选择输入模式 — 消除噪音等级 (Playback) — 降噪* — V-UP — 音效 — 简易搜索 — 播放模式 — 闹铃 — — * for ICD-SX813 only... - Page 92 Tabs Menu items Operation mode (a: the setting can be made / —: the setting cannot be made) Stop mode Playback mode Recording mode 保护 (Edit) — — 分割当前位置 — — 移动文件 — 复制文件 — — 更改文件夹名 — — 删除曲目标记 —...
- Page 93 Tabs Menu items Settings (*: Initial setting) See page 场景编辑 Edits the settings of the various recording menu items (Recording) which are pre-set in the “场景选择” menu. You can choose a scene item as follows: (会议), (语音 备忘录), (采访), (音乐), (我的场景) 编辑当前设置: Changes the settings that is pre-set in the menu.
- Page 94 Tabs Menu items Settings (*: Initial setting) See page 录音模式 Sets the recording mode. – (Recording) LPCM 44.1kHz/16bit: LPCM (not compressed) in stereo high-quality recording mode MP3 320kbps*: MP3 (compressed) in stereo high-quality recording mode MP3 192kbps: MP3 (compressed) in stereo standard-quality recording mode MP3 128kbps: MP3 (compressed) in long play stereo recording...
- Page 95 Tabs Menu items Settings (*: Initial setting) See page 录音水平 Sets the microphone sensitivity. – (Recording) 高 To record a sound far away from the IC recorder or a low sound, such as recording in a spacious room. 中 To record a sound relatively-close to the IC recorder, such as recording in a meeting space.
- Page 96 Tabs Menu items Settings (*: Initial setting) See page LIMITER Sets the input level automatically to prevent the sound – (Recording) distortion that occurs when a sound that is too loud is input. 开*: The LIMITER function is activated. 关: The LIMITER function is canceled.
- Page 97 Tabs Menu items Settings (*: Initial setting) See page 跨内存录音 When the memory media currently selected (page 49) (Recording) becomes full during recording, the IC recorder automatically switches its destination to the other memory media and continues recording. The new recording is stored as another file.
- Page 98 Tabs Menu items Settings (*: Initial setting) See page 选择输入模式 Selects the external input to be recorded that is 52, 53 (Recording) connected to the m (microphone) jack. 麦克风*: Select when you record files using an external microphone. 音频输入: Select when you record using other equipment. 消除噪音等级...
- Page 99 A low-level portion of a recorded file can be amplified, allowing you to hear even low/small voices more easily. 强: Adjusts the digital voice up function more effectively. 弱: Adjusts the digital voice up function less finely. 关*: Disables the digital voice up function. ** for ICD-SX813 only...
- Page 100 Tabs Menu items Settings (*: Initial setting) See page 音效 Sets the effect you want for the playback in the menu. 流行: (Playback) Stresses middle ranges, ideal for vocals. 摇滚: Emphasizes high and low ranges for a powerful sound. 爵士: Emphasizes high ranges for lively sound.
- Page 101 Tabs Menu items Settings (*: Initial setting) See page 播放模式 Sets the playback mode. (Playback) A file is played back. Files in one folder are played back continuously. ALL: All the files are played back continuously. One file is played back repeatedly. Files in one folder are played back repeatedly.
- Page 102 Tabs Menu items Settings (*: Initial setting) See page 保护 Protects the selected file to prevent the file from being (Edit) erased, divided, or being moved. 执行: The selected file will be protected. If you specify a file that has already been protected, cancel the protection.
- Page 103 Tabs Menu items Settings (*: Initial setting) See page 删除所有曲目标记 Erases all the track marks of the selected file. 执行: (Edit) All the track marks will be erased. 取消: All the track marks will not be erased. 分割所有曲目标记 Divides a file at all the track mark positions. 执行: The track mark division is executed.
- Page 104 Tabs Menu items Settings (*: Initial setting) See page 显示 Changes the display mode. – 经过时间*: (Display) Elapsed playback time of one file 剩余时间: During stop or playback, the remaining time of one file During recording, the available recording time 录音日期: Date recorded 录音时间:...
- Page 105 Tabs Menu items Settings (*: Initial setting) See page 背景灯 Turns the backlight in the display window on or off. – 10秒*: (Display) The backlight in the display window lights up for approx. 10 seconds. 60秒: The backlight in the display window lights up for approx.
- Page 106 Tabs Menu items Settings (*: Initial setting) See page 语言(Language) Sets the language to be used for messages, menus, (IC recorder folder names, file names, etc. setting) English, (Chinese)* 时钟设定 自动*: When the IC recorder is connected to a computer that is running the Sound Organizer, the clock will be automatically adjusted according to that computer.
- Page 107 Tabs Menu items Settings (*: Initial setting) See page USB充电 Sets whether batteries will be charged using a USB – (IC recorder connection or not. 开*: setting) The batteries will be charged. 关: The batteries will not be charged. P Note If you use a USB AC adaptor (not supplied) to connect the IC recorder to the AC outlet (page 126), you can charge batteries regardless this setting.
- Page 108 • When you format the built-in memory, the operating instructions stored in the built-in memory will also be erased. To get another copy of the operating instructions, please visit the Sony support home page: http://www.sony-asia.com/support...
-
Page 109: Utilizing Your Computer
Utilizing Your Computer Using the IC Recorder with Your Computer System requirements for your When the IC recorder is connected to your computer computer, you can transfer data between them. For details on the system requirements for your computer, see page 121, 131. Copying files from the IC recorder to your computer to store them (page 116) -
Page 110: Structure Of Folders And Files
Connect the (USB) connector of the • A malfunction may occur depending on the USB devices connected at the same time. IC recorder with the USB port of your • Before connecting the IC recorder to your running computer with the supplied USB computer, check that batteries are inserted in connecting cable inserted into the the IC recorder. - Page 111 Built-in memory Even if a file is transferred directly under the VOICE folder, it will not be displayed “IC RECORDER” on the (Voice) tab of the IC recorder. When you transfer a file from your Folder for files recorded using the IC recorder computer to the IC recorder, put the file in VOICE* the folders under the VOICE folder.
- Page 112 Memory Stick Micro™ (M2™) When connecting the IC recorder with your computer after the destination memory “MEMORY CARD” media has been set to “存储卡” (page 49), MSSONY the structure of folders is different from that when the destination memory media is set Folder for files recorded using the IC recorder to “内置内存.”...
- Page 113 IC “MEMORY CARD” recorder PRIVATE The display of the structure of the folders SONY seen in the display window of the IC recorder is different from that seen on the Folder for files recorded display of a computer.
-
Page 114: Disconnecting The Ic Recorder From Your Computer
Folders displayed on the • Folders transferred to places other than (Voice) tab of the IC recorder under the MUSIC folder or the PODCASTS folder • A folder called “无文件夹” (If you transfer music files separately, those files will be displayed under this folder.) Folders displayed on the (Podcast) tab of the IC recorder Folders for files recorded using the IC... - Page 115 Perform the following operation on your computer. On a Windows screen, left-click the icon at the bottom of the desktop of the computer. t Left-click “弹出IC RECORDER.” The icon and menu displayed can be different on different operating systems. On a Macintosh screen, drag “IC RECORDER”...
-
Page 116: Copying Files From The Ic Recorder To Your Computer
Copying Files from the IC Recorder to Your Computer To copy a file or folder (Drag and drop) You can copy the files and folders from the IC recorder to your computer to store them. 1 Click and hold, Connect the IC recorder to your 2 drag, 3 and then drop. -
Page 117: Copying Music Files From Your Computer To The Ic Recorder And Playing Them Back
Copying Music Files from Your Computer to the IC Recorder and Playing Them Back Copy the folder in which the music files are stored to the IC recorder. On a Windows screen using 资源管理 器, or on a Macintosh screen using Finder, drag and drop the folder containing the music files onto “IC RECORDER”... - Page 118 25 min. 30 min. 45 min. (1,341 (502 files) (251 files) files) ICD-SX713/ 178 hr. 67 hr. 33 hr. ICD-SX813 (2,670 5 min. 30 min. : Folder name files) (1,006 (502 files) files) : File name (hr.: hours/min.: minutes) : Artist name...
-
Page 119: Using The Ic Recorder As Usb Memory
Using the IC Recorder as USB Memory When the IC recorder is connected to your computer using a USB connecting cable, image data or text data on the computer, as well as files recorded using the IC recorder can be temporarily stored on the IC recorder. -
Page 120: Using The Supplied Sound Organizer Software
Using the Supplied Sound Organizer Software What you can do using Importing songs from a music Sound Organizer You can import the songs of a music CD Sound Organizer allows you to exchange into Sound Organizer. files with an IC recorder or memory card. The imported songs are saved to the The songs imported from music CDs and computer. -
Page 121: System Requirements For Your Computer
Changing the file information of Burning a music CD files You can select your favorite songs from the You can change the title name, artist name, songs imported into Sound Organizer and and other file information displayed in the then burn your own original music CD. file list. - Page 122 • Windows XP Professional Service Pack 3 Depending on the version of Windows, or higher more than 400 MB may be used. • Windows XP Home Edition Service Pack Also, free space for handling music data 3 or higher is required. Pre-installed.
-
Page 123: Installing Sound Organizer
Installing Sound Organizer Make sure that the IC recorder is not connected, then turn on your computer Install Sound Organizer on your computer. and start up Windows. P Notes Insert the supplied CD-ROM into the • When installing Sound Organizer, log in to CD-ROM drive. -
Page 124: The Sound Organizer Window
A 帮助 When the [Ready to Install the Program] window appears, click [Install]. Displays the help of Sound Organizer. The installation starts. For details on each operation, refer to these help files. When [Sound Organizer has been B The file list of Sound Organizer (我的 installed successfully.] window appears, 媒体库) check [Launch Sound Organizer Now],... - Page 125 F Sidebar (导入/传输) 录音笔: Displays the transfer screen. A list of files on a connected device appears. 导入CD: Displays the screen for importing music CDs. 刻录CD/DVD: Displays the screen for burning discs. G Transfer buttons : Transfers the files of Sound Organizer to an IC recorder or memory card.
-
Page 126: Additional Information
Additional Information Using a USB AC Adaptor the batteries continuously until “ ” is displayed. It takes about 4 hours to fully charge exhausted batteries.* Connect a USB AC adaptor (not To the (USB) supplied) to an AC outlet. connector USB connecting cable (supplied) Connect the USB AC adaptor to the... -
Page 127: Disconnecting The Ic Recorder From The Ac Outlet
and the condition of the batteries. It also P Notes takes more time if the temperature of the • During recording (the operation indicator batteries is low, or if the batteries are lights or flashes in red) or accessing data (the charged while you are transferring data to operation indicator flashes in orange), the IC recorder. -
Page 128: Precautions
Precautions On power – When you use the unit in an environment where the unit is exposed Operate the unit only on 2.4 V or 3.0 V DC. to rain, snow, or humidity. Use two NH-AAA rechargeable batteries or – In circumstances where you get sweaty. two LR03 (size AAA) alkaline batteries. - Page 129 IC recorder, we by Sony. The IC recorder does not support recommend that you save a backup copy data recording/playback that requires of your recorded files to a computer, etc.
- Page 130 • We recommend that you save a backup copy of the important data. • Do not touch the terminal of a memory card with your hand or a metal object. • Do not strike, bend or drop a memory card. •...
-
Page 131: Specifications
– Windows 7 Home Premium please access the support home page for the – Windows 7 Home Basic IC recorder: – Windows 7 Starter http://www.sony-asia.com/support – Windows Vista Ultimate Service Pack 2 or higher – Windows Vista Business Service Pack 2 or higher... -
Page 132: Design And Specifications
ICD-SX712: 2 GB (approx. 1.80 GB = WMA Ver. 9 is compatible, however, MBR 1,932,735,283 Byte) (Multi Bit Rate), Lossless, Professional, ICD-SX713/ICD-SX813: and Voice are not supported. 4 GB (approx. 3.60 GB = Copyright-protected file cannot be played 3,865,470,566 Byte) back. - Page 133 ICD-SX813 only) Two NH-AAA rechargeable batteries: 2.4 Approx. 17 dB* V DC Two LR03 (size AAA) alkaline batteries: 3.0 Under the Sony measurement standard. V DC Equivalent to approx. 98.0% reduction of Operating temperature energy of sound compared with not wearing 5°C - 35°C...
- Page 134 Mass (JEITA) Approx. 92 g including two NH-AAA rechargeable batteries Measured value by the standard of JEITA (Japan Electronics and Information Technology Industries Association) Supplied accessories See page 7. Optional accessories Active speaker SRS-M50 Electret condenser microphone ECM-CS10, ECM-TL1 USB AC adaptor AC-NWUM50 Design and specifications are subject to change without notice.
- Page 135 *7*8 Maximum recording time The maximum recording time of all the folders is as follows. 录音模式 Recording Built-in Memory card scene* memory ICD- ICD- 2 GB 4 GB 8 GB 16 GB 32 GB SX712 SX713/ SX813 LPCM 44.1kHz/ (音乐) 3 hr.
-
Page 136: Battery Life
Battery life When using Sony NH-AAA rechargeable batteries* 录音模式 Recording Playback Playback using Playback using Playback using through the headphones the headphones the headphones speaker* (ICD-SX712/ (noise canceling (noise canceling SX713) function: off) function: on) (ICD-SX813) (ICD-SX813) LPCM 44.1kHz/ 19 hr. - Page 137 44.1kHz) (hr.: hours) The battery life is measured in testing using methods proprietary to Sony. The battery life may shorten depending on how you operate the IC recorder. When playing back music through the internal speaker with the volume level set to 20...
-
Page 138: Troubleshooting
• Noise may be heard during recording pause of an MP3 file, VOR recording, or synchronized recording. • Noise canceling function is set in a quiet place (for ICD-SX813 only). Noise tends to be more noticeable in a quiet place or depending on the noise type. - Page 139 Symptom Remedy You cannot charge the • When you connect the IC recorder to a computer which is not batteries by connecting the running, the batteries will not be charged. IC recorder to your • Even if the computer is on, and the computer is in a mode of computer.
- Page 140 Symptom Remedy The IC recorder is powered • When the IC recorder is in the stop mode and you leave the IC off automatically. recorder without attempting an operation for a certain length of time, the auto power off function will take effect. (The length of time before auto power off is set to “10分钟”...
- Page 141 Symptom Remedy The “存储容量已满” • The memory is full. Erase some of the files (page 31) or erase all animation is displayed and the files after you store them on the other memory media or on you cannot start recording. your computer.
- Page 142 Symptom Remedy You cannot add a recording • “添加/覆盖” is set to “关” in the menu. Set “添加/覆盖” to “添 加” or “覆盖” (page 96). or an overwrite recording. • The remaining memory capacity is insufficient. The overwritten part will be deleted after the overwriting part finishes recording. Therefore, you can only overwrite within the remaining recording time.
- Page 143 • The noise canceling function is disabled. Set “开/关” of “降噪” not effective (for to “开” (page 73). When the noise canceling function is active, ICD-SX813 only). “ ” appears in the display window. • You are using headphones other than the supplied ones. Use the supplied stereo headphones for noise canceling.
- Page 144 Symptom Remedy DPC(SPEED)/ Playback speed is too fast or • The playback speed is adjusted in DPC. Slide the KEY CTRL too slow. switch to “OFF” or press on the control > button to adjust the speed in DPC again (page 63). You cannot divide a file.
- Page 145 Symptom Remedy The remaining time • The IC recorder requires a certain amount of memory for system displayed in the display operation. That amount is subtracted from the remaining time, window is shorter than that which is the reason for the difference. displayed in the supplied Sound Organizer software.
- Page 146 Symptom Remedy The battery life of the • You are using the rechargeable batteries in an environment with a rechargeable batteries is temperature of under 5 °C. Charge the batteries in an environment short. with a temperature of 5 °C - 35 °C. •...
- Page 147 Symptom Remedy The IC recorder is not • Disconnect the IC recorder from your computer and reconnect it. recognized by your • Do not use a USB hub or USB extension cable other than the computer. supplied USB connecting cable. Connect the IC recorder to your A folder/file cannot be computer using the supplied USB connecting cable.
- Page 148 Sound Organizer Refer to the help files of the Sound Organizer software, too. Symptom Cause/Remedy The Sound Organizer • The free disk or memory space on the computer is too small. software cannot be installed. Check the hard disk and memory space. •...
- Page 149 Symptom Cause/Remedy Playback sound from the • No sound board is installed. computer is low./No sound is • No speaker is built-in or connected to the computer. emitted from the computer. • The volume of the sound is turned down. •...
-
Page 150: Message List
Message List Message Cause/Remedy HOLD • All the button operations are disabled because the IC recorder is in the HOLD status to prevent unintentional operations. Slide the POWER/HOLD switch towards the center to release the IC recorder from the HOLD status (page 11). 电量不足... - Page 151 Message Cause/Remedy 文件存储已满 • When there are already the maximum number of files in the selected folder or the total number of files stored on the IC recorder has exceeded the maximum, you cannot record a new file. Erase some files before recording. 文件已损坏...
- Page 152 Message Cause/Remedy 电池电量低 • You cannot format the memory or erase all the files in a folder because of insufficient battery power. Replace the old LR03 (size AAA) alkaline batteries with new ones. Or charge the rechargeable batteries (page 12) or replace the old rechargeable batteries with new ones.
- Page 153 Message Cause/Remedy 操作无效 • You cannot divide or set a track mark in files in the folder in the playback-only area (the (Music) tab and the (Podcast) tab). • When a memory card has a bad block on it, the card cannot be written to.
- Page 154 Message Cause/Remedy 无存储卡 • There is no memory card inserted into the memory card slot when you attempt to set the “选择存储,” “复制文件,” or “跨内存录音” menus. 切换存储媒介继续录音 • When “跨内存录音” in the menu is enabled and the memory media currently being used becomes full during recording, the IC recorder switches to the other memory media and continues recording.
-
Page 155: System Limitations
System Limitations There are some system limitations of the IC recorder. Troubles as mentioned below are not malfunctions of the IC recorder. Symptom Cause/Remedy You cannot record files up to • If you record files in a mixture of the recording modes, the the maximum recording recordable time varies from the maximum recording time of the time. - Page 156 Symptom Cause/Remedy The remaining recording • You need a certain amount of free space for a file management time becomes shorter when area to divide a file, therefore the remaining recording time will be you divide a file. shortened.
-
Page 157: Display Window Guide
Display Window Guide C File information type indicator Display when stopped : A folder where you can record a file : A folder for playback only : A folder for podcast files : Title name : Artist name : File name D Microphone sensitivity indicator : 高... - Page 158 I Track mark indicator the control button. You can also display the recording level meter. Displays the track mark number just G Operation mode indicator before the current position. Appears when a track mark is set for a file. Displays the following, depending on J Alarm indicator the current operation of the IC recorder.
- Page 159 L Limiter indicator (only displayed Display when recording (auto (AGC) recording) during manual recording) Appears when “LIMITER” is set to “开” in the menu. M LCF (Low Cut Filter) indicator Appears when “LCF(Low Cut)” is set to “开” in the menu. N Protect indicator Appears when the protection is set for a file.
- Page 160 P Level meter display Display during playback Level meter display in auto (AGC) recording mode. In manual recording, the level meter whose colors are reverse is displayed. Q File number The selected file number is displayed in the numerator and the total number of files in the folder is displayed in the denominator.
- Page 161 V Noise canceling indicator (for X HOLD indicator ICD-SX813 only) Appears when the IC recorder is in the Appears when the noise canceling HOLD status to prevent unintentional function is active. operations. W Noise cut/Effect indicator To release the HOLD status, slide the...
-
Page 162: Index
Index Cue ............58 AAC-LC files ........133 A-B repeat ..........67 Digital voice up ......61, 91, 99 Adding a recording .....40, 91, 96 Displaying the current date and time ..18 Adjusting the noise canceling effect ..75 Dividing a file at all the track Adjusting the volume ......26, 57 mark positions ......85, 92, 103 Alarm ........68, 91, 101... - Page 163 格式化 ........92, 108 简易搜索 ........91, 100 HOLD .............11 降噪 ..........91, 99 跨内存录音 ........91, 97 Index to parts and controls LCF(Low Cut) ......91, 95 Display window ........ 157 LED ..........92, 104 Front .............8 LIMITER ........91, 96 Rear ............9 录音水平 ........91, 95 Input selection ......52, 91, 98 录音模式...
- Page 164 消除噪音等级 ......91, 98 Podcast ..........120 选择存储 ........92, 105 POWER/HOLD switch .....11, 15 选择输入模式 ......91, 98 Precautions ..........128 移动文件 ........92, 102 Pre-recording .......43, 91, 96 音效 ..........91, 100 Protecting a file ......89, 92, 102 语言(Language) ......92, 106 自动关机 ........92, 107 Rechargeable battery ....12, 126, 136 Message list ..........150 Recharging the batteries ......12...
- Page 165 Tab view ..........28 Track mark ..........81 Troubleshooting ........138 USB AC adaptor ........126 USB memory ........119 Using the IC recorder with your computer ..........109 VOR (Voice Operated Recording) ........45, 91, 97 WMA files ..........132...
- Page 166 © 2010 Sony Corporation...
Need help?
Do you have a question about the ICD-SX813 and is the answer not in the manual?
Questions and answers