Advertisement
Introduction
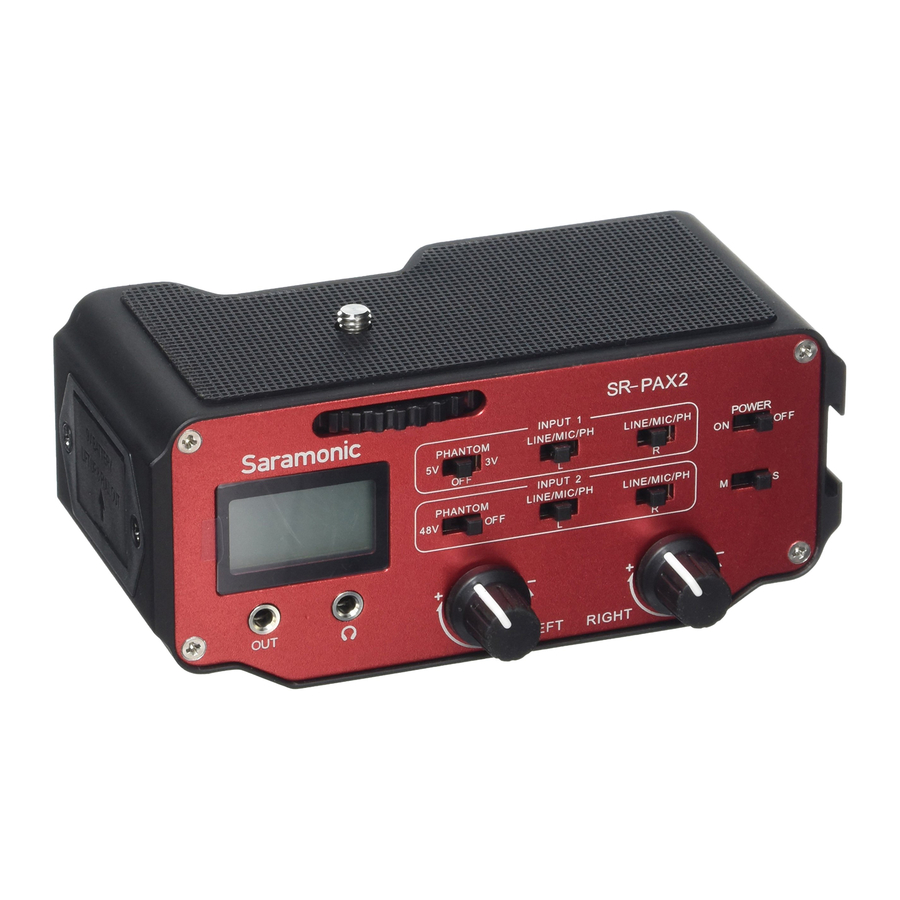
The SARAMONIC SR-PAX2 is a two-channel active audio mixer with preamplifier and phantom power, specially designed for mirrorless digital camera, Blackmagic Design pocket cinema camera and DSLR camera with a microphone jack.
Product Introduction
General Introductions
The SARAMONIC SR-PAX2 is a two-channel active audio mixer with preamplifier and phantom power, specially designed for mirrorless digital camera, Blackmagic Design pocket cinema camera and DSLR camera with a microphone jack. It is a compact and lightweight mixer ideal for recording professional-quality audio from two sources and mixing them into your camera. It attaches to the base of a camera, and a threaded socket on its base allows for mounting on a tripod or case.
With two sets of inputs, the SR-PAX2 accepts signals from a wide variety of mic or line level sources such as balanced XLR microphones, 3.5mm microphones, wireless microphones and external audio mixers. The 3.5mm inputs are also ideal for connecting audio devices with a 3.5mm output such as a smart phone or an MP3 player. The input levels of each channel can be easily controlled with the dual gain control knobs. The cold shoe on the side gives you space to mount and move other equipment. A phone jack allows you to monitor the audio in real time. The SR-PAX2 makes your recording work much easier.
Product Structure


- INPUT 1: 3.5mm Inputs
One stereo input
LEFT and RIGHT mono inputs - INPUT 2: XLR Inputs Balanced LEFT and RIGHT
XLR inputs - 1/4" Screw Thread
- Battery Compartment
Operates on a 9 volt battery (not included). You could use a lithium type battery for longer operating time. - INPUT 1 Switch Group Control the 3.5mm inputs.
- LINE/MIC/PH L, select LINE or MIC or Phantom level for the left channel
- LINE/MIC/PH R, select LINE or MIC or Phantom level for the right channel
- PHANTOM 5V/OFF/3V Switch
Optional 5 volt or 3 volt phantom power for microphones that require phantom power.
- INPUT 2 Switch Group Control the XLR inputs.
- LINE/MIC/PH L, select LINE or MIC or Phantom level for the left channel
- LINE/MIC/PH R, select LINE or MIC or Phantom level for the right channel
- PHANTOM 48V/OFF Switch
Select 48 volt phantom power for XLR microphones that require phantom power.
- POWER Switch
Main power switch for SR-PAX2. - Mono/Stereo Switch (M/S)
When recording one channel, please use the mono(M) setting. The signal will be sent to both left and right channels. When recording two channels, please use the stereo(S) setting. The level of each channel can be controlled individually. - Left and Right Channel Control Knobs
Adjust the signal of each channel to the optimum recording levels. - Level Meter
Indicates the sound level in dB for each channel. - Output (OUT)
Use the included stereo 3.5mm signal transmission line to connect to the mic input of your camera. - Phone
Headphone jack to monitor the audio from microphones.
Specification
| Frequency Response | 20 Hz to 20 Khz, +/-0.5 dB |
| THD | Less than 0.01% @ 1 kHz, -30 dBu input |
| SNR | 80 dB @ 1 kHz, -30 dBu input |
| INPUT1 GAIN | LINE: 0 dB MIC/PH: 20dB |
| INPUT2 GAIN | LINE: 0 dB MIC/PH: 20dB |
| INPUT 1 Phantom Power | 5V/3V power supplies |
| INPUT 2 Phantom Power | 48V power supplies |
| Level Meter | -18 dB to +3 dB in 3 dB increments |
| Power Requirements | 9 V alkaline or lithium battery |
| Battery Duration | 5 hours typical lithium battery (no phanton) 3 hour typical lithium batter (with phanton) |
| Dimensions | (L x W x H) 136 mm x 80.5 mm x 62.5 mm |
| Weight | 13.5 oz (0.385 kg) |
Set Up Guide
- Install the battery.
Lift up and pull out the drawer from the battery compartment.
Insert 9V battery into place aligning + and - polarity as shown. Slide the drawer closed until it clicks into place. - Attach the SR-PAX2 to the base of the camera. Spin counter-clockwise to tighten up the mixer with the camera. Mount the mixer to a tripod with the tripod socket on the bottom of the mixer.
- Connect the supplied signal transmission line from the output jack (OUT) of mixer to the MIC input of camera. If there is a Mic/ Line switch on the camera, select it to Mic.
- Connect microphones or other audio sources to the XLR inputs or 3.5mm inputs of the mixer.
- Set the LINE/MIC/PH switch.
When using self-powered microphones and wireless systems, set to MIC for 20dB gain or set to LINE for 0dB gain.
When using other audio devices, please set to LINE.
When using microphones operating on phantom power, please set to PH for phantom power.
Note: Please DO NOT select phantom level when recording with microphones that do not operate on phantom power, like wireless receivers, mixing boards or any unbalanced device, because it may damage both the mixer and audio device. - Set the 3V/5V/48V/OFF phantom power according to your needs.
- Set the M/S switch according to your needs. (Please refer to "Mono/Stereo Switch")
- Turn the POWER switch to ON.
- Please set the volume control knobs to low to avoid excessively loud audio from damaging your hearing. Plug an headphone into the
![]() phone jack to monitor the sound.
phone jack to monitor the sound. - We suggest you to do a test recording and playback the audio to see if it is acceptable.
When testing, you could adjust the knobs flexibly to get the the optimum signal levels.

Documents / ResourcesDownload manual
Here you can download full pdf version of manual, it may contain additional safety instructions, warranty information, FCC rules, etc.
Advertisement


Need help?
Do you have a question about the SR-PAX2 and is the answer not in the manual?
Questions and answers