Table of Contents
Advertisement
Quick Links
OWNER'S MANUAL
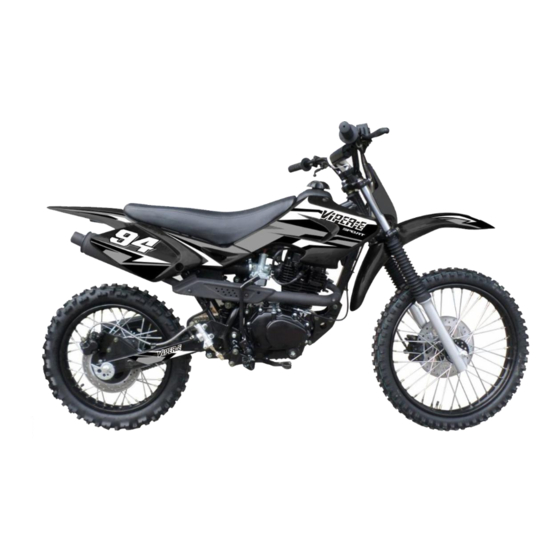
Viper 150-E Dirt Bike
No one under the age of 16 should operate this Dirt bike without adult supervision. Parents
should consider child's age, size, maturity and ability before allowing to ride.
Max. Weight Limit: 250lbs. (113kg)
Always wear a helmet; It could save your Life!
This manual should be considered as a permanent part of the vehicle and should remain with
the vehicle when resold or otherwise transferred to a new user or operator. The manual
contains important safety information and instructions which should be read carefully before
operating the vehicle.
Please obtain, review, and follow the municipal, provincial and government acts and
regulations pertaining to owning and operating an off-road vehicle.
Advertisement
Table of Contents

Summary of Contents for PPS Viper 150-E
- Page 1 OWNER’S MANUAL Viper 150-E Dirt Bike No one under the age of 16 should operate this Dirt bike without adult supervision. Parents should consider child’s age, size, maturity and ability before allowing to ride. Max. Weight Limit: 250lbs. (113kg) Always wear a helmet; It could save your Life! This manual should be considered as a permanent part of the vehicle and should remain with the vehicle when resold or otherwise transferred to a new user or operator.
- Page 2 Congratulations on your purchase of the Ricky Power Sports LLC. Viper 150-E Dirt Bike. Your bike is warranted to be free of manufacturing defects in the material and workmanship for a period of 90 days from the date of purchase. During the warranty period Ricky Power Sports LLC.
-
Page 3: Table Of Contents
TABLE OF CONTENTS NOTICE TO USER’S ..................... 2 SAFE OPERATION ....................3 PRE-RIDE CHECKLIST ..................3 SAFTY GEAR ...................... 4 LOCATION OF WARNING LABELS ................. 5 MAIN DATA ......................5 PARTS & SUBASSEMBLES ..................7 OPERATION ....................... 8 FUEL VALVE ....................... 8 ENGINE STARTING ..................... -
Page 4: Notice To User's
NOTICE TO USER’S Please read this manual and follow all instructions carefully. To emphasize special information, the symbol and the words WARNING or CAUTION have some special meanings. Pay great attention to the messages. WARNING Indicates a potential hazard that could result in death or injury. CAUTION Indicates a potential hazard that could result in vehicle damage. -
Page 5: Safe Operation
SAFE OPERATION A pre-operation check must be conducted before starting the engine. This check will insure safety, prevent mishaps, and prevent damage to components. It is strongly suggested that all operators take a certified motorcycle rider’s course prior to operating the vehicle. Full attention is required during driving;... -
Page 6: Safty Gear
b) Check for frayed cable or damaged cable housing. Replace damaged cable. c) Check for mud, debris and ice in the throttle cable/mechanism. Clean out any contamination. SAFTY GEAR A DOT approved motorcycle helmet is the most important part of you safety gear. A DOT approved motorcycle helmet can help prevent a serious head injury. -
Page 7: Location Of Warning Labels
LOCATION OF WARNING LABELS Read and follow all of the warnings labels on your Dirt bike. Make sure you understand all the labels. Keep the labels on the Dirt bike. Do not remove them for any reason. If a label come off or become difficult to read, you should get a replacement by contacting Ricky Power Sports LLC. -
Page 8: Main Data
MAIN DATA DESCRIPTION DATA DESCRIPTION DATA Overall length 1540mm Cylinder bore x stroke 62mm x 49.5mm Overall width 640mm Compression ratio 9.0 : 1 Overall height 880mm Related Power 8.0Kw/8500rpm Wheelbase 1270mm Related torque 10.0N.m/6500rpm 1500±150 r/min Curb mass 92Kg Idle speed Payload 113Kg... -
Page 9: Parts & Subassembles
PARTS & SUBASSEMBLES Viper... -
Page 10: Operation
OPERATION FUEL VALVE Fuel filling The capacity of the fuel tank is 6.0L. Unscrew the gas cap by turning it counter clockwise and carefully fill the tank with unleaded gasoline through the opening. DO NOT MIX GAS AND OIL TOGETHER, THIS IS A 4-STROKE ENGINE. Replace the gas cap by carefully aligning the threads on the cap and the tank and turning the cap clock wise. -
Page 11: Engine Starting
ENGINE STARTING CAUTION Verify oil level prior to starting. Starting the engine with low or no oil will damage the engine. WARNING Never start the engine in a closed place as the exhausted gas from the vehicle contains toxic carbon monoxide. Starting procedures ... -
Page 12: Breaking In The Engine
CAUTION Unnecessarily increasing RPM’s to a high level while the dirt bike is in neutral is harmful to the engine. Flooded Engine The engine may be flooded with extra gasoline, if it does not start after several attempts. Try the following to clear a flooded engine: 1) Turn the engine stop switch to the “OFF”... -
Page 13: Switches On Right Handlebar
SWITCHES ON RIGHT HANDLEBAR Ignition switch The ignition switch is Located on the right handlebar. When the switch is turned to (off) position, the engine will not start. If the engine is running and the Off button is pushed the engine will turn off. When the switch is turned to (on) position, the engine can start by using the kick start lever. -
Page 14: Check-Ups, Adjustment And Maintenance
Points for Attention during Drive 1. To warm the engine let engine idle. Do not rev the engine to prevent damage to the engine components. 2. The clutch will wear out quickly if the dirt bike is operated with the clutch in a semi-engaged position. -
Page 15: Changing The Oil, Cleaning Oil Filter Screen
CHANGING THE OIL, CLEANING OIL FILTER SCREEN 1. of the engine and let the oil drain into an approved collection container. DO NOT PERFORM THIS PROCEDURE WHILE THE ENGINE IS HOT. SERIOUS BURNS COULD RESULT FROM CONTACT WITH HOT OIL. 2. -
Page 16: Valve Inspection
VALVE INSPECTION Refer to maintenance schedule in this owner’s manual for valve adjustment inspection intervals . Valve clearance should be: Intake: 0.02-0.03mm Exhaust: 0.03-0.05mm The engine will make excess noise if the gap is too large in air valve. If gap is too small valve operation will be hindered which could result in valve malfunction and failure. -
Page 17: Adjusting The Throttle Cable
ADJUSTING THE THROTTLE CABLE Make sure the throttle works normally. Check if the throttle twist grip has the required free operating movement. The required free operating movement: 2-6mm (0.078 inches - 0.24 inches) If the grip cannot be moved freely, turn the adjusting nut located on top of the throttle twist grip to ensure proper operating movement. -
Page 18: Inspection Of Front Hydraulic Disk Brake
INSPECTION OF FRONT HYDRAULIC DISK BRAKE 1. Inspect the front disk brake caliper for leakage. If brake fluid leaks, the safety of riding could be affected. 2. Inspect the brake hose for cracks, and the joint for leakage. 3. Check the brake fluid level in the brake fluid reservoir, if level is at or below the LOWER mark, inspect brake pads for wear and hydraulic system for leaks. -
Page 19: Clutch Adjustment
CLUTCH ADJUSTMENT To adjust the clutch lever play: 1. Remove the adjuster cover (slide back on cable). 2. Loosen adjuster nut and move adjuster in or out to obtain the correct play. 3. Tighten adjuster nut 4. Recheck the clutch lever free distance. Readjust it if it is not within the correct limits. -
Page 20: Adjustment Of Chain
ADJUSTMENT OF CHAIN 1. When chain adjustment is needed, loosen rear axle nut . 2. Turn the chain adjusting brackets on the left and right sides to adjust the tension of the chain and to align the marking of the chain adjuster with the engraved lines in the similar position on both sides. -
Page 21: Troubleshooting
TROUBLESHOOTING This troubleshooting guide is provided to help you to find the cause of some common complaints. COMPLAINT: Engine is hard to start or does not start at all. Something is probably wrong with the fuel system or ignition system. CAUTION Failing to troubleshoot a problem correctly would damage your Dirt Bike. -
Page 22: Ignition System Check
IGNITION SYSTEM CHECK Remove the spark plug and reattach it to the spark plug lead. Turn ignition key to the “RUN” position. Slide the engine stop switch to the “Run” position. Kick the start lever. If the ignition system is operating properly, a blue spark should jump across the spark plug gap. If there is no spark, take your machine to your Service center. -
Page 23: Vehicle Washing
VEHICLE WASHING Cleaning the vehicle regularly can slow down the color fading of its body and make it easier to check if there is any damage and any oil leakage. CAUTION Washing the motorcycle with over-pressurized water may cause damage to some of its components. -
Page 24: Resumption Of Service After Storage
3. Take out the spark plug, pour about 15-20ml (.5 - .68 oz.) of clean engine oil into the cylinder, step down on the kick lever several times so as to have machine oil distributed inside the engine and finally fit the spark plug back on. 4. -
Page 25: Resumption Of Service
RESUMPTION OF SERVICE 1. Remove the covering and clean the vehicle. Change the lubricating oil if the vehicle has been off service for more than 4 months. 2. Drain off the anti-rust solution from the fuel tank, followed by filling fuel therein to the required level. -
Page 26: Battery
BATTERY Your bike is equipped with battery. Please check the electrolyte level or add distilled water when they are shortage. WARNING Immediately wash hands after handling battery. Battery and related components contain lead and lead compounds. NOTICE: If you remove the cap strip you can permanently damage the battery. Any electrical accessory will use currents from the battery. - Page 27 Use a slow trickle charger every 30 days to maintain life of thebattery. Charging the Battery Charging the battery incorrectly may cause damage. Always read the instructions that came with the battery charger and follow all directions on the battery. For home charging we suggest you use a trickle charger.
-
Page 28: Maintenance Schedule
MAINTENANCE SCHEDULE Every 6 Initial 1 Initial 3 Every 3 months Item months months months / 20hrs / 50hrs / 50hrs 100hrs * Valves Spark plug Valve clearance-Check-Adjust I Every 20~40 hours Air fiter (more often in dusty areas) * Carburetor * Exhaust system Spark arrester Fuel hose... -
Page 29: Serial Number Location
SERIAL NUMBER LOCATION You need to know the frame and engine serial numbers to get title documents for your Dirt Bike. You also need these numbers to help your authorized service center or Ricky Power Sports LLC. order parts. The Frame number is stamped on front of Dirt bike frame. The engine number is located on the left side of the engine housing. -
Page 30: Wire Diagram
WIRE DIAGRAM... -
Page 31: Ricky Power Sports, Llc. - Emission Control System Warranty
RICKY POWER SPORTS, LLC. – EMISSION CONTROL SYSTEM WARRANTY YOUR WARRANTY RIGHTS AND OBLIGATIONS The emission control system warranty period for this vehicle begins on the date the vehicle is delivered to the first purchaser other than an authorized dealer, or the date it is first used as a demonstrator, lease, or company vehicle, whichever comes first and continues for 30 months after that date, or 5,000km, whichever comes first, provided there has been no abuse, neglect or improper maintenance of your vehicle. - Page 32 Replacing or repairing other components (including parts, labor, and other costs) not covered by this emission control system warranty or the standard warranty is the responsibility of the owner. Coverage of repairs under this warranty applies only when repairs are completed at an authorized dealer or repair facility.
- Page 33 LIMITED LIABILITY The liability of Ricky Power Sports, LLC under this Emission Control System Warranty is limited solely to the remedying of defects in material workmanship by an authorized dealer at its place of business during customary business hours. This warranty does not cover inconvenience or loss of use of the vehicle or transportation of the vehicle to/from the authorized dealer.
- Page 34 Ricky Power Sports, LLC. 2425 Camp. Avenue, Carrollton, TX 75006 Toll Free: 844-250-2199...
Need help?
Do you have a question about the Viper 150-E and is the answer not in the manual?
Questions and answers