Advertisement
Quick Links
Advertisement

Subscribe to Our Youtube Channel
Related Manuals for Twin Star Home SD42-6905


Summary of Contents for Twin Star Home SD42-6905
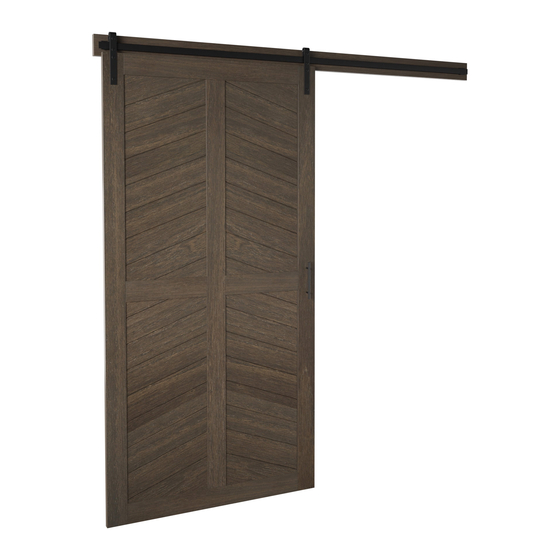
- Page 1 SD42-6905...
- Page 2 Call customer service Monday to Friday 8:30 am – 5:30 pm EST. Appelez le service à la clientèle Lundi – Vendredi 8 h 30 – 17 h 30 (HNE) Llame al servicio de atención al cliente. De lunes a viernes de 8:30 a. m. a 5:30 p. m.(hora estándar del este) 1.866.661.1218 SD42-6905 REV1.0...
- Page 3 PRODUCT DETAILS AND NOTES DÉTAILS ET NOTES DU PRODUIT/DETALLES DEL PRODUCTO Y NOTAS Place of purchase/Lieu de l’achat/Lugar de compra: Date of purchase/Date de l’achat/Fecha de compra: Model #/No de modèle/Número de modelo: Notes/Remarque/Notas: SD42-6905 REV1.0...
- Page 4 • Tenga cuidado al ensamblar follow assembly instructions closely. • Soyez vigilant lorsque vous el nuevo producto. Tómese su assemblez le nouveau produit. tiempo y siga detenidamente las Prenez votre temps et suivez instrucciones de ensamblaje. attentivement ces instructions. SD42-6905 REV1.0...
- Page 5 SD42-6905 REV1.0...
- Page 6 HARDWARE/QUINCAILLERIE/FERRETERÍA [x5] [x5] [x20] [x40] Ø8x80mm Ø16mm PH-SD426905-AA PH-WSRBLK002 PH-SD426905-CC PH-KDCZNC001 [x20] [x1] [x6] [x2] Ø8x30mm Ø6.3x20mm PH-DWLNTL001 PH-SD426905-FF PH-SD426905-GG PH-SD426905-HH [x1] [x2] [x1] [x2] Ø 4x31mm A6417 PH-BDRBLK004 PH-SD426905-KK PH-SCRBLK014 SD42-6905 REV1.0...
- Page 7 [x1] [x1] [x1] [x1] Size: 148x210mm Color: 1C (black) PH-SD426905-MM PH-SD426905-NN PH-SD426905-OO PH-SD426905-PP SD42-6905 REV1.0...
- Page 8 Pour bois : 6 mm / 1/4 po Destornillador de punta Phillips Broca: de 6 mm para madera o Drill Perceuse Pencil Taladro Crayon Lápiz Tape Measure Ruban à mesurer Cinta métrica Level Niveau Nivel Stud Finder Détecteur de montant Localizador de montantes SD42-6905 REV1.0...
- Page 9 ATTENTION: Para reducir el riesgo de daño a sus muebles, por favor coloque una manta, tela o cartón en el suelo antes del montaje. ATENCIÓN: Pour réduire le risque d’endommager vos fournitures, veuillez les poser sur un tapis, un tissu ou un carton sur le sol avant l’assemblage. [x8] SD42-6905 REV1.0...
- Page 10 [x8] [x8] SD42-6905 REV1.0...
- Page 11 [x4] SD42-6905 REV1.0...
- Page 12 SD42-6905 REV1.0...
- Page 13 [x4] SD42-6905 REV1.0...
- Page 14 [x12] SD42-6905 REV1.0...
- Page 15 [x12] [x12] SD42-6905 REV1.0...
- Page 16 SD42-6905 REV1.0...
- Page 17 SD42-6905 REV1.0...
- Page 18 [x12] SD42-6905 REV1.0...
- Page 19 [x1] SD42-6905 REV1.0...
- Page 20 [x2] [x4] SD42-6905 REV1.0...
- Page 21 [x1] Size: 148x210mm Color: 1C (black) [x1] Note: Door can be used with or without the included handle. If you wish to install the handle, please use the enclosed drilling template. SD42-6905 REV1.0...
- Page 22 être attaché. MARQUER les bords gauche et droit pour déterminer le centre de chaque montant. Utilizando un localizador de montantes, DETERMINELA ubicación exacta de los montantes sobre los que desea fijar. MARQUE los lados derecho e izquierdo para determinar el centro de cada montante. SD42-6905 REV1.0...
- Page 23 NOTE: Mark centerlines of wall studs as shown below. Bottom of mounting rail should be 83-3/4” from the floor. The center of the track should be mounted 1-1/2” from the edge of the door opening for optimal operation. SD42-6905 REV1.0...
- Page 24 NOTE: Drill 3/8” through holes on the mounting rail so they will align with the wall studs. The holes should be drilled 1-1/8” from the top of the rail. SD42-6905 REV1.0...
- Page 25 NOTE: Place mounting rail on wall aligning with markings from step 15. Mark hole locations through mounting holes and onto wall. Drill 1/4”D x 2” deep pilot holes into the wall studs. SD42-6905 REV1.0...
- Page 26 [x5] [x5] Note: Mounting bolts AA (X5) must be screwed into the wall stud. SD42-6905 REV1.0...
- Page 27 [x1] [x2] SD42-6905 REV1.0...
- Page 28 SD42-6905 REV1.0...
- Page 29 [x2] SD42-6905 REV1.0...
- Page 30 [x2] SD42-6905 REV1.0...
-
Page 31: Cuidado / Mantenimiento
Nous espérons que vous apprécierez Esperamos que disfrute de su compra for many years. Thank you for your votre achat pendant de nombreuses durante muchos años. ¡Gracias por purchase! années. Nous vous remercions pour su compra! votre achat! SD42-6905 REV1.0... - Page 32 INSTALLED REPLACEMENT PARTS SD42-6905 PIÈCES DE REMPLACEMENT INSTALLÉES SD42-6905 PIEZAS DE REPUESTO INSTALADAS SD42-6905 [x4] PH-TNTZNC001 1-866-661-1218 tsicustomerservice.com When registering your product, be When registering your product, be Lorsque vous enregistrez votre Lorsque vous enregistrez votre Cuando registre su producto,...
Need help?
Do you have a question about the SD42-6905 and is the answer not in the manual?
Questions and answers