Table of Contents
Advertisement
Quick Links
4651.036F
Telecamera Bullet AHD Day & Night, risoluzione 8 Mpx, sensore da 1/2,5", filtro IR
meccanico, obiettivo fisso 3,6 mm, funzione CsC, sensibilità 0 lux IR in ON, grado di
protezione IP66, illuminatore IR con portata fino a 15 m, Smart-IR, funzioni automa-
tiche: BLC, 2DNR, D-WDR. Alimentazione 12 Vdc 400 mA, completa di staffa con
passaggio di cavi protetto. Peso 490 g.
Contenuto della confezione
Una volta ricevuto il dispositivo, controllare gli accessori indicati di seguito. Le illu-
strazioni sotto riportate hanno solo funzione di riferimento. Far riferimento all'appa-
recchiatura in dotazione.
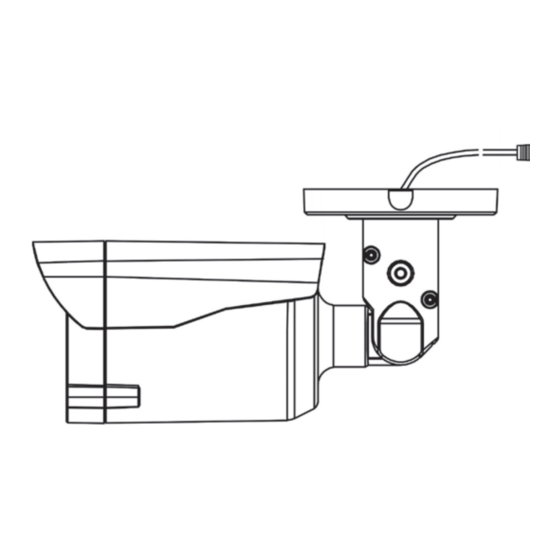
Telecamera
Camera
Connessioni
Di seguito sono riportate le principali connessioni della telecamera.
Installazione
Prima di iniziare, assicurarsi che la parete o il soffitto siano sufficientemente solidi
per sopportare tre volte il peso della telecamera. Installare e utilizzare la telecamera
in ambiente asciutto. La procedura di montaggio è la seguente:
1) Praticare i fori per le viti e per il cavo sulla parete utilizzando la dima di foratura.
2) Passare i cavi e collegare il cavo di alimentazione e il cavo video.
3) Fissare la base di montaggio della telecamera alla parete con le viti, come
descritto di seguito.
167 mm
• Controllo da DVR su cavo coassiale:
- Richiamare il menu PTZ del DVR.
- Utilizzare il pulsante Enter dal menu OSD per entrare nel menu della telecame-
ra.
49401849A0 01 2209
Istruzioni per l'uso
Quick and start guide
70 mm
AHD Day & Night Bullet camera, 8 Mpx resolution, 1/2.5" sensor, mechanical IR fil-
ter, 3.6 mm fixed lens, CoC function, sensitivity 0 Lux with IR ON, IP66 protection
degree, IR illuminator with range up to 15 m, Smart-IR, automatic functions: BLC,
2DNR, D-WDR Power supply 12 Vdc 400 mA, complete with bracket with passage of
protected cables. Weight 490 g.
Package content
After you receive your device, please check the following accessories. The pictures
here are for reference only.
Dima di foratura
Screws & spiles
Drill template
Connections
Here below the main connections of the camera.
DC 12 V IN
VIDEO OUT
Installation
Before start, please make sure that the wall or ceiling is strong enough to withstand
3 times the weight of the camera. Please install and use the camera in the dry
environment. The mounting steps are as follows:
1) Drill the screw holes and the cable hole on the wall according to the drill template.
2) Route the cables and connect the power cable and video cable.
3) Secure the mounting base with camera to the wall with screws as shown below.
• DVR coaxial signal control:
- Recall the PTZ menu of DVR.
- Use Enter from OSD menu to enter in the camera menu
IT
EN
Viti
Chiave a brugola
Allen key
Ø 4,3 mm
Viale Vicenza, 14
36063 Marostica VI - Italy
www.vimar.com
Advertisement
Table of Contents

Subscribe to Our Youtube Channel
Related Manuals for Vimar ELVOX TVCC 4651.036F


Summary of Contents for Vimar ELVOX TVCC 4651.036F
- Page 1 - Recall the PTZ menu of DVR. - Utilizzare il pulsante Enter dal menu OSD per entrare nel menu della telecame- - Use Enter from OSD menu to enter in the camera menu Viale Vicenza, 14 36063 Marostica VI - Italy www.vimar.com 49401849A0 01 2209...
- Page 2 1 - 10 2DNR 2DNR 1 - 10 D-WDR D-WDR OFF\ON FLIP FLIP OFF\ON MIRROR MIRROR OFF\ON RETURN VIDEO SETTING 8MP15 1080P25\1080P30\4MP15\4MP25\4MP30 5MP12.5\5MP20 \8MP15 APPLY&REBOOT CVBS CVBS PAL/NTSC APPLY&REBOOT Viale Vicenza, 14 36063 Marostica VI - Italy www.vimar.com 49401849A0 01 2209...
- Page 3 +60 °C (IR OFF) Alimentazione / Power supply 12 Vdc ±10% - 400 mA (max) Dimensioni / Dimensions 167 x 84 x 70 mm Peso / Weight 490 g Viale Vicenza, 14 36063 Marostica VI - Italy www.vimar.com 49401849A0 01 2209...
- Page 4 L’Interessato al momento della richiesta di access to its system when requesting help from the Vimar Support Centre, so that the related intervento al Centro Assistenza Vimar, per poter consentire le attività di assistenza, deve fornire support can be provided.
Need help?
Do you have a question about the ELVOX TVCC 4651.036F and is the answer not in the manual?
Questions and answers