Table of Contents
Advertisement
Quick Links
Advertisement
Table of Contents

Related Manuals for Precisionary Compresstome VF-510-0Z


Summary of Contents for Precisionary Compresstome VF-510-0Z
- Page 1 Compresstome ® VF-510-0Z User Manual...
-
Page 2: Thank You
Thank you for choosing the Compresstome ® VF-510-0Z! At Precisionary Instruments, we are thrilled to help you get started with your new vibrating microtome, and we take great pride in quality customer service. Please read the following ® manual to help you get started with the Compresstome VF-510-0Z. -
Page 3: Table Of Contents
Table of Contents Thank You ................................1 Safety ................................... 1 Table of Contents ............................2 Part 1: Introduction ..........................3 Model Description ............................3 Technical Specifications ..........................4 Model Components ............................5 Control Box Anatomy ............................. 7 Accessories ................................ 8 Starter Kit Components ..........................9 Part 2: Setup ............................ 1 0 IMPORTANT! Transportation Fixture Removal .................. 1 0 Mounting the Cutting Blade to the Blade Holder ................ 1 1 Mounting the Cutting Blade to the Magnetic Blade Holder ............ 1 7 Attaching the Gooseneck Lamp to the Compresstome® .............. 1 8 Preparing Agarose for Embedding . -
Page 4: Part 1: Introduction
Part 1: Introduction Model Description The VF-510-0Z tissue slicer model is the latest version of our flagship product in the Compresstome ® slicer family. With patented Auto Zero-Z ® technology, the VF-510-0Z is fully automated to section both fixed and live tissues with a thickness range of 4 µm* to 1000 µm and an adjustable precision of 1 µm. -
Page 5: Technical Specifications
Technical Specifications Advance Speed 0-20 mm/s, adjustable Return Speed 20 mm/s Vibration Frequency 0-45 Hz, adjustable Vibration Amplitude 2 mm Z-axis Vibration ~0 µm Compatible Blades Stainless Steel, Ceramic, Tungsten Carbide Cutting Angle 15 degrees (fixed, no need for blade alignment) Thickness Adjustment Automatic... -
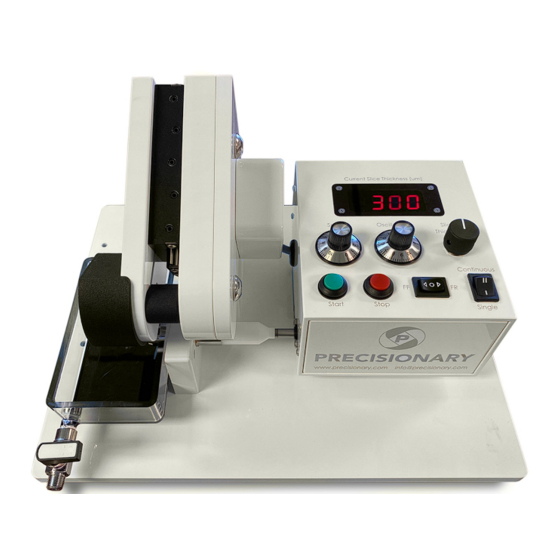
Page 6: Model Components
Model Components... - Page 7 Figure Number Compresstome Part Part Number Function Vibration Head Blade oscillation assembly, which includes a blade holder and an oscillation motor Blade Holder VF-BH-VM-MGNT Holds and stabilizes the cutting blade Buffer Tray VF-BT-510 Holds buffer or solutions during sectioning Buffer Tray Valve VF-BT-PL-BOS On/off knob to keep solution in buffer tray...
-
Page 8: Control Box Anatomy
Control Box Anatomy Figure Number Control Box Part Name Control Box Function Slice Thickness Display Displays the slice thickness your VF-510-0Z will cut slices to (in µm) Knob that controls Oscillation setting Control the oscillation frequency of the blade holder as it cuts Knob that controls Speed setting Controls how fast the vibration head travels on its cutting track... -
Page 9: Accessories
Accessories Figure Number Compresstome Part Part Number Function Rapidly chills agarose in VF-VM-CB-15.5-BOS Chilling Block specimen tube for VF-VM-CB-20-BOS sectioning Specimen Tube: Where tissue sample is Plastic Plunger glued onto VF-SPS-VM-15.5-BOS Outer metal tube that the plastic plunger moves Specimen Tube: VF-SPS-VM-20-BOS through for the sample Metal Tube... -
Page 10: Starter Kit Components
Starter Kit Components Note: All of our Compresstome ® consumables can be ordered online at: https://precisionary.com/e-store/ Contact us directly at info@precisionary.com and we will send you a quote. Consumable Part Number Quantity Description Agarose Tablets VF-AGT-VM-10 Low melting agarose for embedding tissue. -
Page 11: Part 2: Setup
Part 2: Setup IMPORTANT! Transportation Fixture Removal Please remove the transportation fixture before your first-time use. This fixture will need to be securely mounted back to the machine before any future shipment. Before using the Compresstome ® slicer, you MUST remove the thumbscrew that holds the “transportation fixture”... -
Page 12: Mounting The Cutting Blade To The Blade Holder
Mounting the Cutting Blade to the Blade Holder Double-edged razor blades, ceramic blades, and tungsten carbide blades are ideal for this vibrating microtome. The Compresstome ® Starter Kit includes either 10 double-edged ® razor blades or two ceramic blades to get you up and running with your Compresstome purchase. - Page 13 How to Properly Cut the Double-Edged Blades Step # Instruction Picture Carefully cut the double-edged blades horizontally: Curled edges after the blades are cut in half Two separate blades will form: Curled edges after the blades are cut in half After the stainless-steel blades are cut in half, trim the extra tabs (curled edges) on the ends of the blades so they don’t stick out beyond the blade (pictured in step #2).
- Page 14 How to Properly Mount the Cutting Blade to the Blade Holder via Glue To remove the blade holder from the vibrating head unit, loosen the small screw on top of the blade holder with the included Allen wrench. Always remove the blade holder BEFORE removing or inserting the buffer tray. Slide the blade holder off the axial bar. Remove the old cutting blade.
- Page 15 Soak the blade holder in the acetone bath for 5 minutes. Wipe off any residual glue on the blade holder using a paper towel. It is critical to ensure all glue residue removed before attaching a new blade. DISCLAIMER: Please only use acetone to clean the blade holder and specimen tube.
- Page 16 Position the cutting blade on the blade holder. The edge of the blade should touch the raised lip of the blade holder (see step #7a). Make sure the exposed surfaces of the blade are clean to prevent damage to tissue. Press firmly, then allow the glue to dry for one (1) minute before use.
- Page 17 You do NOT want your cutting blade to be mounted like this: On the left side, the trimmed, curled edge is on the raised lip of the blade holder and the blade is off-centered. On the right side, you can see how the blade is off-centered.
-
Page 18: Mounting The Cutting Blade To The Magnetic Blade Holder
Mounting the Cutting Blade to the Magnetic Blade Holder The magnetic blade holder can be used without glue to adhere the stainless-steel blades only. The below directions explain how to attach the stainless-steel blades to the magnetic blade holder. While the magnetic blade holder can still hold ceramic and tungsten carbide blades, these blades will need to be applied via glue in the above steps on pages 13-15, they are not magnetic. To clean the magnetic blade holder, soak in liquid overnight and dry & clean right after use. Step Instruction Photo The magnetic blade holder will have visible magnets along the outer side (left photo) of the holder. Locate the inner side of the blade holder (right photo), with the raised lip along the top edge, as this is the side of the blade holder the blade will be applied to. Carefully remove and cut one of the double-edged stainless-steel blades for your experiment (see page 12), and prepare to position the blade on top of the flat side of the blade holder. Carefully place the blade on the blade holder so that the top edge of the blade touches the bottom edge of the raised blade holder lip. Carefully slide the blade towards the right from the edge hanging off the blade holder to center the blade along the magnets. Once your blade is centered and aligned, you are ready to use your new magnetic blade holder! -
Page 19: Attaching The Gooseneck Lamp To The Compresstome
Attaching the Gooseneck Lamp to the Compresstome® Step Instruction Picture To attach the Gooseneck Lamp, you will first need to attach the Magnet “Puck” and thumbscrew onto the base of your Compresstome model. The photo on the top shows the two pieces separately, and the photo on the bottom shows the two components as one (i.e. - Page 20 Now, gently lay the Compresstome upright, and you are now ready to attach your Gooseneck Lamp to your Compresstome! You can see from the two photos that the magnet “puck” rests on the top of the Compresstome base, and the thumbscrew holds the magnet in place from the underside of the base of the Compresstome, as shown in the second...
-
Page 21: Preparing Agarose For Embedding
Preparing Agarose for Embedding ® All tissue specimens must be embedded in agarose for the Compresstome to perform as designed. We recommend using our type-Ib agarose tablets. However, for larger quantities, type-Ib agarose powder can be purchased through Sigma Aldrich at: http://www.sigmaaldrich.com/catalog/product/sial/a0576?lang=en®ion=US Please see Table 1 below for using our 0.5 g agarose tablets. - Page 22 Step # Instruction Picture Each tablet contains 0.5 g of low-melting point agarose. We recommend adding 20-25 mL of solution to each vial containing 1 agarose tablet. For alternative gel strengths, please see Table 1 on page 20 for the appropriate solution volume.
-
Page 23: Cutting Parameters Guideline
Cutting Parameters Guideline Compresstome® Cutting Parameters Tissue or Specimen Advance Oscillation Suggested (Speed) Agarose % Lung: • Precision-cut lung slices Any fixed tissues 1.5-2 Brain: live 1.5-2 1.8-2% • Electrophysiology • imaging Organotypic slices: Tumor research Brain culture slices Retina (fixed and acute slices) 1.5-2 2.5% * Infuse with agarose or gelatin to replace vitreous humor Kidney (acute slices) 2.5% Liver (acute slices) 2.5% Cardiac (fixed and acute slices) 1.5-2 2.5% * Infuse with agarose or gelatin... -
Page 24: Embedding Tissue In Agarose
Embedding Tissue in Agarose Place the chilling block into water and ice bath or a freezer to cool for at least 1 hour. The chilling block must be chilled pre-embedding your tissue sample. Prepare your tissue sample by cutting it so that the tissue fits inside the specimen tube. - Page 25 Pipette agarose fully cover specimen. Make sure no bubbles remain around the sample. Tap the side of the tube to remove any that are present. Suctioning the bubbles out with the pipette can also help remove them. Place the chilling block (should be pre- chilled, see step 1) over the specimen tube to chill the entire sample and help the agarose solidify.
-
Page 26: Part 3: Operation
Part 3: Operation Sectioning with the Compresstome® Tissue Slicer Exercise caution if using fixatives and always remember to wear gloves and safety goggles while operating the Compresstome®. The Compresstome® tissue slicer is intended for indoor use only, 5˚ C to 40˚... - Page 27 Make sure the micrometer is touching the back of your specimen tube before you begin sectioning. You can use the ‘Fast Forward’ and ‘Fast Reverse’ functions on the control box to move the micrometer forward or backwards. Slide the prepared blade holder onto the axial bar of the vibrating unit, and lock in place with the included Allen key.
-
Page 28: Part 4: General Information
Part 4: General Information General Cleaning and Maintenance The Compresstome® should be disconnected from the power source before preforming any maintenance or servicing operations. Exercise caution when dealing with flammable substances and always remember to wear gloves and safety goggles while operating and cleaning the Compresstome®. - Page 29 If using the ball valve, please refer to these photos (2b + 2c) for opening and closing the ball valve. In this photo, the buffer tray valve is closed: In this photo, the buffer tray valve is open: Open the buffer tray valve for removing the buffer solution and cleaning the buffer tray.
- Page 30 Remove the plunger from the metal casing. Use the plastic cleanup razor to scrape residual glue from the front end of the plunger. Clean up any debris on the plunger and inside of the specimen tube with acetone swabs or soft brush. DISCLAIMER: Please only use acetone to clean the blade holder...
-
Page 31: Buffer Tray Maintenance And Cleaning
Buffer Tray Maintenance and Cleaning Step Instruction Picture Unscrew buffer tray assembly. Slide tray off unit. Make sure the blade holder is ALREADY removed before removing the buffer tray from the machine. Clean with rubbing alcohol. DISCLAIMER: Do not use acetone as it may damage the materials. -
Page 32: Auto Zero-Z® Technology
Auto Zero-Z® Technology ® Auto Zero-Z is our latest breakthrough technology at Precisionary Instruments. This is a patented feature designed to allow the blade holder to operate in near zero Z-axis deflection without the need to optically align every single time. -
Page 33: Troubleshooting
Troubleshooting v Avoid trapping any air bubbles in the agarose during embedding. v The blade holder is a pre-aligned, delicate part. Glue residue on either side of the blade holder will deteriorate slice quality. v Do not bubble artificial cerebrospinal fluid (ACSF) or other buffer solutions during slicing to avoid contaminating and damaging the linear bearing of the vibration head. - Page 34 Is agarose safe to use for live tissue? For fixed tissue? • Absolutely! Agarose is a soft embedding medium that is safe to use for embedding both live and fixed tissues. We have diligently performed experiments in the lab to test the effects of agarose on both live and fixed tissue.
-
Page 35: Warranty Information
Precisionary Instruments first causes the warranty to be voided. In this case, the customer is responsible for all shipping and repair costs as the warranty is voided due to customer tampering in an attempt to repair the Compresstome®...
Need help?
Do you have a question about the Compresstome VF-510-0Z and is the answer not in the manual?
Questions and answers