Advertisement
- 1 CORRECT USE
- 2 TECHNICAL DATA
- 3 SAFETY INSTRUCTIONS
- 4 OVERVIEW
- 5 COMMISSIONING
- 6 LIGHT OF LCD DISPLAY
- 7 AUTOMATIC SETTING OF TIME OF DAY AND DAY OF WEEK
- 8 MANUAL SETTING OF TIME OF DAY AND DAY OF WEEK
- 9 CHECKING AND SETTING OF PROGRAMS
- 10 EXAMPLE FOR SETTING A DAILY PROGRAM
- 11 EXAMPLE FOR SETTING A WEEKLY PROGRAM
- 12 HOW TO DISABLE PROGRAMS
- 13 COUNTDOWN FUNCTION
- 14 MANUAL SWITCHING
- 15 AUTOMATIC RETURN TO TIME DISPLAY
- 16 SUMMER / WINTER TIME
- 17 UNUSUAL DISPLAY / NO DISPLAY
- 18 Documents / Resources
CORRECT USE
Our product is intended for automatic switching of lights and electric devices in dry rooms, and is only for interior use.
![]() Conforms to corresponding European directives.
Conforms to corresponding European directives.
TECHNICAL DATA
- Voltage: 230V∼, 50Hz
- Switching capacity: max. 3680W, 16A, ind. 690VA, 3A
- Operating temperature: 0°C to + 35°C
Settings:
- 4 program options per day or week; due to block formation (e.g. MO - FR, etc.) up to 28 switch operations are possible
- Minimum switching period 1 minute
- Countdown function (connected device is switched on or off when set time expires)
- Reserve in case of power failure
- Blue LCD display with blue backlight (can be switched off)
- Automatic summer time change
- Child-safe
SAFETY INSTRUCTIONS
 Only a proper mains socket (230V∼, 50Hz, with protective earth) from the public supply network may be used.
 Do not operate any equipment which could cause danger to life and limb if operated without supervision.
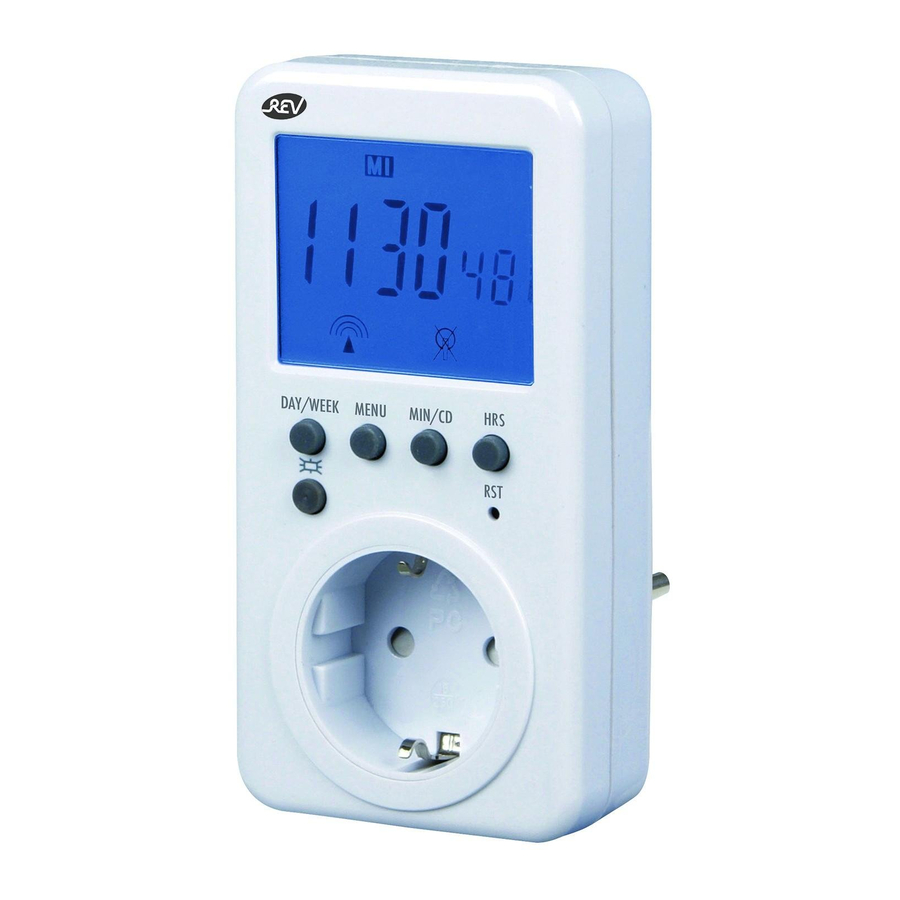
OVERVIEW

DAY/WEEK
- Setting of daily and weekly combinations in setting mode
- Manual switch ( (On-Automatic- Off) in time mode
- Deleting programs
MENU
- Accessing time, programs and countdown function
MIN/CD
- Setting minutes in setting mode
- Starting countdown program in time mode
HRS
- Setting hours in setting mode
- Switching from 24 to 12 hour mode (press once)
- Activating manual time setting (keep pressed for about 2 seconds)
RST
- Deleting time; radio reception is automatically activated
![]() On and off switch for blue display light
On and off switch for blue display light
Remove the timer from the socket and press RST using a thin, electrically non-conductive object.
COMMISSIONING
- Plug timer into a 230V∼ socket. The battery requires only approx. 6 hours charging time. If timer is not used for an extended period, it should be connected at least once a month for at least two hours to maintain battery capacity.
- If there is no display, press the RST key.
- The timer is now ready to be set.
LIGHT OF LCD DISPLAY
If timer is plugged into a live Schuko socket, the blue backlight of the LCD display can be switched on or off by pressing the  key.
key.
AUTOMATIC SETTING OF TIME OF DAY AND DAY OF WEEK
Day of week and time of day are usually set automatically. The reception of the DCF radio signal is indicated by symbol ![]() flashing on the display. The DCF radio signal is received once per night and used to update the time. Press RST key (see unusual display/no display) to activate radio reception of timer at any time. The display shows dashes and symbol
flashing on the display. The DCF radio signal is received once per night and used to update the time. Press RST key (see unusual display/no display) to activate radio reception of timer at any time. The display shows dashes and symbol ![]() is flashing. After about 2 to 10 minutes, the day of week and time are automatically displayed, symbol
is flashing. After about 2 to 10 minutes, the day of week and time are automatically displayed, symbol ![]() disappears. If there is no display, the DCF radio signal has not been received. Fig. [2]
disappears. If there is no display, the DCF radio signal has not been received. Fig. [2]
Please check the following possibilities:
- Test reception at another location
- Keep at least 1 m distance to electronic devices (e.g. computer, video, TV, etc.)
- Check reception at window.
- If reception is not possible, the DCF radio signal is shielded too much by buildings and mountains. Set timer manually!
![]()

MANUAL SETTING OF TIME OF DAY AND DAY OF WEEK
- Press HRS key for about 2 seconds; the message on the display starts to flash.
- Use DAY/WEEK key to set day of week,
- Use MIN/CD key to set minutes
- Use STD/HRS key to set hours.
- Confirm with MENU key. The display message stops flashing.
- For rapid sequence, press and hold the keys.
CHECKING AND SETTING OF PROGRAMS
- The timer can be set for daily or weekly programs.
- Up to 4 programs are possible.
- To open the individual programs, access program with MENU key:
Program 1 ![]() — Program 1
— Program 1 ![]()
Program 2 ![]() — Program 2
— Program 2 ![]()
. . .
Program 4 ![]() — Program 4
— Program 4 ![]()
- For rapid sequence, press and hold MENU key.
- You can select daily or weekly combinations:
MO = Monday, TU = Tuesday, WED = Wednesday, TH = Thursday, FR = Friday, SA = Saturday, SU = Sunday or for combinations:
MO – WE – FR
TU – TH – SA
MO – TU – WE
TH – FR – SA
MO – TU – WE – TH – FR
MO – TU – WE – TH – FR – SA
MO – TU – WE – TH – FR – SA – SU
EXAMPLE FOR SETTING A DAILY PROGRAM
- MO 8.15 On — MO 15.45 Off
- Use MENU key to access program 1
![]() .
. - Use DAY/WEEK key to select day (e.g. MO)
- Use MIN/CD key to select minutes (e.g. 15)
- Use HRS key to select hours (e.g. 8) Fig. [3]
![]()
- Use MENU key to access program 1
![]()
- Use DAY/WEEK key to select day (e.g. MO)
- Use MIN/CD key to select minutes (e.g. 45)
- Use HRS key to select hours (e.g. 15) Fig. [4]
![]()


The timer will only switch on and off on Monday.
EXAMPLE FOR SETTING A WEEKLY PROGRAM
- MO - Fr 8.15 On — 15.45 Off
- Use MENU key to access program 1
![]() .
. - Use DAY/WEEK key to select day (MO TU WE TH FR)
- Use MIN/CD key to select minutes (e.g. 15)
- Use HRS key to select hours (e.g. 8) Fig. [5]
![]()
- Use MENU key to access program 1
![]() .
. - Use DAY/WEEK key to select day (MO TU WE TH FR)
- Use MIN/CD key to select minutes (e.g. 45)
- Use HRS key to select hours (e.g. 15) Fig. [6]
![]()


Every day, from Monday through Friday, the timer switches on and off at the same time.

To ensure that programming is activated, ![]() must appear in time mode. Press DAY/WEEK key in time mode to access
must appear in time mode. Press DAY/WEEK key in time mode to access ![]() (see Manual Switching).
(see Manual Switching).
HOW TO DISABLE PROGRAMS
Use MENU key to access program to be disabled. Press and hold DAY/WEEK key until dashes appear. Please note that programs 
 must be deleted individually. Fig. [7]

COUNTDOWN FUNCTION
The connected device can be switched off after expiration of the set time.
- In time mode, use MENU key to access program CD.
- Use MIN/CD key to set minutes; use HRS key to set hours
- Use MENU key to return to time.
- In time mode, press MIN/CD key; countdown is started and display shows countdown time. After expiration of countdown, the connected load will be switched off.
- Press MIN/CD key to cancel countdown. The programmed time is maintained.
- Use MENU key to return to time mode. When countdown is activated, CD flashes in display. Fig. [8]
![]()

To ensure that CD program is activated, ![]() must appear in time mode. Press DAY/WEEK key in time mode to access
must appear in time mode. Press DAY/WEEK key in time mode to access ![]() (see Manual Switching).
(see Manual Switching).
MANUAL SWITCHING
Press DAY/WEEK key in time mode to switch as follows:
Connected load is always switched on
Connected load is in program mode and switches on and off at programmed time.
 Connected load is always switched off

AUTOMATIC RETURN TO TIME DISPLAY
If timer shows program mode and more than 10 seconds have expired since key was last operated, the display automatically returns to the time display.
SUMMER / WINTER TIME
The change from summer to winter time takes place automatically via the radio signal. If signal is not received, time can be set as described under MANUAL SETTING of time of day or by pressing RST key.
UNUSUAL DISPLAY / NO DISPLAY
If timer shows no display or incomplete display, press RST key for 2 seconds. Radio reception is activated.
REV Ritter GmbH • Frankenstr. 1-4
D-63776 Mömbris • E-mail: service@rev.biz
Telefon +491805007359 • Telefax +491805007410

Documents / ResourcesDownload manual
Here you can download full pdf version of manual, it may contain additional safety instructions, warranty information, FCC rules, etc.
Advertisement


Need help?
Do you have a question about the 25510 and is the answer not in the manual?
Questions and answers