Advertisement
- 1 Intended use
- 2 Features
- 3 Delivery contents
- 4 Safety instructions
- 5 Operating elements
- 6 Display
- 7 Battery installation
- 8 Operation
- 9 Distance to spot ratio (D/S)
- 10 Dual targeting lasers
- 11 Measuring unit adjustment (ºC/ ºF)
- 12 Backlight
- 13 Field verifi cation of accuracy
- 14 Configuration
- 15 Emissivity (EMS) adjustment
- 16 Lock on/off (LOCK)
- 17 High Alarm (HAL)
- 18 Low Alarm (LAL)
- 19 Maintenance
- 20 Disposal
- 21 Technical data
- 22 Documents / Resources
Intended use
The device serves for non-contact temperature measurement. It determines the temperature by the amount of infrared energy emitted by the object and its emissivity. It is especially useful for temperature measurement of hot, hard to reach or moving targets.
The thermometer measures the surface temperature of an object. It cannot measure through transparent surfaces such as glass and plastic. Its temperature measuring range is from -50ºC to 800ºC. It is powered by a 9V block battery.
This product fulfi ls European and national requirements related to electromagnetic compatibility (EMC). CE conformity has been verifi ed and the relevant statements and documents have been deposited at the manufacturer.
Any usage other than described above is not permitted and can damage the product and lead to associated risks such as short-circuit, fi re, electric shock, etc. Please read the operating instructions thoroughly and keep them for further reference.
Features
- Dual laser targeting
- Capture maximum temperature during measurement
- Integrated high and low temperature alarms
- Adjustable emissivity, from 0.10 to 0.99
- Background illumination for operation in poorly lit area
Delivery contents
- Infrared thermometer IR-380
- Carrying bag
- 9V block battery
- Operating instructions
Safety instructions

We do not assume liability for resulting damages to property or personal injury if the product has been abused in any way or damaged by improper use or failure to observe these operating instructions. The warranty will then expire!
An exclamation mark in a triangle indicates important information in the operating instructions. Carefully read the whole operating instructions before operating the device, otherwise there is risk of danger.
- Unauthorised conversion and/or modifi cation of the product are inadmissible because of safety and approval reasons (CE).
- The product must not be subjected to heavy mechanical stress or intense vibration.
- The product must not be exposed to electromagnetic fi elds, extreme temperatures, direct sunlight or dampness.
- The device must not be exposed to humidity or liquids. It must be used under appropriate weather conditions only or with appropriate protection in case of outdoor use.
- Steam, dust, smoke and/or vapours can prevent accurate measurement by obstructing the thermometer's optics.
- Laser beam must not be stared into or viewed directly with optical instruments.
- Laser beam must not be pointed on mirrors or other refl ecting areas.
- Laser beam must not be directed at other people or animals or into public areas. Laser radiation may lead to eye or skin injuries.
- This product is equipped with a class 2 laser according to EN 60825-1:1994+A1:2002+ A2:2001.

LASER RADIATION-DO NOT
STARE INTO THE BEAM
CLASS 2 LASER PRODUCT
WAVELENGTH: 630-670nm OUTPUT:<1mW
EN 60825-1:1994 + A1: 2002 + A2: 2001
Operating the product or alternating its setting others than described herein could lead to hazardous radiation exposure.
- The product should not be connected immediately after it has been brought from an area of cold temperature to an area of warm temperature. Condensed water might destroy the product. Wait until the product stabilises to adapt to the new ambient temperature before use.
- If there is reason to believe that safe operation is no longer possible, put the device out of operation and secure it against unintended operation. Safe operation is no longer possible if:
- the product shows visible damages,
- the product no longer works and
- the product was stored under unfavourable conditions for a long period of time,
- the product was subject to considerable transport stress.
- The product is not a toy and should be kept out of reach of children and pets!
- On commercial premises, the accident prevention regulations of the Association of Industrial Professional Associations with respect to electrical systems and operating equipment must be observed.
- In schools, training centres, Hobby and DIY workshops, the handling of measuring appliances must be responsibly supervised by trained personnel.
- Servicing, adjustment or repair works must only be carried out by a specialist/ specialist workshop.
- If you have queries about handling the measuring device, that are not answered in this operating instruction, our technical support is available under the following address and telephone number: Voltcraft ®, 92242 Hirschau, Lindenweg 15, phone 0180 / 586 582 723 8
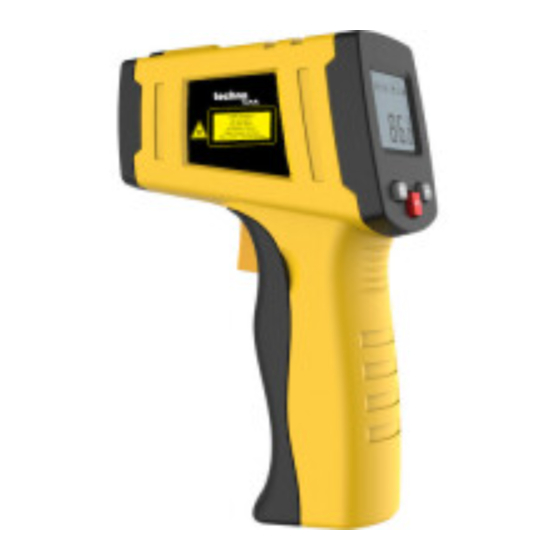
Operating elements

- Display
- "
![]() " button
" button - "
![]() " button
" button - "MODE" button
- Battery compartment
- Trigger
- ºC/ ºF slide switch
- Battery terminal
- Infrared sensor opening
- Laser apertures
 " button
 " button
Display

- "SCAN", measurement indicator
- "HOLD", Data hold indicator
- Laser symbol
- Lock indicator
- High alarm indicator
- Low alarm indicator
- Measuring unit (ºC/ ºF)
- Low battery symbol
- Emissivity
- Emissivity symbol
- Maximum temperature
- Measured temperature
Battery installation
Observe correct polarity while inserting the batteries. Remove the batteries if the device is not used for a long period of time to avoid damage through leaking. Leaking or damaged batteries might cause acid burns when contact with skin, therefore use suitable protective gloves to handle corrupted batteries.
Keep batteries out of reach of children. Do not leave the battery lying around, as there is risk, which children or pets could swallow it.
Make sure that batteries are not dismantled, short-circuited or thrown into fi re. Never recharge non-rechargeable batteries. There is a risk of explosion!
Replace the battery when the low battery symbol,  , appears.
- Open the battery compartment (5).
- Insert one 9V block battery to the battery terminal (8). The 9V block battery is designed to be connected in one orientation only to avoid wrong polarity. Do not insert the battery by force.
- Close the battery compartment (5).
Operation
- Point the opening (9) of the thermometer towards the target. For accurate temperature measurement aim the thermometer perpendicular to the target.
- To measure the temperature of a stationary or fi xed surface, aim the sensor at the starting point and move it across the surface.
- To take a temperature scan of a moving surface, aim the sensor at a fi xed point and measure the temperature as the target moves past, or continually scan across the target as it moves past.
- Hold the trigger (6) to initiate the measurement. "SCAN" appears on the display (1).
- The measured temperature will be shown on the display (1).
- Upon releasing the trigger (6), the measured value will be held for 7 seconds. "HOLD" appears on the display (1).
The thermometer is switched off after 7 seconds unless the thermometer is locked.
To locate the hot or cold spot
- Aim the thermometer outside the target.
- Scan across the target with up and down motion.

The thermometer is not recommended for use in measuring refl ective surfaces such as stainless steel and/or aluminium wrapping. The temperature of a refl ective object may be measured if the surface is coated with a matt material.
The thermometer needs to adjust to the ambient temperature in order to produce correct readings.
Distance to spot ratio (D/S)
The target should be larger than the thermometer's measurement spot size to achieve precise measurement.
The temperature recorded is the average temperature of the spot.
The smaller the target is, the shorter the distance is between the thermometer and the target.
")
Dual targeting lasers
For determining the measuring area easily, dual targeting lasers for aiming are integrated. The two laser spots converge to a single spot when at a distance of 260 mm from the target. From then onward, they indicate the true diameter of the measurement spot.
For precise measurement, it is recommended to keep the measuring distance at 260 mm whenever possible.
Press the " " button (2) to activate/ deactivate the dual targeting lasers. The "
 " symbol appears on the display to indicate that the targeting laser is activated.
The lasers are turned on when the trigger is pulled and turned off when the trigger is released.
Measuring unit adjustment (ºC/ ºF)
Locate the "ºC/ ºF" slide switch (7) inside the battery compartment. Set the switch position to "ºC" or "ºF" to set the measuring unit.
Backlight
Press " " button (3) to activate the display backlight when measuring in dark environment.
Field verifi cation of accuracy
The thermometer is calibrated, but its accuracy can be verifi ed in the fi eld by using the following procedure.
- Prepare an aluminium container such as beverage can.
- Paint the container with matt black spray paint or apply matt black adhesive material to the outer surface.
- Fill the aluminium container with refrigerated water, insert a standard thermometer and allow the can and standard thermometer to come to equilibrium.
- Take a reading with the thermometer. Do not exceed the spot size of the IR thermometer.
- Compare the temperature reading of the IR thermometer with the standard thermometer.
- Repeat this procedure using hot water.
Configuration

- Press the "MODE" button (4) to advance through the selection sequence as shown in above diagram.
- Press the "
![]() " button (2) or "
" button (2) or "![]() " button (3) to adjust the value of the selected setting.
" button (3) to adjust the value of the selected setting. - Press the trigger to save the adjustment and exit the configuration mode.
Emissivity (EMS) adjustment
The emissivity depends on the material and its surface characteristics. Most organic materials or oxidized surfaces have an emissivity of approx. 0.95, which is the default value of this thermometer. However, metallic surfaces or shiny objects have a lower emissivity. To compensate this, the thermometer integrates an emissivity adjustment function for accurate measurement.
- Press the "MODE" button (4) until the " =" symbol fl ashes to select emissivity adjustment.
- Press the "
![]() " button (2) or "
" button (2) or "![]() " button (3) to adjust the emissivity, from 0.10 to 0.99. For reference emissivity value, please refer to "Surface emissivity" table in the "Technical data".
" button (3) to adjust the emissivity, from 0.10 to 0.99. For reference emissivity value, please refer to "Surface emissivity" table in the "Technical data". - Pull the trigger to save the adjustment and exit the configuration mode or press the "MODE" button (4) to advance to the next setting.
Lock on/off (LOCK)
The lock feature sets the thermometer to continuous measurement.
- Press the "MODE" button (4) until the "
![]() " symbol fl ashes to select lock function.
" symbol fl ashes to select lock function. - Press the "
![]() " button (2) or "
" button (2) or "![]() " button (3) to turn on/off the lock function. ("ON" = on; "OFF" = off)
" button (3) to turn on/off the lock function. ("ON" = on; "OFF" = off) - Pull the trigger to save the adjustment and exit the configuration mode or press the "MODE" button (4) to advance to the next setting.
- When the lock is on, the "
![]() " symbol appears. The thermometer will measure continuously without the trigger being held.
" symbol appears. The thermometer will measure continuously without the trigger being held. - Pull the trigger to turn off the lock function.
 " symbol fl ashes to select lock function.
High Alarm (HAL)
- Press the "MODE" button (4) until the "
![]() " symbol flashes to select the high alarm function.
" symbol flashes to select the high alarm function. - Press the "
![]() " button (2) or "
" button (2) or "![]() " button (3) to turn on/off the high alarm function. ("ON" = on; "OFF" = off)
" button (3) to turn on/off the high alarm function. ("ON" = on; "OFF" = off) - Press the "MODE" button (4) to proceed to set the alarm value.
- Press the "
![]() " button (2) to increase or "
" button (2) to increase or "![]() " button (3) to decrease the alarm value within the range of -50.0ºC to 800.0ºC.
" button (3) to decrease the alarm value within the range of -50.0ºC to 800.0ºC. - Pull the trigger to save the adjustment and exit the configuration mode or "MODE" button (4) to advance to the next setting.
- The "
![]() " symbol appears to indicate that the high alarm is activated.
" symbol appears to indicate that the high alarm is activated.
An audible alarm will be generated if the measured value is above the temperature set in the high alarm (HAL).
 " symbol flashes to select the high alarm function.
Low Alarm (LAL)
- Press the "MODE" button (4) until the "
![]() " symbol fl ashes to select the low alarm function.
" symbol fl ashes to select the low alarm function. - Press the "
![]() " button (2) or "
" button (2) or "![]() " button (3) to turn on/off the low alarm function. ("ON" = on; "OFF" = off)
" button (3) to turn on/off the low alarm function. ("ON" = on; "OFF" = off) - Press the "MODE" button (4) to proceed to set the alarm value.
- Press the "
![]() " button (2) to increase or "
" button (2) to increase or "![]() " button (3) to decrease the alarm value within the range of -50.0ºC to 800.0ºC.
" button (3) to decrease the alarm value within the range of -50.0ºC to 800.0ºC. - Pull the trigger to save the adjustment and exit the configuration mode or "MODE" button (4) to advance to the next setting.
- The "
![]() " symbol appears to indicate that the low alarm is activated.
" symbol appears to indicate that the low alarm is activated.
An audible alarm will be generated if the measured value is below the temperature set in the high alarm (LAL).
 " symbol fl ashes to select the low alarm function.
Maintenance
Lens Cleaning:
Blow off loose particles using clean compressed air and then brush the remaining debris away with a fi ne lens brush.
Wipe the surface with a lens cleaning cloth or a clean, soft, lint-free cloth. In the case of fi ngerprints or any other grease formation, the cloth may be moistened with water or lens cleaning fl uid.
Do not use acid, alcohol, or other solvents or harsh, linty cloth to clean the lens. Avoid excessive cleaning and excessive pressure.
Cleaning the exterior:
To clean the exterior housing, use soap and water or a mild commercial cleaner. Do not use abrasive or solvents!
Disposal

Dispose of waste electrical and electronic equipment
In order to preserve, protect and improve the quality of environment, protect human health and utilise natural resources prudently and rationally, the user should return unserviceable product to relevant facilities in accordance with statutory regulations.
The crossed-out wheeled bin indicates the product needs to be disposed separately and not as municipal waste.

Used batteries/ rechargeable batteries disposal
The user is legally obliged (battery regulation) to return used batteries and rechargeable batteries. Disposing used batteries in the household waste is prohibited! Batteries/ rechargeable batteries containing hazardous substances are marked with the crossed-out wheeled bin. The symbol indicates that the product is forbidden to be disposed via the domestic refuse. The chemical symbols for the respective hazardous substances are Cd = Cadmium, Hg = Mercury, Pb = Lead.
You can return used batteries/ rechargeable batteries free of charge to any collecting point of your local authority, our stores or where batteries/ rechargeable batteries are sold.
Consequently you comply with your legal obligations and contribute to environmental protection!
Technical data
| Operating Voltage: | 9V | |
| Current consumption: | max. 5.5mA | |
| Measuring temperature range: | -50ºC to 800ºC (-58ºF to 1472ºF) | |
| Resolution: | 0.1ºC (0.1ºF) | |
| Accuracy: | ± 2.5ºC (4.5ºF) | -50ºC to 20ºC (-58ºF to 68ºF) |
| ± 1.0% ± 1.0 ºC (1.8ºF) | 20ºC to 300ºC (68ºF to 572ºF) | |
| ± 1.5% | 300ºC to 800ºC (572ºF to 1472ºF) | |
| Repeatability: | ± 1.3ºC (2.3ºF) | -50ºC to 20ºC (-58ºF to 68ºF) |
| ± 0.5% or ± 0.5ºC (0.9ºF) | 20ºC to 800ºC (68ºF to 1472ºF) | |
| Response time: | 150ms | |
| Spectral response: | 8 to 14 μm | |
| Distance-to-Spot ratio: | 20:1 | |
| Laser wavelength: | 630 - 670 nm | |
| Laser emission power: | <1mW | |
| Operating temperature: | 0ºC to 50ºC | |
| Operating humidity: | 10% to 90% relative humidity, non-condensing | |
| Storage temperature: | -10ºC to 60ºC | |
| Storage humidity: | <80% relative humidity, non-condensing | |
| Weight: | 163 g | |
| Dimensions (L x W x H): | 146 x 104 x 43 mm | |
Surface emissivity
| Measured surface | Emissivity |
| Asphalt | 0.90 to 0.98 |
| Brick | 0.93 to 0.96 |
| Cement | 0.96 |
| Ceramic | 0.90 to 0.94 |
| Charcoal (powder) | 0.96 |
| Chromium oxides | 0.81 |
| Cloth (black) | 0.98 |
| Concrete | 0.94 |
| Copper oxides | 0.78 |
| Glass | 0.90 to 0.95 |
| Human skin | 0.98 |
| Ice | 0.96 to 0.98 |
| Iron oxide | 0.78 to 0.82 |
| Lacquer | 0.80 to 0.95 |
| Lacquer (matt) | 0.97 |
| Lather | 0.75 to 0.80 |
| Marble | 0.94 |
| Mortar | 0.89 to 0.91 |
| Paper | 0.70 to 0.94 |
| Plaster | 0.80 to 0.90 |
| Plastic | 0.85 to 0.95 |
| Rubber (black) | 0.94 |
| Sand | 0.90 |
| Soil | 0.92 to 0.96 |
| Textiles | 0.90 |
| Water | 0.92 to 0.96 |
The emissivity values shown in the above table are approximate. Several parameters, e.g. geometry, surface quality, may affect the emissivity of an object.

Documents / ResourcesDownload manual
Here you can download full pdf version of manual, it may contain additional safety instructions, warranty information, FCC rules, etc.
Advertisement


Need help?
Do you have a question about the IR-380 and is the answer not in the manual?
Questions and answers