JBL ProFlora u201 - Aquarium Accessory Manual
- Quick start manual (6 pages)
Advertisement
JBL ProFlora u201
Easy-CO2 Fertilisation System
for tanks of 10 to 200 litres*
* at 4° dKH, from 10 to 100 l at 10° dKH
Instructions for Use
Why CO2 in the aquarium?
Aquatic plants essentially need three things for lush, healthy growth: Light, CO2 and mineral nutrients. CO2 is in short supply in an aquarium under normal conditions i.e. the concentration is approx. 2 mg/l or less. However, approx. 20 mg/l are required for successful, healthy plant growth. The JBL ProFlora u201 Easy-CO2 fertilisation system lets you raise the CO2 concentration in your tank, thereby ensuring magnificent plant growth. This also guarantees a healthy "tank climate" that lets all of your tank inhabitants feel comfortable: The oxygen content is brought to an optimum level by plants in a natural way. The pH is adjusted to a level of around 7, which is favourable for most of the organisms in an aquarium.
Safety Instructions
Always observe the following safety instructions when handling JBL ProFlora u95 disposable cylinders!
- Store out of reach of children!
- Only for use in an aquarium.
- The cylinder is pressurized; do not expose to temperatures over 50°C!
- Store in a well-ventilated place.
- Always use the cylinder in an upright position!
- Withdrawal only with the matching CO2 pressure regulator from the JBL ProFlora u201 Easy-CO2 fertilisation system!
- Do not open cylinder by force.
- Never loosen or remove the CO2 pressure regulator before the cylinder is completely empty!
- Only replace the cylinder with a new one if you are sure it is completely empty!
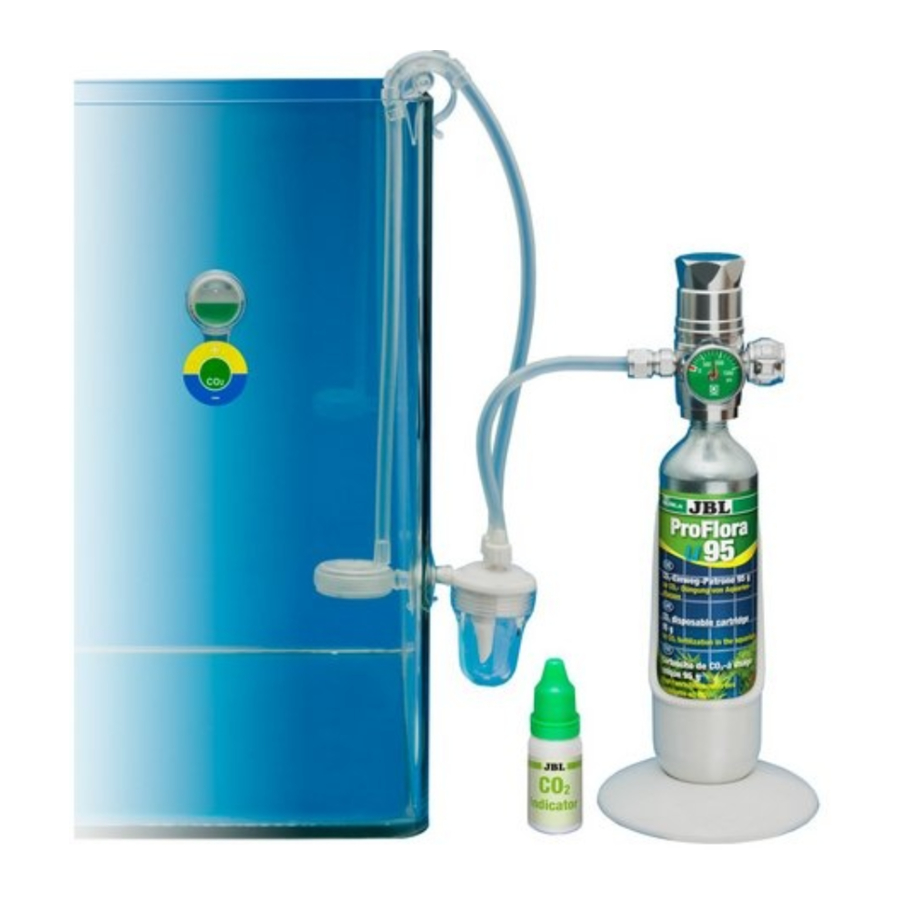
Parts and names / contents

- Stand
- JBL ProFlora u95 disposable CO2 cylinder
- Mini CO2 pressure regulator with a dispensing valve (3a) and pressure gauge (3b)
- Bubble counter with an integrated non-return valve
- CO2 hose and hose guide (5a)
- Diffuser with a ceramic membrane
- CO2 indicator (Permanent-Test)
- Colour disk for indicator
- Indicator solution
Setup
The illustration shows how to set up the JBL ProFlora u201 EasyCO2 fertilisation system.

- Connect the base plate to the upper part of the stand if you are setting the disposable CO2 cylinder up next to the tank. If the base plate is not used, the stand with the cylinder can be hung on the edge of the tank.
- Make sure that the dispensing valve (3a) on the mini CO2 pressure regulator (3) is turned shut (turn clockwise) and that the O-ring, thread and cannula are clean.
- Now screw the mini CO2 pressure regulator onto the disposable CO2 cylinder until you feel light resistance. The cannula has now reached the metal seal of the disposable CO2 cylinder. Keep on turning vigorously until the pressure regulator fits securely on the disposable CO2 cylinder. The pressure gauge (3b) on the CO2 pressure regulator now indicates a pressure of around 850 PSI, which corresponds to approx. 60 bar.
- You can now place the disposable CO2 cylinder in the stand. Ensure that the disposable CO2 cylinder is always upright and cannot be accidentally knocked over.
- Now connect the CO2 hose (5) to the diffuser (6) and insert the upper end of the hose through the hose guide (5a). Position the diffuser as deep in the tank as possible. Hang the hose guide on the edge of the tank as shown in the illustration.
- Unscrew the lid of the bubble counter (4) and fill it halfway with water. Screw the lid back on and mount the bubble counter on the outside of the tank with the enclosed suction cup. Connect the outlet of the bubble counter (arrow outwards) to the CO2 hose coming out of the tank.
- Connect the inlet side of the bubble counter (arrow inwards) to the CO2 connection (3c) of the pressure regulator with another piece of the CO2 hose. To do this, unscrew the union nut on the CO2 connection of the pressure regulator, push it over the hose end and connect the hose end to the connector on the pressure regulator. Now secure the hose end with the union nut on the pressure regulator.
- You may now carefully open the dispensing valve (3a) by turning anti-clockwise. It will take a short while for sufficient pressure to build up in the hose system and fine gas bubbles to exit from the diffuser and rise. Make sure not to add too much CO2 at the beginning. The bubble counter will help you when setting the dosage. Start with 1 – 2 bubbles per minute and per 10 litres of tank water.
- Now you can set up the CO2 indicator supplied with the kit (7, 8) which will help you find the right dosage for your aquarium:
The CO2 indicator enables you to permanently monitor the CO2 concentration in the tank.
The inspection glass made from scratch-resistant acrylic permits simple and accurate colour comparison.
The indicator casing can be turned in any direction, but the opening for the air cushion on the white cape should always be facing down.
Setup- Remove the white cap and add 15 drops of indicator fluid (9) into the transparent indicator.
- Replace the white cap on the indicator tank with the opening facing the suction cup.
- Move the indicator into a vertical position (with the suction cup down) and mount it in the aquarium at a place with ample water flow and as far away from the diffuser as possible. Make sure that the opening of the white cap forms an air cushion that separates the indicator fluid from the tank water. The level is indicated by diffusion.
- Position the round colour disk (8) over the suction cup so that it becomes invisible. The colour disk stays in place as a result of adhesion and can be removed and placed elsewhere any time.
- The colour disk shows three colours which the solution in the indicator window can take on: Yellow: CO2 too high; Green: CO2 correct; Blue: CO2 too low.
- Please note that the indicator solution takes approx. 2 – 3 hours to indicate the correct CO2 level.
- Replace the indicator solution every 3 – 4 weeks.
- At the beginning, keep the CO2 dosage at 1 – 2 bubbles per minute and 10 litres of tank water for one to two days. If the colour of the CO2 indicator is blue after this period, you can start increasing the dosage step by step. Increase in small amounts and always wait a day in between to give the indicator time to adjust the colour.
- If the indicator stays green permanently, you have found the correct dosage for your aquarium. If the colour of the indicator turns yellow, the CO2 concentration is too high and you should significantly reduce the dosage immediately, wait a day and then start increasing the dosage again step-wise.
- The amount of CO2 an aquarium requires depends on a number of factors: Water movement, amount of plants, light and carbonate hardness are the most important. We recommend a carbonate hardness of around 8° dKH. The carbonate hardness may also be lower, but not less than 4° dKH. This ensures adequate pH buffering.
Replacing disposable cylinders
The gas pressure in the disposable cylinder stays at the value of approx. 850 PSI mentioned at the beginning. The pressure only begins dropping when there is no more liquid CO2 in the cylinder i.e. the cylinder is empty when the pressure begins to drop.

The cylinder pressure is high when it is not completely empty! Make sure that the cylinder is empty before replacing it!
- When the pressure gauge (3b) on the mini CO2 pressure regulator indicates 0 and no more bubbles are rising in the bubble counter (4), the cylinder is empty and can be replaced.
- Open the union nut on the CO2 connection (3c) and pull the hose off. As a precaution, open the needle valve wide (anti-clockwise) to release any pressure that may still be in the cylinder.
- After you have made sure that there is no pressure left in the cylinder, you can unscrew the mini CO2 pressure regulator off the cylinder.
- Connect a new cylinder as described under "Setup". Only use the original JBL disposable cylinders, JBL ProFlora u95 (1x 95 g) or JBL ProFlora u95 Set (3 x 95 g).
JBL GmbH & Co. KG
Dieselstr. 3
67141 Neuhofen, Germany

Documents / ResourcesDownload manual
Here you can download full pdf version of manual, it may contain additional safety instructions, warranty information, FCC rules, etc.
Advertisement


Need help?
Do you have a question about the ProFlora u201 and is the answer not in the manual?
Questions and answers