Advertisement
* Herramientas
NO incluidas/
15
Tools not
Utilizar una broca
included
de 5/16" para hacer
las perforaciones
Use a 5/16" drill bit
PARED/WALL
8,19"
18,89"
20,8
48
Altura definida por el cliente y tamaño de TV/
X
Height defined by the customer and TV size
X
Altura definida por el cliente/
Height defined by the customer
Al finalizar el ajuste, cubra
las cajas con las tapas
adhesivas/ After tightening all
the panels, cover the minifix
cams with the adhesive caps.
en el muro/
Chazo Plástico +
to drill the wall.
Tornillo de Ensamble 2" 1/2/
Plastic Wall Anchor +
Drywall Screw
18,89"
8,19"
48
20,8
A
B
* Centímetros / Inches
Al terminar de armar, desprenda
los adhesivos (en caso de que
queden residuos de pegamento,
limpie la superficie con alcohol) /
After finishing the assembly, take off
the adhesives. (In case of glue
residues, wipe them with alcohol)
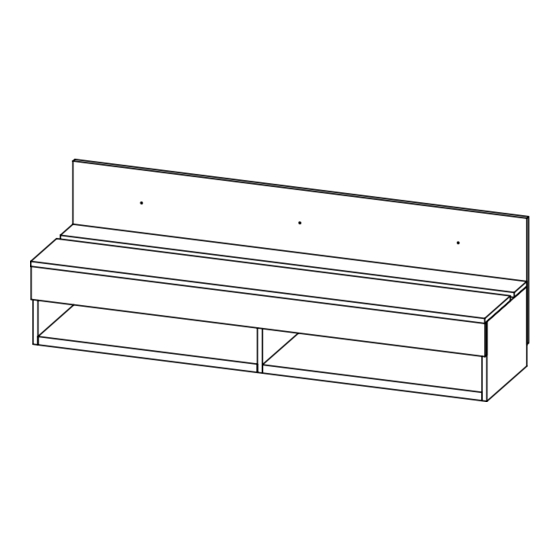
INSTRUCCIONES DE ENSAMBLE
Alto/
Height:
134,6 cm /
52,99 in
Ancho/
Width:
137,7 cm /
54,21 in
Fondo/
Depth:
35,2 cm /
13,86 in
LOTE No:
By:
TEL (572) 691 17 00
PBX (572) 695 91 81
CALI - COLOMBIA
www.rta.com.co
ASSEMBLY INSTRUCTIONS
REF./SKU. PMP3818
PANEL TV
WALL 2A
/Wall 2A Tv panel
Advertisement
Table of Contents

Related Manuals for RTA PMP3818


Summary of Contents for RTA PMP3818
- Page 1 13,86 in Altura definida por el cliente/ Height defined by the customer LOTE No: * Centímetros / Inches REF./SKU. PMP3818 Al terminar de armar, desprenda los adhesivos (en caso de que Al finalizar el ajuste, cubra queden residuos de pegamento,...
- Page 2 / Clean with a dry cloth. Do not drag thefurniture. Lift it between two people. HERRAJES BÁSICOS PARA MUEBLES RTA BASIC HARDWARE FOR RTA FURNITURE 3. Separe los herrajes para 1. Abrir la caja del mueble facilitar su identificación y buscar la bolsa con los...
- Page 3 RECOMENDACIONES DE ENSAMBLE ASSEMBLY RECOMENDATIONS El buen funcionamiento del mueble depende de un adecuado ensamblaje An excellent furniture´s performance relies on a solid and a suitable assembly. MINIFIX / CONNECTOR - DOWELS 180° Sistema de unión compuesto por un perno (A) y una caja minifix (B). (1) Se inserta la caja minifix dentro de la perforación ubicada en la cara de la pieza, la flecha debe apuntar siempre a la dirección de la perforación por donde entrará...
- Page 4 RECOMENDACIONES IMPORTANTES KEY RECOMMENDATIONS VOLTEAR TURN OVER Se recomienda armar el mueble sobre Voltear el mueble cuidadosamente para la caja o una superficie lisa para no ensamblar los fondos. Carefully turn rayarlo. It is recommended to assemble over the cabinet to assemble the back the product on the box or on a flat panels.
- Page 5 HERRAJES PARA ARMADO ASSEMBLY HARDWARE Color 1 Tapa Adhesiva Tarugo/ Perno minifix/ Minifix/ Minifix/ Fluted Dowel Pin Spreading Bolt Minifix Cams Cover Caps Color 2 Pegante/ Chazo Plástico + Tapa Adhesiva Tornillo de Glue Tornillo de Ensamble 2" 1/2/ Minifix/ Ensamble 2"/ Plastic Wall Anchor + Cover Caps...
- Page 6 PIEZAS DE ARMADO ASSEMBLY PARTS Girar 180° / Rotate 180° ANTES DE EMPEZAR A ARMAR EL MUEBLE LEA DETENIDAMENTE LAS INSTRUCCIONES. SE RECOMIENDA ARMAR EL MUEBLE SOBRE LA CAJA O SOBRE UNA SUPERFICIE LISA Y CUBIERTA, PARA NO RAYARLO / BEFORE STARTING TO ASSEMBLE THE CABINET, CAREFULLY READ THE INSTRUCTIONS.
- Page 7 *(Herramientas NO incluidas) *Tools NOT Included Girar 180° / Rotate 180°...
- Page 8 SE RECOMIENDA ARMAR EL MUEBLE ENTRE DOS PERSONAS / IT IS RECOMMENDED TO ASSEMBLE THE PRODUCT BETWEEN TWO PEOPLE VOLTEAR TURN OVER...
Need help?
Do you have a question about the PMP3818 and is the answer not in the manual?
Questions and answers