Advertisement
- 1 Introduction
- 2 Intended Use
- 3 Instructions for Use
- 4 Cleaning, Sanitization, Disinfection operations
- 5 Collection canister – 1400 ML
- 6 Filter
- 7 Silicone and PVC tubing
- 8 Maintenance
- 9 Rules for returning and repairing
- 10 Microbial contamination
- 11 Accessories (optional)
- 12 Technical Specifications
- 13 Symbols
- 14 Troubleshooting
- 15 Documents / Resources
Introduction
We thank you for purchasing our Aspirator V5 which is adaptable to your needs. It is very important that the health care worker and/or the patient read and understand the information for use and maintenance.
Intended Use
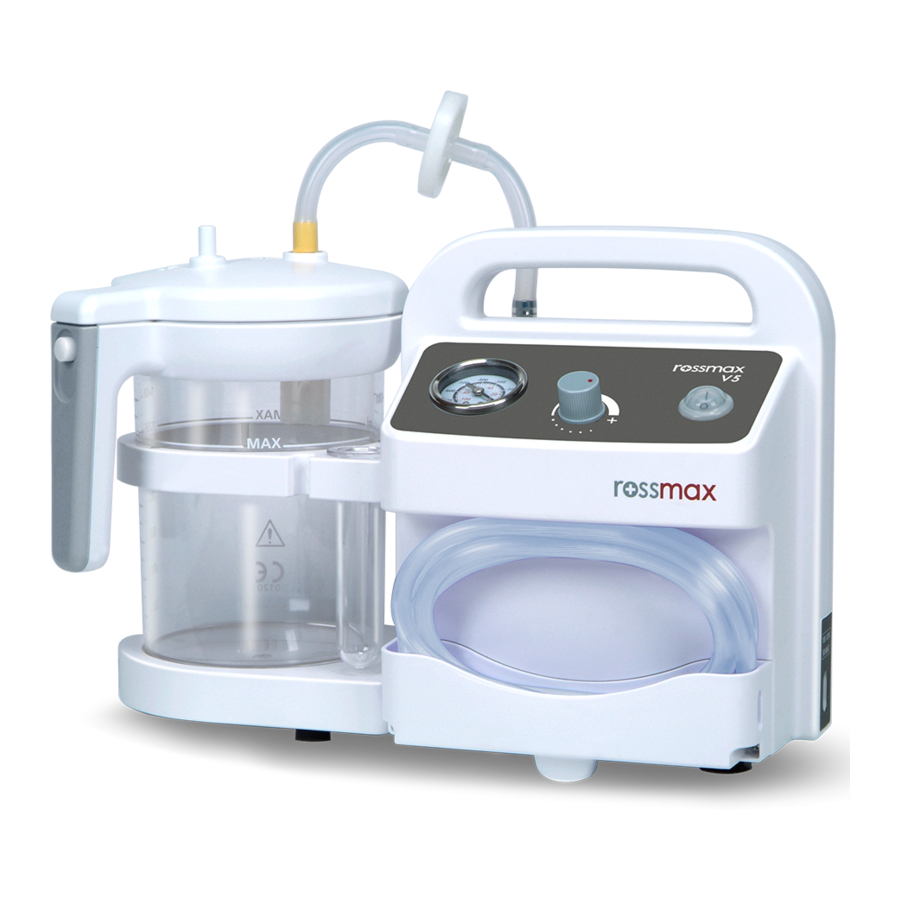
Suction unit (Aspirator) V5 can be used to remove unwanted fluids or infectious materials from the airway or respiratory support system in health care structures like hospitals and home care. The device generates suction (aspiration) which allows fluids to be extracted through connecting PVC tubing connected to a collection canister which retains the fluids until they can be properly disposed of. Use of the device must be prescribed by a doctor. Carefully follow the recommended operations and procedures outlined in this instruction guide to ensure proper functioning and maximize the life of the device.
Instructions for Use
The device must be checked before each use in order to detect malfunctions and / or damage caused by transport and / or storage and do not connect to power if damage is apparent. Before each use, the accessories must be carefully inspected to ensure the absence of dust, incrustation, clots or liquid substances both inside the connecting tubing and the collection canister. Furthermore, they must be cleaned following the instructions rigorously as stated in the "Cleaning, Sanitization, Disinfection". We recommend personal use of the accessories, the collection canister, the connecting tubing and antibacterial filter to prevent risk of contagious infection.
Assembling procedures
- Connect one end of silicone connecting tubing (Ø8mm, 14cm), with the antibacterial filter marked "IN" side, to the VACUUM inlet of the collection canister marked in yellow.
- Connect the other end, with the antibacterial filter marked "OUT" side, to the "AIR INLET" connector of the suction unit marked in yellow.
- Connect the connecting PVC tubing (Ø7mm, 180cm) to the "PATIENT" inlet of the collection canister.
- Connect the electric power cord as required.
 Note: Ensure that the FLUID SIDE or IN marker on the filter is on the side facing the collection canister and fit into the "VACUUM" inlet. A wrong connection may cause immediate destruction in case of contact with sucked liquids.
Setup Before Use
- Before each use, inspect the unit and accessories. If damaged, expired and/or deteriorated, replace it at once.
- Place the unit on a flat, horizontal surface.
- Check the voltage of the environment before using the device.
- Plug the power cord into the socket.
- Place the switch to the "I" (ON) position.
- Collapse the tubing on the antibacterial filter and check the vacuum gauge to test that the unit makes vacuum without any leakage and this level varies when the vacuum regulator is acted on.
- Obstruct the connecting tubing and adjust the level of vacuum prescribed by the doctor in the vacuum gauge turning the vacuum flow adjustment knob/ vacuum regulator.
![warning]() Note: The vacuum regulator can be used to set the level of vacuum required (mmHg/kPa). Turn the regulator clockwise, in the "+" direction, to obtain a higher vacuum; or anticlockwise for a lower vacuum; these values can be read on the vacuum gauge.
Note: The vacuum regulator can be used to set the level of vacuum required (mmHg/kPa). Turn the regulator clockwise, in the "+" direction, to obtain a higher vacuum; or anticlockwise for a lower vacuum; these values can be read on the vacuum gauge.
![]()
The vacuum values on the control decal are purely for guidance; always refer to the reading shown on the vacuum gauge.
![warning]() Note: Gauge is for reference only. If the unit sustains a severe drop, accuracy of the gauge must be checked.
Note: Gauge is for reference only. If the unit sustains a severe drop, accuracy of the gauge must be checked. - Place the switch to the "O" (OFF) position.

Note:
- The device is intended to be used on a flat, horizontal surface in order for the overflow valve to function correctly and prevent liquids from entering the suction pump. The device must be kept away from walls to allow for adequate engine cooling.
- In case unit is dropped, always transport unit with vacuum regulator rotated fully clockwise.
Starting the Suction
- Connect the suction catheter to the connecting PVC tubing (Ø7mm, 180cm)
![warning]() Note: suction catheter and manual regulator are not supplied by Rossmax.
Note: suction catheter and manual regulator are not supplied by Rossmax. - Switch on the unit (ON/OFF switch)
- Place your finger on the manual regulator to activate the suction, begin suction on the patient using the suction catheter. The unit is ready to put the suction catheter to the patient.
- After application, switch off the device and remove the Power cord from the mains socket. Perform the cleaning operations as described in the "Cleaning, Sanitization, Disinfection" paragraph.
Note: A 30-minute interval is recommended after each use. Do not operate the device continuously for more than 30 minutes for a single use without turning it off and following with a cooling period for at least 30 minutes
Cleaning, Sanitization, Disinfection operations
Before using the device, the manufacturer advises you to clean and/or disinfect the accessories. Switch off the device before any cleaning procedures and unplug the power cord from the socket.
Cleaning of the device
Use only a damp cloth with antibacterial soap (non-abrasive and with dissolvents of any sort) to clean the external surfaces of the main unit.

- Particular care should be taken to ensure that the internal parts of the device do not get in touch with liquids.
- Do not submerge in water as this will result in damage to the vacuum pump.
- Do not use any cleaners or disinfectants that contain ammonia, benzene and/or acetone to clean the unit.
Collection canister and connecting tubing
- Detach the suction catheter (21), the manual regulator (20) and the connecting PVC tubing (19) from the collection canister.
- Disconnect the silicone tubing (17) from both the canister and the device.
- Remove the canister from its holder. keep it upright, and empty it (in the WC at home, in the biological waste container in the hospital) and clean it after each use.
Disassemble it as below:
- Open the collection canister by pressing the switch button.
- Remove the overflow valve(13) from the canister lid (12)
- Remove the rubber valve and float (13a) from the overflow valve (13)
- Remove the silicone gasket (12a) from the canister lid (12)
Sanitization, Disinfection operations

- To prevent possible risk of infection from contaminated cleaning/disinfection solutions, always prepare fresh solution for each cleaning cycle and discard solution after each use.
- Contaminated devices must be thoroughly cleaned prior to disinfection.
- Personal protective equipment must be worn when handling contaminated equipment, particularly tubing, filter and collection canister (protective clothing, disposable latex gloves, mask, eye protection)
- If any liquid accidentally enters in the main unit or in the pump, the unit may be damaged. For this reason, we recommend not to use the aspirator. The failure should invalidate the guarantee and the technical specifications under the manufacturer's responsibility.
- In the event that contaminated fluids have moved past the internal unit, remove the tubing and the filter, clean the casing, and decontaminate the collection canister. Return the device to your local distributor or authorized Rossmax service center following "Rules for returning and repairing" paragraph.
Sanitization
Before and after each use, sanitize the collection canister and the connecting tubing. Rinse each part (7, 9, 12, 12a, 13, 13a, 14, 17, 19) with clean, hot running water (<50°C) with gentle dishwashing liquid (non-abrasive). After cleaning, leave the parts to dry in an open, clean environment.
Disinfection
The accessories which can be disinfected are (7, 9, 12, 12a, 13, 13a, 14, 17). Wash with a commercial disinfectant that must be an electrolytic chloroxidizer (active principle: sodium hypochlorite) specific and follow the instructions and dilution rates supplied by the disinfectant manufacturer carefully. It is effective on the parts that undergo this treatment only if the parts to be treated have previously been sanitized. After cleaning, leave the parts to dry in an open, clean environment.


O: Applicable, X: Not applicable
Note:
- The collection canister and tubing after disinfecting should be dated and stored in clean and dry areas to avoid recontamination.
- Do not use any cleaners or disinfectants that contain ammonia, benzene and/or acetone to clean the unit.
- Dispose of the solution following the instructions provided by the disinfectant manufacturer.
- Dispose of the suction catheter in accordance with the local laws and regulations.
Collection canister – 1400 ML
The collection canister consists of an overflow valve, a bottle in PC (polycarbonate) material, a lid with switch button on handle and must be replaced if there are visible signs of the damage.
Note:
- Keep the device vertical to allow the overflow valve to function correctly.
- Do not overturn the collection canister during use, in order to prevent the intervention of the overflow valve; should this occur, switch the aspirator off and detach the tubing connected to the antibacterial filter.
- To accelerate aspiration and simplify cleaning, it is recommended to put water in the collection canister before using.
- Suction at the patient is automatically obstructed when the liquid level reaches the overflow valve located on the underside of the canister lid.
- Contents of the container should be emptied when automatic overflow valve is activated. Further suctioning could cause damage to the vacuum pump.
Filter
The antibacterial filter supplied with Rossmax aspirators must be strictly replaced for each new patient, or if overflow occurs or the filter is saturated. Should the aspirator be used on the same patient, the filter for single-patient use is recommended to be replaced after every application. It should also be replaced if the unit is used with a patient whose risk of contamination is unknown. The filter cannot be sanitized, disinfected, or sterilized.
Note:
- Do not use the aspirator without the antibacterial filter, the unit could be damaged. From a bacteriological point of view, it becomes dangerous for the patient.
- Do not substitute any other material for this antibacterial filter. Substitution may lead to contamination or poor performance; use only Rossmax filters.
Silicone and PVC tubing
The tubing is recommended to be single use, but the number of cycles of disinfection and/or cleaning is strictly linked to the employment of the said tubing. Therefore, after each cleaning cycle, it is up to the final user to verify whether the tubing is suitable for reuse. The component must be replaced if there are visible signs of the decay of the tubing.
Maintenance
The suction equipment does not need maintenance or lubrication. It is, however to inspect the unit and accessories before each use.

Electric shock hazard. Do not attempt to open or remove cabinet, there are no user-serviceable internal components. If service is required, return the device to your local distributor or authorized Rossmax service center. Opening or tampering with the unit will void warranty.
Rules for returning and repairing
Rossmax requires the following procedures to be carried out to protect the instrument and the safety of all who come in contact with it.
Before returning an instrument for repair, the external surfaces and all accessories MUST be carefully disinfected with a cloth soaked in methylated spirits or hypochlorite-based solution. The instrument and accessories should then be placed in a bag with a note outlining the disinfection undertaken. Failure to follow this procedure will result in the instrument being returned to the purchaser unrepaired. Instruments returned for repair MUST be accompanied by a description of the problem. Rossmax will not be responsible for damage caused through improper use. To avoid such damage, please read the instruction carefully. Rossmax will not be responsible for damage of accessories. Accessories will be replaced at the customer's expense.
Microbial contamination
In the presence of pathologies with the risk of infection and microbial contamination, we recommend personal use of the accessories, collection canister, connecting tubing and antibacterial filter and all accessories should be thoroughly cleaned and disinfected after each use.
Note: Use only with original Rossmax accessories.
Accessories (optional)
")
Technical Specifications
| Suction class: | High Vacuum / High Flow |
| Power source: | AC100-120V, 50/60Hz or AC220-240V, 50/60Hz |
| Max. vacuum @ pump inlet: | -80 kPa/ -600 mmHg (mmHg for reference only) |
| Max air flow @ pump inlet: | 30L/min |
| Power Consumption: | ≤ 55VA |
| Collection canister: | 1,400 ml |
| Weight: | Approx. 3.2 (Kgs) |
| Machine dimension (without collection canister): | 363 (W) × 175 (D) × 254.5 (H) mm (Incl. rubber pad) |
| Operating conditions: | Temperature min.: 10°C; max. 40°C; Relative humidity: ≤90% non-condensing Atmospheric pressure: Min. 700 hPa; max. 1060 hPa |
| Storage and transportation conditions: | Temperature min.: -20°C; max. 60°C; Relative humidity: ≤90% non-condensing Atmospheric pressure: Min. 700 hPa; max. 1060 hPa |
| IP Classification: | IP21: Protection against harmful ingress of water and particulate matter |
Symbols

Troubleshooting
If, after checking the described conditions below the device is still not working properly, we recommend that you consult your local distributor or authorized Rossmax service center.
| Problem | Possible cause | Solution |
The device does not work | The power cord has not been correctly inserted into the socket of the device or the power socket | Correctly insert the power cord into the sockets |
| Power switch has not been activated. | Check if the power switch is turned to the "I" (ON) position | |
Lack of suction | The collection canister lid has not been correctly positioned on the canister | Correctly position the collection canister lid |
| Lid gasket (rubber O-ring) not in place | Correctly position the gasket on the lid | |
| Leaks or cracks in canister assembly | Replace the canister | |
| Filter blocked | Replace the filter | |
Blocked float | Incrustation on the float | Remove the canister lid and overflow valve and extract the float. Continue by carrying out the cleaning procedures as described in the paragraph "Sanitization, Disinfection operations" |
Vacuum power poor and/or non-existent | Vacuum flow adjustment knob/ vacuum regulator completely open | Fully close the adjustment knob and check the vacuum power |
| Filter blocked | Replace the filter | |
| Connecting tubing to the device or collection canister is clogged, bent, disconnected or broken; or suction catheter is twisted or blocked | Check the condition of the tubing, replace it if blocked or broken and correctly connect it as per the Assembling Procedures of this manual | |
| Canister lid overflow valve closed or blocked | Unblock the overflow valve, keep the device upright | |
| Dirty, blocked or damaged pump | Take the device to your local distributor or authorized Rossmax service center |

Documents / ResourcesDownload manual
Here you can download full pdf version of manual, it may contain additional safety instructions, warranty information, FCC rules, etc.
Advertisement
Need help?
Do you have a question about the V5 and is the answer not in the manual?
Questions and answers