Advertisement
Quick Links
Please do not return this item to the store where it was purchased
We appreciate your selection of our product. You can have confidence in this product that incorporates
quality components. Please do not return this item to where it was purchased, if any question, please
contact our Customer Service Department at 1-866-558 -0211 between 8:30am- 5:00pm(Pacific Time)
Monday through Friday, or E-mail us at info@altonfurniture.com
Quality statement
AFG is appreciates your selection of this product, we know you had many other choices. Please pay
attention that proper care and cleaning at home will extend the life of your purchase. Following these
important and helpful tips will enhance your furniture as it ages.
Upholstered furniture care instuctions
-Vacuum your upholstered furniture regularly. Small dust particles are very abrasive and can wear
furniture permaturely.
-Bolt spills immediately to prevent staining. If necessary, gently wipe away the spill using a soft, clean
cloth dampend with lukewarm water. Allow to dry and brush lightly.
-Never use harsh chemicals or solvents on your upholstered furniture as this may damage the finish.
-Never use water to clean your furniture as it may cause damage to the finish.
-If you choose to use a professional product, pretest the fabric in an inconspicuous area for any signs of
discoloration or shrinking.
-Marks and stains from pens, crayons and ink markers are difficult to remove. In the event that your
furniture becomes permanently stained, we recommend that you consult a professional expert.
Please contact our Customer Service Department for assistance at info@altonfurniture.com
CAUTION
ITEM#: A1T
Page 1 of 10
Advertisement

Subscribe to Our Youtube Channel
Related Manuals for Alton A1T

Summary of Contents for Alton A1T
- Page 1 ITEM#: A1T CAUTION Please do not return this item to the store where it was purchased We appreciate your selection of our product. You can have confidence in this product that incorporates quality components. Please do not return this item to where it was purchased, if any question, please contact our Customer Service Department at 1-866-558 -0211 between 8:30am- 5:00pm(Pacific Time) Monday through Friday, or E-mail us at info@altonfurniture.com...
-
Page 2: Parts List
PARTS LIST PLEASE ALWAYS CHECK EVERY PART BEFORE ASSEMBLY 1PCE 1PCE Left Headboard leg Headboard Panel 1PCE 1PCE 2PCS Right Headboard leg Footboard Panel Wood feet 2PCS 2PCS 2PCS Side Rail Support Legs Side Rails Side Rails 4PCS 4PCS Support Legs Slats Page 2 of 10 Please contact our Customer Service Department for assistance at info@altonfurniture.com... -
Page 3: Hardware List
HARDWARE LIST PLEASE ALWAYS CHECK EVERY PART BEFORE ASSEMBLY 20PCS 4PCS Allen Bolts Ø 5/16" x 1" Allen Bolts Ø 5/16" x 2" 8PCS 2PCS Screw M4 x 30mm Allen Bolts Ø 5/16" x 2-1/4" 2PCS 12PCS 12PCS Wood Dowels Ø8 x 30mm Spring Washers Ø... - Page 4 IMPORTANT ! ! Tips: **Please also check the thickness of your mattress and box spring before your assembly. Step 1: Assemble the Headboard Panel (A) and the Legs (R & L). (DO NOT FULLY TIGHTEN BOLTS AT THIS STAGE.) BACK BOX Spring Adjustable HeadBoard Heigh +Mattress...
- Page 5 Step 2: Assemble the Footboard (B) & Wood Feet (C). Step 2.1 Step 2.2 2PCS Allen Bolts Ø 5/16" x 2-1/4" 2PCS 1PCE Wood Dowels Ø8 x 30mm Allen Wrench M5 x 2-1/2" Page 5 of 10 Please contact our Customer Service Department for assistance at info@altonfurniture.com...
- Page 6 Step 3: Attach the Side Rail Support Legs (F) to join of the Side Rail (D) & Side Rail (E). 8PCS 8PCS Spring Washers Ø 5/16" x 9/16" Allen Bolts Ø 5/16" x 1" 8PCS 1PCE Flat Washers Ø 5/16" x 3/4" Allen Wrench M5 x 2-1/2"...
- Page 7 Step 4: Attach the Bolt ( ) 70% tight to the Headboard Leg (L) &(R) and Footboard (B) and then attached Side Rail (D) & (E) to Headboard Leg (L) & (R) and Footboard (B) by pushing the bracket down to fix it. Step 4.1 Step 4.2 8PCS...
- Page 8 Step 5: Attach Support Legs (H) to Slat (G), after that attach Slat (G) to Side Rail (D) & (E). Tighten all the bolts once the bed is level. Step 5.2 Step 5.1 Phillips head screwdriver / Electric drill (not included) are necessary for assembly Use the phillips head screwdriver to tighten the wood screw 4PCS...
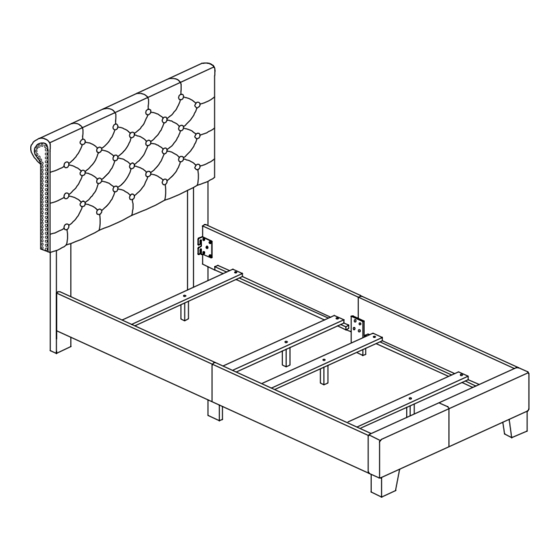
- Page 9 Step 6: Adjust the unit to be evenly aligned, then secure all the bolts completely and tightly. Cover the fabric lining behind the headboard. Page 9 of 10 Please contact our Customer Service Department for assistance at info@altonfurniture.com...
- Page 10 MATTRESS BOX SPRING Please contact our Customer Service Department for assistance at info@altonfurniture.com Page 10 of 10...
Need help?
Do you have a question about the A1T and is the answer not in the manual?
Questions and answers