
Summary of Contents for hi-fortune HY603
- Page 1 Multifunctional Electric Patient Instruction manual Please read it carefully before using Model HY603...
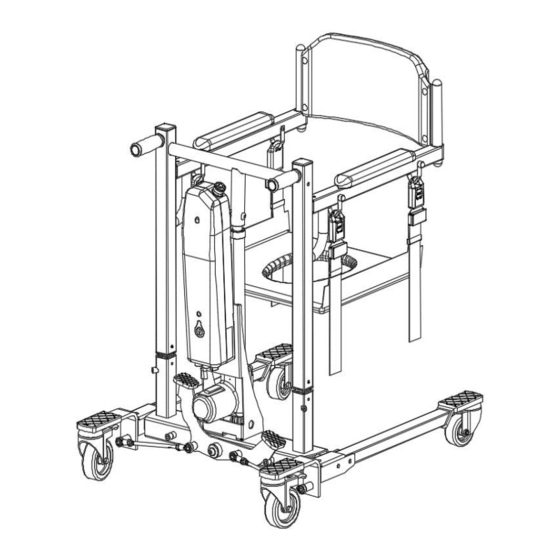
- Page 2 Multi-functional lifting chair for easy transfor of bedridden patients The applicable population is the disabled, the sick and the elderly and infirm who have difficulty in mobility. It is widely...
-
Page 3: Table Of Contents
Content 1 . Safety instructions................1 2 . Parts introduction................1 3 . Technical Parameters................2 4 . Installation instructions................3 5 . User's Guide................5 6 . Basic maintenance and maintenance...............10 7 . Simple troubleshooting ..............10 8 . Product warranty card...............11... -
Page 4: Safety Instructions
1.Safety instructions 一.使用产品前 1. 按照说明书组装产品; 2. 电池充电至少4个小时直至满格; 3. 仔细研究所有手册并完全理解; 4. 产品使用者接受适当的指导和培训; 5. 不同的使用情况下,选择正确的型号,尺寸,材料,吊具和附件,确保安全满足病 人需求。 a warning statement to the effect that "WARNING : Use of accessories,transducers and cables other than those specified or provided by the manufacturer of this equipment could result in increased electromagnetic emissions or decreased electromagnetic immunity of this equipment and result in improper operation."... -
Page 5: Technical Parameters
3 . Technical Parameters ● Dimensions: 900*676*870 ● Product net weight: 45 Kg ● Lifting range: 0~250mm ● No-load lifting speed: 7.6mm/s ● Drive mode: motor push rod ● Charging power supply: AC220V/50Hz ● Load weight: 150Kg Max ● Waterproof grade: ordinary splash ●... -
Page 6: Installation Instructions
4 . Installation instructions 1. Unpacking acceptance Please check whether the host and accessories are missing (accessories are subject to the accessory list provided). If there is any loss or missing, please contact the dealer or our company in time. Lift body x 1set armrest x 1set Bedpan/potty... - Page 7 Step 2: Install the handrails The red button of the buckle is facing outward ②Insert the left and ①区分左右扶手。 right armrests into the ③Insert the short plug ④Complete. - 4 -...
-
Page 8: User's Guide
5 . User's Guide 1. Use of hand controller Use the up and down buttons on the hand controller to control the up and down of the main frame, release the button to lift and stop the movement. Overload DOWN Battery 2. - Page 9 3. Connection of control equipment This device has 4 sockets in total. Motor 2 socket (optional) Motor 1 Hand control socket Charging cable 4. Opening and braking of rear wheels Step on release Step on brake 7. Operation of the lift Step ①: The patient sits on the edge of Step ②: Push in the lift, brake the bed with a sling underneath.
- Page 10 toilet stand Step ③: Install the backrest, raise the Sofa Toilet Bath Step on Step on close open Wheelchair Note: To move to a wheelchair, the wheelchair footrest needs to be turned to the outside or removed. - 7 -...
- Page 11 8. Storage of the lift When the lift is not in use, the lift can be simply disassembled and put away so that it will not occupy a large space and be placed in an unused place or the trunk of the car. The specific steps are as follows: ②Remove the left and ①...
- Page 12 9. Battery charging When the battery power is only 1 bar, it needs to be charged immediately. If it is not charged, the motor will not work (the battery power is shown in the figure). 100% battery 75% battery 50% battery 25% battery Note: 1.
-
Page 13: Basic Maintenance And
6 . Basic maintenance and For safe and barrier-free operation, perform the following routine inspections before use every day: 1. Visually inspect the elevator for external damage or wear; 2. Check whether the screws and fixing nuts on the armrests are tight;... -
Page 14: Simple Troubleshooting
7 . Simple troubleshooting 8. Product warranty card 1. Description of warranty scope From the date of leaving the factory: (1) The control box will be replaced within six months, and the warranty will be within 1 year. (2) The battery will be replaced if the battery content is less than 60% of the rated capacity for half a year.
Need help?
Do you have a question about the HY603 and is the answer not in the manual?
Questions and answers