Advertisement
Available languages
Available languages
Quick Links
EN
With your inspiring rating, COSTWAY will be more consistent to offer you EASY
SHOPPING EXPERIENCE, GOOD PRODUCTS and EFFICIENT SERVICE!
DE
Mit Ihrer inspirierenden Bewertung wird COSTWAY konsistenter sein, um Ihnen EIN
SCHÖNES EINKAUFSERLEBNIS, GUTE PRODUKTE und EFFIZIENTEN SERVICE zu
bieten!
FR
Avec votre évaluation inspirante, COSTWAY continuera à fournir une EXPÉRIENCE
D'ACHAT PRATIQUE, des PRODUITS DE QUALITÉ et un SERVICE EFFICACE !
ES
Con su calificación inspiradora, COSTWAY será más consistente para ofrecerle
EXPERIENCIA DE COMPRA FÁCIL, BUENOS PRODUCTOS y SERVICIO EFICIENTE.
IT
Con la tua valutazione incoraggiante, COSTWAY sarà più coerente per offrirti
ESPERIENZA DI ACQUISTO FACILE, BUONI PRODOTTI e SERVIZIO EFFICIENTE!
PL
Dzięki twojej opinii COSTWAY będzie mógł oferować jeszcze WYGODNIEJSZE
ZAKUPY, LEPSZE PRODUKTY i SPRAWNIEJSZĄ OBSŁUGĘ KLIENTA.
US office: Fontana
UK office: Ipswich
DE office: Hamburg
FR office: Saint Vigor d'Ymonville
AU office: Truganina
PL office: Gdańsk
EN
FR
USER'S MANUAL/MANUEL DE L'UTILISATEUR
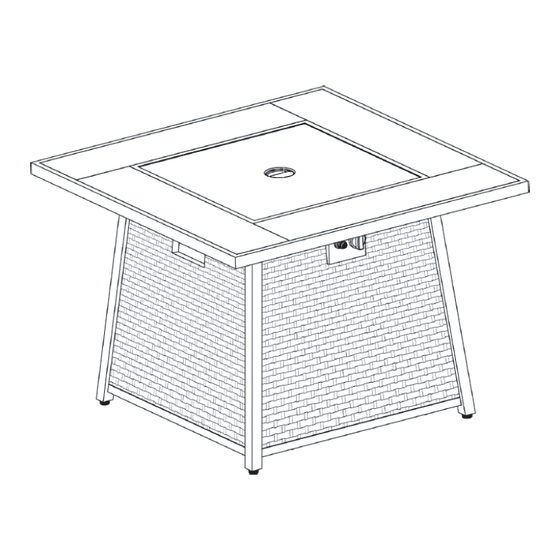
Propane Fire Pit Table / Foyer Extérieur
THIS INSTRUCTION BOOKLET CONTAINS IMPORTANT SAFETY INFORMATION. PLEASE READ AND KEEP FOR FUTURE REFERENCE.
NP10262
Advertisement

Subscribe to Our Youtube Channel
Related Manuals for Costway NP10262


Summary of Contents for Costway NP10262
- Page 1 With your inspiring rating, COSTWAY will be more consistent to offer you EASY SHOPPING EXPERIENCE, GOOD PRODUCTS and EFFICIENT SERVICE! Mit Ihrer inspirierenden Bewertung wird COSTWAY konsistenter sein, um Ihnen EIN SCHÖNES EINKAUFSERLEBNIS, GUTE PRODUKTE und EFFIZIENTEN SERVICE zu bieten! Avec votre évaluation inspirante, COSTWAY continuera à...
-
Page 2: Fire Or Explosion Hazard
DANGER WARNING FIRE OR EXPLOSION HAZARD lmproper installation, adjustment, alteration, service or maintenance can cause injury or property damage. Refer to the owner's If you smell gas: information manual provided with this appliance. For assistance or • Shut off gas to the appliance. additional information consult a qualified installer,and qualified •... - Page 3 ● Keep away from the unit for the first 20 minutes after igniting your • THIS UNIT IS INTENDED FOR OUTDOOR USE ONLY! This product unit for the first time, as lava rocks/pumice stones/L avaGlass@ could shall be used outdoors, in a ventilated space and shall not be used in pop out and cause injury.
- Page 4 ● Do not disconnect any part while unit is in use. ● Children and adults should be alerted to the hazards of high surface temperatures and should stay away to avoid burns or clothing ● Do not store a spare propane tank on or near this unit. ignition.
- Page 5 Door Min. Clearance 60 in. (52.4 cm) Min. Clearance Min. Clearance 48 in. (121.9 cm) 48 in. (121.9 cm) Tank Holder Short Screws M6*12 Long Screws M6*35 Combustible materials should not be within 60 inches of the top of the unit, or within 48 inches around the entire unit. M6 Washer ITEM# PICTURE...
- Page 6 Do not tighten the screws until the assembly is complete. Fasten the tank holder (F) and use 4pcs Short Screws (M6x35) and 4pcs M6 Washer. Check the control knob for gas supply system is turned to "OFF" position before, starting your assembly. Connect panel (B,C,D,E) by 8pcs m6*35 screws(I) and 8pcs Fasten the table Top (A) and use 4pcs Short Screws (M6x12) M6 washers(J).
- Page 7 Place propane gas tank (not included) into the metal stand . Make sure the gas tank sits on the metal stand completely. Turn the cylinder valve on the tank clockwise to close the propane tank. Attach the PRESSURE RELIEF VALVE Remove the rubber cap on the electronic igniter by unscrewing preassembled regulator from the CYLINDER VALVE...
- Page 8 To Extinguish Before performing a leak test, be sure that no sparks can occur and you are in a spacious outdoor area. Connect the propane gas tank to 1. Turn control knob clockwise to the "HIGH" position; push and the regulator and turn the valve on the unit to the “off” position. continue turning the control knob to the "OFF"...
- Page 9 Problem Cause Solution Check that the gas tank isn’t No gas flow empty Heating unit won’t light Dry off with a soft cloth Turn the control knob to the Igniter battery is Check which direction the ‘off’ posi-tion. Close the tank incorrectly inserted battery is inserted valve and disconnect propane...
- Page 10 DANGER AVERTISSEMENT RISQUE D'INCENDIE OU D'EXPLOSION Une installation, un réglage, une modification, un entretien ou une maintenance inappropriés peuvent causer des blessures ou des dommages Si vous sentez une odeur de gaz : matériels. Référez-vous au manuel d'information du propriétaire fourni avec ●...
- Page 11 • CET APPAREIL EST CONÇU POUR UN USAGE EXTÉRIEUR UNIQUEMENT ! Ce • Assurez-vous toujours que les roches de lave/pierres ponces/LavaGlass produit doit être utilisé à l'extérieur, dans un espace ventilé et ne doit pas sont complètement sèches avant utilisation. Ne pas le faire les fera craquer être utilisé...
- Page 12 • Si l'unité de chauffage est à l'intérieur, détachez le réservoir de propane et • Les vêtements ou autres matériaux inflammables ne doivent pas être laissez-le à l'extérieur. suspendus à l'appareil ou placés sur ou à proximité de l'appareil. • Ne pas utiliser sur un bateau ou un véhicule. Cet appareil doit être utilisé sur •...
- Page 13 Porte Espacement minimum 60 pouces (52,4cm) Espacement minimum Espacement minimum 48 pouces (121,9 cm) 48 pouces (121,9 cm) Support de réservoir Vis Courtes M6*12 Vis Longues M6*35 Les matériaux combustibles ne doivent pas se trouver à moins de 60 pouces du haut de l'unité, ou à moins de 48 pouces autour de l'unité entière.
- Page 14 Ne serrez pas les vis tant que l'assemblage n'est pas terminé. Vérifiez que le bouton de commande du système d'alimentation en gaz Fixez le support de réservoir (F) à l'aide de 4 vis courtes (M6 * 35) et est en position « OFF » avant de commencer votre assemblage. de 4 rondelles M6.
- Page 15 Placez le réservoir de gaz propane (non inclus) dans le support en métal . Assurez-vous que le réservoir d'essence repose complètement sur le support métallique. Tournez la valve de la bouteille sur le réservoir dans le sens horaire pour fermer le réservoir de propane. SOUPAPE DE LIMITATION Retirez le capuchon en caoutchouc de l'allumeur électronique en dévissant DE PRESSION...
- Page 16 Pour Éteindre Avant d'effectuer un test de fuite, assurez-vous qu'aucune étincelle ne peut se produire et que vous vous trouvez dans un espace extérieur spacieux. 1.Tournez le bouton de commande dans le sens des aiguilles d'une montre Connectez le réservoir de gaz propane au régulateur et tournez la valve de jusqu'à...
- Page 17 Problème Cause Solution Vérifiez que le réservoir d'essence Pas de débit de gaz n'est pas vide La goupille d'allumage et le Sécher avec un chiffon doux brûleur sont humides Tournez le bouton de commande sur la position « off La batterie de l'allumeur est Vérifiez dans quelle direction ».
Need help?
Do you have a question about the NP10262 and is the answer not in the manual?
Questions and answers