Advertisement
IMPORTANT INFORMATION & WARNINGS
- This product is a high performance, fully automatic air compressor including sealant for passenger vehicle tires.
- Emergency roadside tire mobility kit solutions only provide temporary mobility.
- With the AirMan® tire mobility kit you can continue on your journey even after experiencing a flat tire. The high performance compressor and sealant effectively seal most tire punctures up to 6mm with Active Seal® Tire Sealant.
- For AirMan® products adapted for passenger vehicles, you can drive up to 200km or 125 miles at a maximum speed of 80km/h or 50mph on a sealed tire to get you to the nearest service station.
- If you experience vibrations, unsteady steering behaviour or noises while driving, reduce your speed and drive with caution to a place where it is safe for you to stop the vehicle. Recheck the tire pressure to see if there's any pressure loss. If there is any visible damage, do not continue driving on this tire.
- If there is any damage to the sidewall or if there is a tire blow out, this product will not work as mentioned.
- Park your vehicles at the side of the road when using AirMan® tire mobility kit so as not to impede the flow of traffic and so you can use AirMan® tire mobility kit without being in danger. Keep your vehicles' lights on, wear a safety west and use a warning triangle to make others around you aware of your presence.
- Under all circumstance, follow all regional traffic laws.
- Do not remove any foreign objects (nails, screws, debris, etc.) that may have gotten stuck in the tire, if these objects prevent the wheel from moving, then call for assistance.
- Do not run your vehicles' engine indoors, in closed areas, or non-ventilated areas.
- Operating temperature for AirMan® products are between -20°C to +60°C.
- Do not exceed the listed operating time. And allow the device to cool down before the next operation.
- If the tire pressure is too high, it can be safely reduced by using the deflate button.
- Never leave the product unattended while in use.
- Use ONLY AirMan® branded tire sealant or replacement.
- Do not use the Active Seal® Tire Sealant after its expiry date. Replace with a new Active Seal® Tire Sealant as soon as possible.
- You can also use AirMan® tire mobility kit for all of your everyday inflation needs. With the supplied adaptors, you can inflate easily and quickly your inflatables, sporting goods, bicycle tires and more!
- Do not use the compressor unit in a potentially explosive atmosphere.
- During operation, gloves, eye and ear protection are recommended.
- Keep away from children. The AirMan® compressor and sealant are not toys.
RESIDUAL RISKS
- In the event of a puncture no larger than 6mm, and with no damage to the side wall, if the compressor is showing its pressure to suddenly rise or max out, yet the tire remains deflated. Sealant has potentially clogged the valve stem at this time during the application process. Therefore resulting in a blocked valve core, where the tire will be unrepairable. Please call for roadside assistance.
MEANING OF SIGNS
 | In accordance with the law, electric tools that have reached the end of their life must be collected separately and returned to an environmentally compatible recycling facility. |
 | Warning. The surface of the hose can be hot. |
REPAIRABLE AREA

WHERE TO FIND RECOMMENDED TIRE PRESSURE
The location of your vehicle's recommended tire pressure may vary but can usually be found:

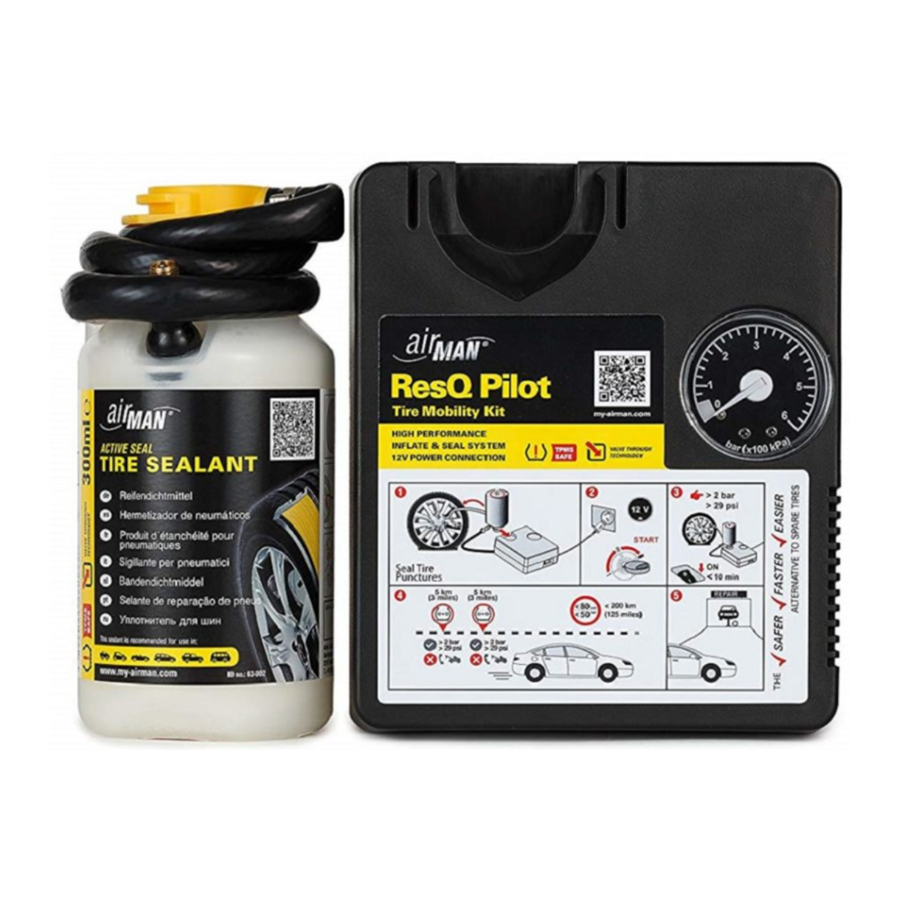
PRODUCT DESCRIPTION & TECHNICAL DATA


- Instruction Label
- On / Off Switch
- Pressure Gauge
- 12V Power Cord / Plug
- Black Air Hose
- Sealant Bottle & Expiration Date
- Sealant Hose
- Mattress adaptor
- Ball needle adaptor
- Bike Dunlop / Presta valve adaptor
| Voltage (V) | 12 |
| Amperage (A) | 10 |
| Power (W) | 120 |
| p_max (kPa) | 620 |
| p_max (bar) | 6,2 |
| p_max (psi) | 90 |
Do not exceed the operating times of the certain pressure modes for the applicable compressor, as seen in the table.
The maximum pressure (p_max) occurs when emptying the sealant bottle. The nominal pressure (p_nom) can occur when inflating the tire with air.
The Kit does not require a fuse, because an appropriate fuse for the 12V plug is built in the corresponding vehicle and acts as overcurrent protection.
TIRE SEALING INSTRUCTIONS
Safety always comes first, so before you start the sealing process, remove the speed limit sticker from the bottom of the sealant bottle, and place it in a visible location such as your steering wheel.

- Connect compressor hose to bottle and slide bottle into compressor socket. Take out the sealant hose and connect it to the tire valve.
- To power the kit, plug the power cord into the vehicle's 12V power outlet. Start the car engine, and leave it running during the operation period.
- Turn on the compressor. Wait for the sealant to be fully injected to the tire. Then allow the tire to be inflated to the recommended tire pressure. Do not operate the compressor continually for more than 15 minutes.
![]()
- Drive the car for up to 5km (3miles) at no more than 80km/h (50mph) to verify the sealant has temporarily sealed the tire. During your 1st 5km drive, check the repaired tire for loss of air pressure. Inflate the tire if necessary and drive another 5km. If the desired tire pressure still cannot be achieved, then abort this repair attempt immediately and call for roadside assistance.

- As a reminder, this is a Temporary Puncture Repair Kit, so although you can drive for up to 200km or 125 miles, it is still recommended to go to a qualified repair center, or authorized dealer for permanent repair. We recommend that you do so otherwise the tire pressure monitoring system may always show the tire on low pressure. Dealerships and qualified repair centres will be able to reset the system.
![]()


INFLATE ONLY

- Take out the compressor hose and connect it to the tire valve.
- Remove the power cord and plug it into the vehicle's 12V power outlet. Start the car engine, and leave it running during the operation period.
- Turn the compressor on and inflate the tire until recommended tire pressure is achieved. Do not operate the compressor continually for more than 15 minutes.
WARRANTY
Manufacturer's liability is limited to product replacement with proof of Purchase by Active Tools. Active Tools warrants that their AirMan® Compressors/Inflators will be free for defects in material and workmanship, under normal use, for 2 years from the date of retail purchase. The limited warranty does not apply in the event of damage caused by abuse, misuse, or other external causes to the products. Active Tools reserves the right to substitute products of equal or greater value if identical products are not available. This limited warranty is non-transferable.

Documents / ResourcesDownload manual
Here you can download full pdf version of manual, it may contain additional safety instructions, warranty information, FCC rules, etc.
Download AirMan ResQ Pilot Tire Mobility Kit - High Performance Air Compressor & Sealant Manual
Advertisement


Need help?
Do you have a question about the ResQ Pilot and is the answer not in the manual?
Questions and answers