Table of Contents
Advertisement
Quick Links
Playground Equipment Manual
This manual and all of it's contents must be kept on hand at the Playground Equipment Site.
Project Name
Distributor
Purchase ID
SO Number
PO Number
Order Date
Contents
- Packing List and Installation Guide for every component in
your Playground Equipment.
- Warning and Age Appropriate Labels.
- Installation Manual
- Construction Views (Top View, Site Plan, Perspective Views).
- Maintenance Manual w/ Safety and Repair Information.
ALL SAINTS CATHOLIC SCHOOL
Park Planet
e83415f50351e84fbd13
P23-0206
3/6/2023
A PlayCore Company (800) 333-8519
FOR KIDS
R5
AGES
5-12
Advertisement
Chapters
Table of Contents

Subscribe to Our Youtube Channel
Related Manuals for Playcore PLAYCRAFT P23-0206


Summary of Contents for Playcore PLAYCRAFT P23-0206
- Page 1 - Packing List and Installation Guide for every component in your Playground Equipment. - Warning and Age Appropriate Labels. - Installation Manual - Construction Views (Top View, Site Plan, Perspective Views). - Maintenance Manual w/ Safety and Repair Information. A PlayCore Company (800) 333-8519...
- Page 2 ALL SAINTS CATHOLIC SCHOOL ADA ACCESSIBILITY GUIDELINES - ADAAG CONFORMANCE FOR KIDS ACCESSIBLE RAMP ACCESSIBLE GROUND TYPES AGES ELEVATED TOP VIEW 5-12 CHILD CAPACITY MAX FALL HEIGHT GENERAL NOTES This conceptual plan is based on information provided prior to construction. Detailed site information, including the following, should be obtained, evaluated, and utilized in the...
- Page 3 ALL SAINTS CATHOLIC SCHOOL ADA ACCESSIBILITY GUIDELINES - ADAAG CONFORMANCE FOR KIDS ACCESSIBLE RAMP ACCESSIBLE GROUND TYPES AGES ELEVATED TOP VIEW (Footings) 5-12 CHILD CAPACITY MAX FALL HEIGHT STRUCTURE # R50C86EFB Park Planet PROJECT # P23-0206 DATE 4/4/2023 MIN. USE ZONE 8' x 4'...
- Page 4 ALL SAINTS CATHOLIC SCHOOL ADA ACCESSIBILITY GUIDELINES - ADAAG CONFORMANCE Mixed FOR KIDS ACCESSIBLE RAMP ACCESSIBLE GROUND TYPES Types AGES ELEVATED SITE PLAN 5-12 GENERAL NOTES This Preliminary Site Plan is based on measurements that were provided in the initial planning phase.
- Page 5 ALL SAINTS CATHOLIC SCHOOL FOR KIDS AGES SW VIEW 5-12 STRUCTURE # R50C86EFB PROJECT # P23-0206 DATE 4/4/2023...
- Page 6 ALL SAINTS CATHOLIC SCHOOL FOR KIDS AGES SE VIEW 5-12 STRUCTURE # R50C86EFB PROJECT # P23-0206 DATE 4/4/2023...
- Page 7 ALL SAINTS CATHOLIC SCHOOL FOR KIDS AGES NE VIEW 5-12 STRUCTURE # R50C86EFB PROJECT # P23-0206 DATE 4/4/2023...
- Page 8 ALL SAINTS CATHOLIC SCHOOL FOR KIDS AGES NW VIEW 5-12 STRUCTURE # R50C86EFB PROJECT # P23-0206 DATE 4/4/2023...
- Page 9 MAINTENANCE MANUAL IMPORTANT! This manual contains maintenance, safety and repair information WARNING: Read this manual thoroughly before installation. Improper assembled or maintained playground equipment can present a serious safety hazard. Impact attenuating surfacing is required under and around all playground equipment and must be maintained. For replacement parts, additional maintenance supplies or information, please contact your Playcraft representative or customer service at: Playcraft Systems ●...
- Page 10 Playground Equipment Maintenance Guidelines IMPORTANT INFORMATION Please Save This Document. Do Not Discard or Destroy. Keep all instructions, specifications, drawings, packing lists and bills of material, plus these Maintenance Guidelines in a permanent file for future reference. Packing and parts lists will be required when ordering replacement parts. Read This Document First Prior to performing required maintenance on any play structures or play accessories supplied by Playcraft Systems, it is imperative that this document be read and fully understood by all persons responsible for...
- Page 11 Playground Equipment Maintenance Guidelines Risk Management Liability exposure concerns us all. Your role in decreasing this exposure begins with careful site selection, proper play surface preparation, and correct equipment installation. Once your playground is put into service your obligation continues with an ongoing maintenance program. ln-service training of your maintenance staff, a systematic and documented program for inspection of the site and equipment, procedures for immediate maintenance and repair, plus meaningful recordkeeping are indispensable steps in providing a safe playground environment for the users.
- Page 12 Playground Equipment Maintenance Guidelines Safety Surfacing (Continued) Climate, supervision, budget, and maintenance considerations can each be a factor for choosing the correct material for your site. Safety surfacing materials must be maintained at a depth or thickness sufficient to meet ASTM Standard F-1292, "Standard Specification for lmpact Attenuation Systems Under and Around Playground Equipment."...
- Page 13 Playground Equipment Maintenance Guidelines Inspection After Installation The following inspection steps should be taken immediately following the installation of play equipment. Check to see that each concrete footing meets all specifications. ● Compare the “as-built" structure with the manufacture’s drawings and specifications to verify that the ●...
- Page 14 Playground Equipment Maintenance Guidelines Scheduling Maintenance (Continued) Monitor changing patterns of use and/or changing site and equipment conditions. Be prepared to increase routine safety inspections as required. Expect the frequency of more detailed playground ● inspections to vary due to changes of season, climate, history of vandalism, intensity of use, type of equipment and behavioral patterns of the playground users.
- Page 15 Playground Equipment Maintenance Guidelines Inspection Points Suggested DAILY Playground Maintenance Safety Inspection Points The Site The safety surfacing material is clean and free of debris and is suitable for play. ● lf the safety surfacing material is loose fill, check for rocks, tree roots, animal feces, glass, nails, food ●...
- Page 16 Playground Equipment Maintenance Guidelines Inspection Points (Continued) Plastic Surfaces Plastic surfaces are smooth, with no sharp protrusions. ● Plastic shows no signs of unacceptable wear or vandalism. ● Protective Barriers Wire Mesh Wall Panels or Steel Pipe Walls Connecting hardware is secure and intact. ●...
- Page 17 Playground Equipment Maintenance Guidelines Moving Accessories (Continued) Track Ride Safety surfacing material around and beneath Track Ride path is acceptable. ● Supporting beam is firmly attached to structural supports. ● All attachment hardware is in place and secure. ● Track is free of obstructions and foreign objects and bearings of track assembly roll freely from one ●...
- Page 18 Playground Equipment Maintenance Guidelines Stationary Accessories Spiral Slide Safety surfacing material around and beneath Spiral Slide is acceptable. ● All connecting hardware is in place and secure. ● Bedway is smooth, clean, and free of foreign objects between sections and/or against support post. ●...
- Page 19 Playground Equipment Maintenance Guidelines Replacement Parts Order genuine replacement parts from Playcraft Systems. ● Do not introduce non-factory-supplied substitute parts for any purpose. Great care has been taken to provide the highest quality parts and hardware for your structure and accessories. Correct ●...
- Page 20 Playground Equipment Maintenance Guidelines Repair of Plastic "Poly" Components Do not try to repair deep gouges. Plastic components with deep gouges should be replaced. Minor surface damage to plastic components such as nicks or graffiti can be repaired as follows: Lightly sand surface needing to be repaired.
- Page 21 Playground Equipment Maintenance Guidelines NOTES: Page 13 of 13...
-
Page 22: Table Of Contents
PLAYCRAFT™ INSTALLATION MANUAL PROJECT NAME: PLAYCRAFT SYSTEMS ROUND 5 STEEL POST SYSTEM IMPORTANT! THIS MANUAL CONTAINS: • Construction Views • General Installation Guidelines • Maintenance & Safety Information INSTALLATION MANUAL TABLE OF CONTENTS SECTION Installation Instructions Included R5 – 01 Construction Drawings R5 –... -
Page 23: Construction Drawings R5
CONSTRUCTION DRAWINGS R5 – 02 PLEASE NOTE: The pages enclosed in this section are the construction drawings for the specific job listed. WARNING: Read all instructions thoroughly before installation. Improperly assembled playground equipment can present a serious safety hazard. Appropriate impact attenuating safety surfacing material is required under and around all play structures and must be maintained. -
Page 24: General Installation Guidelines R5
GENERAL INSTALLATION GUIDELINES R5 – 03 R5 - 03.1 PLEASE READ THE FOLLOWING VERY CAREFULLY BEFORE INSTALLATION IMPORTANT: Due to the wide variety, modularity and flexibility of our products, we found it necessary to publish these general installation guidelines. These guidelines are intended for use by experienced playground equipment installers and/or general contractors skilled in assembly and installation of playground equipment. - Page 25 GENERAL INSTALLATION GUIDELINES R5 – 03 R5 - 03.4 GENERAL INSTALLATION GUIDELINES (CONTINUED) To ensure proper alignment of system equipment, it is the manufacturer’s recommendation that concrete be poured after assembly. While referring to the following installation instructions, erect the equipment (main structure first) and plumb and level as you proceed.
-
Page 26: Site Safety Recommendations R5
SITE SAFETY RECOMMENDATIONS R5 – 04 General safety recommendations applicable to the installation and maintenance of play equipment supplied by Playcraft Systems. R5 - 04.1 USE ZONES Use zones are the areas under and surrounding each piece of play equipment that must be covered by an appropriate impact attenuating safety surfacing material as described above. - Page 27 SITE SAFETY RECOMMENDATIONS R5 – 04 R5 - 04.2 SURFACES All play equipment must be installed over an appropriate impact attenuating safety surfacing material. It is the responsibility of the playground designer, installer, and operator to ensure that the size, type, and depth of impact attenuating safety surfacing material used complies with the CPSC Handbook.
- Page 28 POSTS & HARDWARE R5 – 05 Tapped Blind Hole For Customer Service Call 7/2/2018 www.playcraftsystems.com 800.333.8519 (U.S.A.) or 541.955.9199 (International)
-
Page 29: Concrete Footings R5
CONCRETE FOOTINGS R5 – 06 IMPORTANT: The footing depth for support posts and other equipment must be adjusted to compensate for the depth/thickness requirements of the selected impact attenuating safety surfacing. (i.e. wood chips vs. rubber matting). R5 - 06.1 IMPORTANT ITEMS Use more concrete as required for supporting activities with movement such as the Track Rides, Traverses, Chinning Bars and Swings. - Page 30 CONCRETE FOOTINGS R5 – 06 R5 - 06.1 IMPORTANT ITEMS (CONTINUED) Playcraft Systems recommends a loose fill material such as engineered wood fiber (as described in the CPSC) be installed at a depth of no less than 12 in. to allow for natural shrinkage, and compression during use. A minimum 9 in.
-
Page 31: General Safety & Warning Labels R5
GENERAL SAFETY & WARNING LABELS R5 - 07 R5 - 07.1 CHILD SAFETY PRECAUTIONS - PLEASE READ CAREFULLY On-site adult supervision recommended while children are at play. Warn children not to climb or walk on top of playground equipment (framework) not intended for such use. All play equipment should be used in the manner for which it was intended. - Page 32 GENERAL SAFETY & WARNING LABELS R5 – 07 ASTM LABELS CSA LABELS WARNING LABEL For Customer Service Call 7/2/2018 www.playcraftsystems.com 800.333.8519 (U.S.A.) or 541.955.9199 (International)
- Page 33 GENERAL SAFETY & WARNING LABELS R5 – 07 R5 - 07.4 PROPOSITION 65 LABEL ATTACHMENT Some equipment may or may not contain materials that require labeling under California Proposition 65. To eliminate confusion all California customers will receive the labels shown. Attach in a conspicuous location, such as near an entry.
- Page 34 GENERAL MAINTENANCE R5 – 08 IMPORTANT: To ensure the safest play area and equipment possible, periodic inspections should be performed and recorded on a daily, weekly and monthly basis. Some form of maintenance program should be established and strictly adhered to. A comprehensive list of maintenance steps, including a sample playground maintenance safety inspection form, can be found in the maintenance manual included with your equipment.
- Page 35 R5-09 COLLAR ASSEMBLY Page 1 of 2 IMPORTANT NOTES: Read First ® (A) Use liquid thread lock (such as Loctite ) with all threaded hardware. Important: Liquid thread lock (prior to curing) helps to eliminate the common problem of "thread seizure" in stainless steel hardware by serving as a lubricant during assembly.
- Page 36 R5-09 COLLAR ASSEMBLY Page 2 of 2 Collar Split Should be Aligned Parallel with the Exterior Deck Face Tek Screw Should be installed under Socket Clamp FIGURE 3 Collar Alignment FIGURE 4 Overhead Event Collar Alignment Specifications Parts List COLLARS: Part # DESCRIPTION QTY.
- Page 37 R5 - 10 MOUNTING BLOCK APPLICATIONS Page 1 of 2 TYPE 1 - Mounting Block (Applies to most decks) TYPE 2 - Mounting Block & Clevis (Applies to most traverses and bridge walls) 3/8" x 1" O.D. 1/4" x 1-3/8" 3/8"...
- Page 38 R5 - 10 MOUNTING BLOCK APPLICATIONS Page 2 of 2 Parts List - Type 1 Installation More detailed instructions will be supplied with the specific components being installed on your 007006-B Mounting Block R5 Bottom play system. 007006-T Mounting Block R5 Top 9103112-TR Bolt Button Head 3/8"...
- Page 39 R5-11 SOCKET CLAMP ASSEMBLY Page 1 of 2 IMPORTANT NOTES: Read First ® (A) Use liquid thread lock (such as Loctite ) with all threaded hardware. Important: Liquid thread lock (prior to curing) helps to eliminate the common problem of "thread seizure" in stainless steel hardware by serving as a lubricant during assembly.
- Page 40 R5-11 SOCKET CLAMP ASSEMBLY Page 2 of 2 Specifications Parts List SOCKET CLAMPS: Part # DESCRIPTION QTY. Shall be two-part and precision die-cast from a high 007004 Socket Clamp Top R5 strength aluminum alloy. The Socket Clamps have 007005 Socket Clamp Bottom R5 a multi-stage baked-on powder coat finish.
- Page 41 R5 - 12 MOUNTING LUG ASSEMBLY Page 1 of 2 Mounting Lug Application - Steel Washer MOUNTING Button LUG R5 Head Bolt See Note B Socket Clamp Assembly See Assy. Pg. R5 - 11 Mounting Lug Application - HDPE Washer MOUNTING Shoulder Bolt LUG R5...
-
Page 42: Mounting Lug
R5 - 12 MOUNTING LUG ASSEMBLY Page 2 of 2 Parts List Installation A) More detailed instructions will be supplied with 007007 Mounting Lug R5 the specific components being installed on your play system. B) Note that the length of the Button Head Bolt or Shoulder Bolt varies depending upon the application. -
Page 43: Mounting
R5 - 13 MOUNTING INSERT ASSEMBLY Page 1 of 2 Mounting Insert Application Socket Clamp Assembly See Assy. Pg. R5 - 11 Washer MOUNTING INSERT Button Head Bolt See Note B For Customer Service Call Manufactured by Krauss Craft, Inc. Rev B 800.333.8519 (U.S.A.) or www.playcraftsystems.com... - Page 44 R5 - 13 MOUNTING INSERT ASSEMBLY Page 2 of 2 Parts List Installation A) More detailed instructions will be supplied with 007015 Mounting Insert the specific components being installed on your play system. B) Note that the length of the Button Head Bolt varies depending upon the application.
-
Page 45: 800.333.8519 (U.s.a.) Or 541.955.9199 (International)
DECK TO DECK ASSEMBLY 1100-2 INSTALLATION INSTRUCTIONS Page 1 of 2 IMPORTANT NOTES: Read First ® (A) Use liquid thread lock (such as Loctite ) with all threaded hardware. Important: Liquid thread lock (prior to curing) helps to eliminate the common problem of "thread seizure" in stainless steel hardware by serving as a lubricant during assembly. - Page 46 DECK TO DECK ASSEMBLY 1100-2 INSTALLATION INSTRUCTIONS Page 2 of 2 Step 1 Refer to Top View drawing in the Playground Equipment Manual to locate the position(s) of decks on your play structure. Step 2 Attach Deck to Deck as shown in Figure 2. (See Note A) 3/8"...
- Page 47 DECK TO DECK LONG ASSEMBLY 1100-3 INSTALLATION INSTRUCTIONS Page 1 of 2 IMPORTANT NOTES: Read First ® (A) Use liquid thread lock (such as Loctite ) with all threaded hardware. Important: Liquid thread lock (prior to curing) helps to eliminate the common problem of "thread seizure" in stainless steel hardware by serving as a lubricant during assembly.
- Page 48 DECK TO DECK LONG ASSEMBLY 1100-3 INSTALLATION INSTRUCTIONS Page 2 of 2 Step 1 3/8" x 1-3/4" Refer to Top View drawing in the Playground Button Head Bolt Equipment Manual to locate the position(s) of 12 Places decks on your play structure. 3/8"...
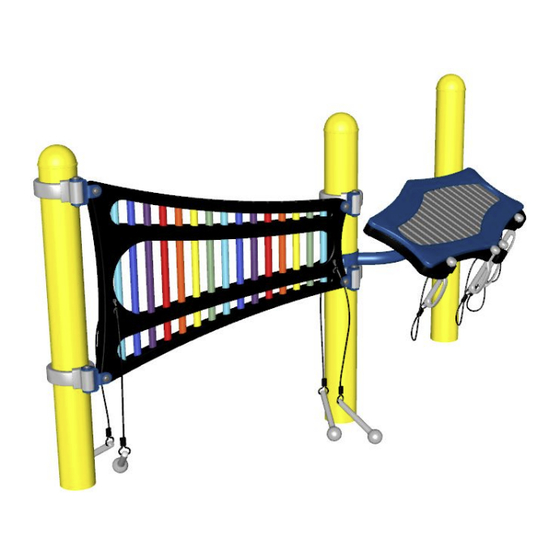
- Page 49 COMPOSER INSTRUMENT PANEL 16520 INSTALLATION INSTRUCTIONS Page 1 of 4 IMPORTANT NOTES: Read First ® (A) Use liquid thread lock (such as Loctite ) with all threaded hardware. Important: Liquid thread lock (prior to curing) helps to eliminate the common problem of "thread seizure" in stainless steel hardware by serving as a lubricant during assembly.
- Page 50 COMPOSER INSTRUMENT PANEL 16520 INSTALLATION INSTRUCTIONS Page 2 of 4 Step 1 Locate and attach collars at heights shown in Elevation View. (See Note B) * Height shown from top of collar to top of collar. ** Height shown from finish grade to top of collar. Elevation View "...
- Page 51 COMPOSER INSTRUMENT PANEL 16520 INSTALLATION INSTRUCTIONS Page 3 of 4 Step 3 Attach Composer to Collar as shown in Figure 1.1. Note orientation of Composer in R5 versus R35. (See Note A). Step 4 Fully tighten all fasteners according to the "TIGHTENING TORQUE FOR HARDWARE"...
- Page 52 COMPOSER INSTRUMENT PANEL 16520 INSTALLATION INSTRUCTIONS Page 4 of 4 Parts List Specifications SIT DOWN BRACKET DOUBLE R3.5: Part # DESCRIPTION Shall be precision cut and formed from 1/4" thick sheet steel and will have a multi-stage baked-on BG-8157 Sit Down Bracket Double R3.5 powder coat finish.
- Page 53 DUO INSTRUMENT PANEL 16522 INSTALLATION INSTRUCTIONS Page 1 of 3 IMPORTANT NOTES: Read First ® (A) Use liquid thread lock (such as Loctite ) with all threaded hardware. Important: Liquid thread lock (prior to curing) helps to eliminate the common problem of "thread seizure" in stainless steel hardware by serving as a lubricant during assembly.
- Page 54 DUO INSTRUMENT PANEL 16522 INSTALLATION INSTRUCTIONS Page 2 of 3 Step 1 (Factory Assembled) Attach Cover to Duo using Mounting Screws packaged with Duo as shown in Figure 2. COVER MOUNTING SCREW (PACKAGED FIGURE 2 WITH DUO) 3/8" x 1" O.D. Washer 3/8"...
- Page 55 DUO INSTRUMENT PANEL 16522 INSTALLATION INSTRUCTIONS Page 3 of 3 Step 4 Secure Mount to Post as shown in Figure 1.2. (See Note A) Tek Screw 1/4" Step 5 x 1-1/4" Fully tighten all fasteners according to the "TIGHTENING TORQUE FOR HARDWARE" section of the Installation Manual.
Need help?
Do you have a question about the PLAYCRAFT P23-0206 and is the answer not in the manual?
Questions and answers