Advertisement
Quick Links
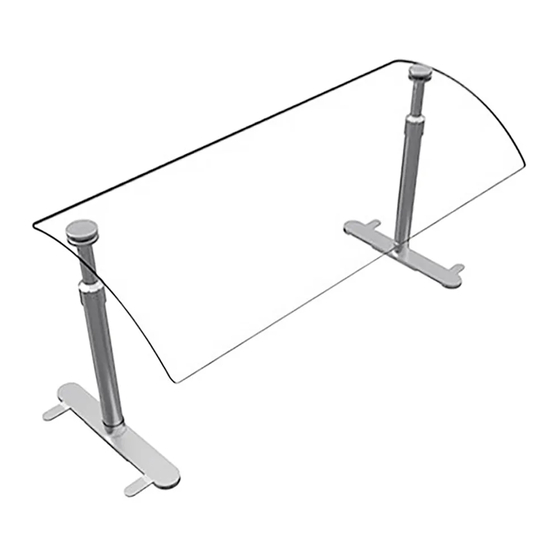
Flav-R-Shield™
Portable Sneeze Guards
Model EP-950 ACRYLIC
Model EP-950 ACRYLIC Curved Portable Sneeze Guards
are available in five, single bay overall widths from 24"–72"
(610–1829 mm). All of the available widths are height adjustable
from 13"–24" (330–610 mm) and have a common base plate
depth of 14" (356 mm).
For additional information regarding Model EP-950 ACRYLIC,
scan the QR Code below:
Important Safety Information
To avoid injury and damage to equipment or property, read the
following safety information before installing this equipment.
Do not attempt to assemble and install sneeze guards
alone. Installation of sneeze guards requires two or
more people, dependent upon unit.
Do not place anything on top of sneeze guard. It is not
designed to be a weight-bearing component.
IMPORTANT—DO NOT use paper towel or glass cleaner
to clean acrylic/plastic surfaces. Paper towel and glass
cleaner may scratch the material. Wipe off plastic
surfaces using a soft, clean, water dampened cloth.
Use non-abrasive cleaners and cloths only. Abrasive
cleaners and cloths could scratch finish of unit,
marring its appearance and making it susceptible to
soil accumulation. Use of abrasive materials will void
warranty.
Assembly and Installation
1. Unpack all components. Model EP950 sneeze guards are
shipped in three pieces—the acrylic shield (w/clamp assemblies
installed) and two vertical post assemblies.
Clamp
Assembly
Acrylic Shield
Post
Assembly
2. Verify the mounting position of the posts on each base plate.
• The posts are pre-installed on each base plate in the offset
position. They can be moved to the center position, if
necessary.
• Use a 7/16" socket wrench to remove the post bolt on the
bottom of the base plates. Then, reinstall the posts in the
center position of the base plates. Use a torque wrench to
tighten the bolts to 20 ft-lbs.
© 2022 Hatco Corporation
3. Install the vertical posts to the acrylic shield.
a. Prepare the work surface
b. Lay the acrylic panel upside-
c. For each post: Thread the
4. Open up the stabilizer tabs, if necessary.
• The base plate of each post assembly has retractable
Tabs in retracted postion.
5. Flip over the sneeze guard so that it is right-side-up, and place
in the desired location.
6. Adjust the angle of the acrylic shield, if necessary.
NOTE: Always loosen the hex set screws on the clamp assemblies
Stabilizer
Tabs
a. On each clamp assembly, loosen the hex set screw.
b. Carefully move the acrylic shield to the desired angle.
c. Tighten the hex set screw on each clamp assembly.
1
P/N 07.14.004.00-0622 [EP950ACRYLIC_IG]
INSTALLATION GUIDE
Legs in offset position.
so that it will not scratch the
acrylic shield during assembly.
Use towels, blankets, or other
soft, non-abrasive material.
down on the prepared work
surface.
post onto the bolt of the
clamp assembly, and tighten
securely.
stabilizer tabs that can be pivoted out for extra stability.
before attempting to the adjust the angle of the acrylic
shield. Failure to loosen the screws will strip the internal
grip fittings.
Shield
removed
for clarity.
Hex Set
Screw
Legs in center position.
Leg
Leg
Bolt
Tabs pivoted to open postion.
Move shield
to desired
angle.
continued...
Advertisement

Related Manuals for Hatco Flav-R-Shield EP-950 ACRYLIC


Summary of Contents for Hatco Flav-R-Shield EP-950 ACRYLIC
- Page 1 Then, reinstall the posts in the center position of the base plates. Use a torque wrench to tighten the bolts to 20 ft-lbs. Move shield to desired Hex Set angle. Screw continued... © 2022 Hatco Corporation...
- Page 2 Safety Set Screw HATCO CORPORATION P.O. Box 340500 24 Hour 7 Day Parts and Service Milwaukee, WI 53234-0500 U.S.A. Assistance available in the United States 414-671-6350 and Canada by calling 414-671-6350. support@hatcocorp.com www.hatcocorp.com © 2022 Hatco Corporation...
Need help?
Do you have a question about the Flav-R-Shield EP-950 ACRYLIC and is the answer not in the manual?
Questions and answers