Table of Contents
Advertisement
Quick Links
Download this manual
See also:
Quick Manual
Advertisement
Table of Contents

Related Manuals for Concord Camera Eye-Q 2133z


Summary of Contents for Concord Camera Eye-Q 2133z
- Page 1 Eye-Q 2133z User Manual 020810...
-
Page 2: About This Manual
About this manual This manual makes using the Eye-Q 2133z as easy as possible. Information in this document has been carefully checked for accuracy; however, no guarantee is given to the correctness of the contents. The information in this document is subject to change without notice. -
Page 3: Table Of Contents
Table of Contents Chapter 1 – Getting Started ... 1 Features ... 1 Safety Information ... 2 Included Components ... 3 Camera Overview... 5 Front View... 5 Rear View ... 7 Bottom View... 10 Install the Memory Card... 11 Install the Batteries... 13 Choose a Language ... - Page 4 Copying Photos to a PC Copying Photos to a Ma Using as a PC Camera (Windows only) ... 34 Chapter 5 – Mode / Operation Guide ... 35 Snapshot Mode ... 35 Video Mode ... 36 Preset Mode ... 37 Landscape ...
-
Page 5: Chapter 1 - Getting Started
Chap ter 1 – Getting Started Featu Optical Zoom (3x), Digital Zoom (3x) • 600x1200 resolution (up to 2048x1536 resolution • rough interpolation) olor LCD viewfinder screen • udio-Video Clip Recording • USB 1.1 interface • Auto exposure, user-defined exposure, auto focus •... -
Page 6: Safety Information
Eye-Q 2133z User’s Manual Safety Information Do not look at the sun through the viewfinder. Viewing the sun or other strong light source through the viewfinder could cause permanent visual impairment. Do not disassemble the camera. Touching the product’s internal parts could result in injury. -
Page 7: Included Components
Included Components Your Eye-Q 2133z comes equipped with the following ponents. Please check to make sure all items are inclu ded. Eye-Q 2133z... - Page 8 Eye-Q 2133z User’s Manual User’s Manual Quick Referen USB Cable Two (2) AA Alkaline Batteries Installation CD-ROM Soft Carrying Case Video Cable ce Guide...
-
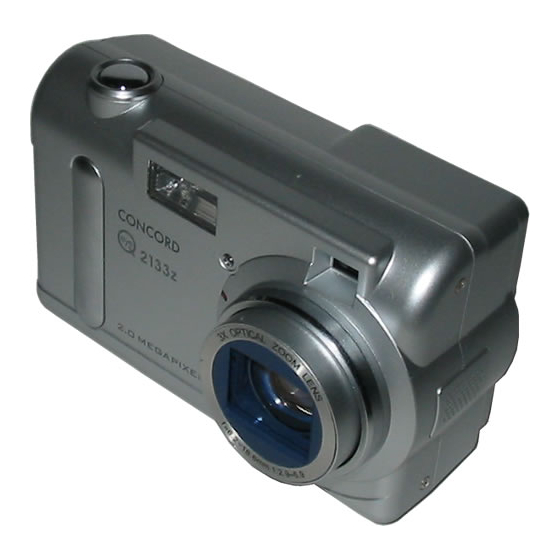
Page 9: Camera Overview
Camera Overview The front, rear, and bottom views of the Eye-Q 2133z a shown on the following pages. Please take a moment t review thes terms used in the rest of this manual. Front View e illustrations to familiarize yourself with the... - Page 10 Self-Timer Shutter Button, th before the camera takes a picture. Light Sensor: The Eye-Q 2133z automatically detects ambient light levels and determines whether or not the flash is needed. Light measurements are made with this sensor. Take care not to block the sensor while taking pictures.
-
Page 11: Rear View
Rear View Status LED: When power is first turned on, or the camera is working (and not available to take a picture), the LED will flash. When the camera is ready to take a picture or accept user commands, the LED is a solid green color. - Page 12 The actual picture is taken with the lens and not the viewfinder. Power Button: Press this button to turn on the Eye-Q 2133z. Press it again to turn it off. WB/Delete: Press this button to cycle through the White Balance presets: Auto, Daylight, Shade, Tungsten and Fluorescent.
- Page 13 10. Video Out Jack: Connect your video out cable here and then the other end to your television set in order to use the camera as a digital video camera. USB Port: The USB (Universal Serial Bus) port is used to connect the camera to a PC as well as for transferring photos.
-
Page 14: Bottom View
Eye-Q 2133z User’s Manual Bottom View Tripod Connector: Attaches the camera to a tripod s is an optional accessory that can be used to hold the camera still and is especially useful for l light night picture tery / Memory Card Cover: Opens to allow access to the battery chambers as well as the memory card slot. -
Page 15: Install The Memory Card
Install th e Memory Card To install the memory card: Turn off the camera. Open the battery / memory card compartment by pressing on the cover and sliding in the direction of the arrow toward the outside edge of the camera. - Page 16 Eye-Q 2133z User’s Manual Insert the memory card with the notched corner facing the camera (gold circuitry facing toward the back of the camera.) Close the battery / memory card cover. Images are not auto matically transferred to the memory card from On-board memory when a memory card is inserted.
-
Page 17: Install The Batteries
Install the Batteries To install or replace the batteries: Turn off the camer Open the battery compartment on the bottom of the camera by pressing on the cover and sliding in the direction of the arrow toward the outside edge of the camera. - Page 18 Eye-Q 2133z User’s Manual Insert batteries into the chamber making sure that the positive properly oriented, as indicated on the compartment’s interior wall. Close the battery cover. and negative ends are...
-
Page 19: Choose A Language
Choose a Language The Eye-Q 2133z can display text and messages in lish, French, Spanish, Germ To select a different language: Rotate the Mode Dial to SET UP m Turn the camera on. an, Italian and Japanese. - Page 20 Eye-Q 2133z User’s Manual Use the Down button press the Display button se the Up and Down buttons he language you want to use. Press the Display button Menu returns. to select Language th to ente this menu. to sele...
-
Page 21: Set The Time And Date
Set the Time and Date When you transfer a photo to a computer and/or p the time and date will show when it was taken. To set the date display style: Rotate the Mode Dial to SET UP Turn on the camera. Use the Down button press the Display button to select Date and then... - Page 22 Eye-Q 2133z User’s Manual Select Choose either Month/Day or Day/Mont display style for the date. When the settings are correct, press the Display button the Style option. Press th to enter that menu. to save the changes. e Display button...
- Page 23 To set the date and time: 1. Select Date on th Display button 2. Select the Clock option. Press t to e nter that menu. e SET UP menu and then press the he Display Button...
- Page 24 Eye-Q 2133z User’s Manual 3. Use the hour. Press the Flash/Copy move on to minutes. Next, se Flash/Copy button the next 5. On ce the time has been set, re year, then the month, and finally the day. 6. When t...
-
Page 25: Chapter 2 - Taking Pictures
Chap ter 2 – Taking Pictures This chapter sh Eye-Q 2133z. Prepare the Camera To prepare the camera for picture taking: Press the Power button to turn it on. After a sho t pause, the LED w signal that the camera is ready for use. -
Page 26: Select The Camera Mode
Eye-Q 2133z User’s Manual Select the Camera Mode There are two modes for taking pictures: set. Snapshot mode is for basic picture taking, while Preset mode allows yo five preset Self-Timer and Macro. Rotate the Mode Dial to the mode you wish to use. -
Page 27: Zoom And Shoot
Zoom and Shoot Zoom in on a particular object You can use the Zoom In or Zoom Out buttons to narrow or w iden the lens’ field of view. Use the LCD display to preview the effects of the zoom function. Automatic Image P rocessing Pressing the Shutter button half way down i... - Page 28 Eye-Q 2133z User’s Manual About the Optical and Digital Zoom Function The camera features both optical and digital zoom, giving you more precision when framing your subject. Optical zoom is similar to the zoom function on a traditional camera. Components in the lens move, reducing the field of view and making t appear closer.
-
Page 29: Turn Off The Camera
Turn off the Camera When you are finished taking pi ctures, press the power button to turn it off. This conserves battery power and prevents unnecessary wear and tear on the internal electronic parts. -
Page 30: Chapter 3 - Reviewing Your Pictures
Eye-Q 2133z User’s Manual Chap ter 3 – Reviewing Your Pictures One benefit of the Eye-Q 2133z is that you can immediately check whether or not you like the pict you just took. After you take a picture you can see w it looks like and then retake it if you are not happy. -
Page 31: Thumbnail Review
You can also use the Zoom buttons more detail on a p setting is "x1"; Press Zoom In ratios as follows: x1.0, x1.5, x2.0, x2.5, x3.0, x3.5, x4.0. Pre the Zoom Out button x4.0 down to x1.) Thumbnail Review If you press the Zoom Out button ratio is at x1 (default), the camera switches over to Thumbnail Review In Thumbnail Review, four pictures are shown on the LCD... -
Page 32: Chapter 4 - Connecting To A Computer
Eye-Q 2133z User’s Manual Chapter 4 – Connecting to a Computer The Eye-Q 2133z stores pictures as digital data ra than on film. Instead of making a trip to a developer an printing from negatives, you can simply copy your pictures to a computer for long-term storage. -
Page 33: Installing Software
Instal ling Software Follow these instructions to install the Eye-Q 2133z drivers and software on your s Please h beforeha during the installation process. Step 1: TWAIN Driver / Utility Installation Insert the ROM drive. Don’t connect The installation p... - Page 34 Eye-Q 2133z User’s Manual Step 2: MSD / PC Camera Driver Installation To install the necessary drivers for Mass Storage Device (MSD) mode and PC Camera mode, fi set the correct operational mode for that function. For example, set the Mode Dial to PC Camera mode to install those drivers, and to any other mode to install Mass Storage Device drivers.
-
Page 35: Making The Connection
Make sure the installation CD is in the CD drive and turn th Hardware W camera and lead you through the installation procedures for the corresponding mode. You will need to do this once for each mode (PC amera and MSD.) To n sure that the camera works in the correct mo un l... -
Page 36: Copying Photos To A Pc
Copying Photos to a PC When connected to your computer in MSD mode, the Eye-Q 2133z behaves exactly like any another disk drive attached to your computer. This makes copying the images to your hard drive as easy as copying f floppy disk, zip drive or CD-ROM. -
Page 37: Copying Photos To A Macintosh
Before you plug the camera into a Mac, ensure that t Mac OS version is 9.0 or later. When connected to MAC in MSD mode, the Con Eye-Q 2133z behaves exactly like any another di ttached to MAC. The disk drive appears on the desktop. This m... -
Page 38: Using As A Pc Camera (Windows Only)
PC Camera mode can also be us conferencing software such as Microsoft NetMeeting™. use the Eye-Q 2 set the camera to PC Camera mode. use the Eye-Q 2133z i y of the modes except for the PC Camera mod d disk. and then connect it to... -
Page 39: Chapter 5 - Mode / Operation Guide
Chapter 5 – Mode / Operation Guide e Eye-Q 2133z has six separate modes of eration. You can select which mode you want to use by rotating the Mode Dial to the correct position. This chapter describes each the different button function apshot Mode Snapshot mode is used for taking pictures. -
Page 40: Video Mode
Eye-Q 2133z User’s Manual • ht (flash) is used t rough the following settings: Auto, On, Off, and uto Flash with Red-Eye Redu Auto Flash has no icon. • settings. Pressing the WB following settings: Auto, Da Bulb (incandescent light), and Fluorescent Light. -
Page 41: Preset Mode
16MB, your camera can record up to a maximum of 60 seconds of video. To record a video clip: . Turn the Mode Dial to the Video Clip mode setting. . When the camera’s LCD screen comes on, f your shot. 3. -
Page 42: Landscape
Eye-Q 2133z User’s Manual the ty pe of picture you want to take using the Up and Down Landscap reset is optimized for taki the lens focus universally distributed to encompass everything within the entire frame. Portrait Th prese t is optimized for taking “head shots” of othe... -
Page 43: Self-Timer
Self-Timer This preset lets you take a photo after a ten second delay. This gives you haps self-portraits or group photos, for example. To Take a Group Photo Position the camera on a stable surface (such a an optical tripod) and frame the shot. Rotate the camera’s Mode Dial to Preset mod Use the Up Timer Preset. -
Page 44: Playback Mode
Playback Mode The Playback mode is used to view the photos stored i the Eye-Q 2133z’s on-board memory or on the SD/MMC memory card. To view the photos, rotate mode position. (Press th Playback mode’s button functions:... -
Page 45: Set Up Mode
Zoom Out: In Snapshot Mode, widens the field • med by th u zoom out while in Playback mode the camera switches to Thumbnail mode. Zoom In: Narrows the field framed by the • camera’s lens from x1.0 to x4.0 (x1.0, x1.5, x2.0, x2.5, x3.0, x3.5, 4.0) SET UP Mode Mode configures the camera. -
Page 46: Delete All
Eye-Q 2133z User’s Manual Delete To delete image memory or from from the SET UP menu. Format This opti on completely erases and reformats of the orage device. It is similar in function to formatting or defra gmenting a PC hard drive. Although Formatting... -
Page 47: Quality
Quality Adjus t the image quality and resolution by selecting Quali ty from the SET UP menu. There are five 2048 x 1536 (Super) 1600 x 1200 (Fine) 1600 x 1200 (Normal) 800 x 600 (Fine) 800 x 600 ( The higher the quali but at the same t and therefore yo... -
Page 48: Buzzer
Eye-Q 2133z User’s Manual Buzzer en this feature is turned on, the camera makes a beep when you push its buttons or rotate its Mode dial. To activate the beeps, select the menu. On the subsequent screen, and then press the Display button... -
Page 49: Date/Time
After making your selection, press the Display button Date/T The Eye-Q 2133z marks each pi displaying the hour, minute ken. This is useful for organizing and ke your photo collection. For more on setting the time and date see page 17. -
Page 50: Language
External, to use an installed SD/MMC Card. Press the Display button selection and return to the main Setup screen. Langua The Eye-Q 2133z can display languages: English, French, Japanese. For more on setting the default to select Memory Type buttons mera’s on-bo d... -
Page 51: Video Out
Video O If connecting your camera to a television set by means of A /V cables, you have the option to choose a tran smission format compatible with that of your TV. This allows you to record video images sent to the TV with a VCR. -
Page 52: Pc Camera Mode
Eye-Q 2133z User’s Manual PC Camera Mode The Eye-Q available video soft connect it to the Mode dial to For more on this mode, see pa 2133z can be used with any commerci ware as a video camera. your PC with the supplied US... -
Page 53: Chapter 6 - Using The Lcd Display
Chapter 6 – Using the LCD Display When the camera is in any mode other than SET U mode, current camera settings such as zoom, icons on the LCD display indicate quality, etc. This chapter describes these icons and their me Preset Mode Flash... -
Page 54: Lcd Icon Descriptions
Eye-Q 2133z User’s Manual LCD Icon Descriptions Icon Name Auto Flash The camera senses whether the flash is needed by Flash Off Flash is turned off, regardless of the amount of ligh t Auto Flash with Red- Reduction Flash On Flash is always on, regardless of light available. - Page 55 Indicates the level of zoom currently applied. In Video Mode, zoom options are: x1.0, x1.2 x2.0, x2.25, x2.5, x2.75, x3.0; digital zoom op x1.2, x1.4, x1.6, x1.8, x2.0. In Snapshot Mode, optical zoom options are: x1.0, x1.25, Zoom x1.5, x1.75, x2.0, x2.25, x2.5, x2.75, x3.0; digital zoom options are: x1.0, x1.2, x1.4, x1.6, x1.8, x2.0 x2.8, x3.0.
-
Page 56: Appendix 1 - Button Function Guide
Eye-Q 2133z User’s Manual Appendix 1 – Button Function Guide Mode Shutter Single Capture Snapshot Single Capture Preset Select Photo Playback Start / Stop Recording Video PC Camera Execute Function SET UP N/A = Not Available Down play LCD + Light →... -
Page 57: Appen Dix 2 - Troubleshooting
Appendix 2 – Troubleshooting Problem Possi le cause The camera The cam has no power. turned o The bat teries are discharg The bat teries are inserted incorrectly. The camera Ensure t won’t take a Camera picture. indicator is on and not fla Is the camera connect... - Page 58 Eye-Q 2133z User’s Manual Windows ME When removing and Windows USB devices, it is 2000: when recommended that the USB cable users follow the is unplugged "Safe R from the PC, USB Device" an "Unsafe procedure. Removal Device Detecte d"...
- Page 59 The camera is PC Camera mode in PC Camera is optimized to mode and is work best when connected to your VGA card's the computer. color depth is set to 24-bits or When an higher. Problems application will occur if the attempts to depth is set to 16- capture video...
- Page 60 Technical Suppor t Hot Line: Toll Free In the USA & Canada 1-866-522-6372 Toll Free In Europe UK: 0800-169-6482 BELGIUM: 0800-787-57 FRANCE: 0800-917-599 GERMANY: 0800-1800-563 SPAIN: 900-973-195 ITALY: 800-781-883 All Other Countries - Toll 31-53-482-9779...