Table of Contents
Advertisement
Quick Links
Accurate Sensors Technologies
We measure accurate temperature in extreme conditions
AST P250/P450
Non-contact Infrared Pyrometers
USER MANUAL
AST - Accurate Sensors Technologies
Misgav Industrial Park
, Misgav 20173, Israel
Tel: +972-4-9990025, Fax: +972-4-9990031
Email: info@accuratesensors.com
Web: www.accuratesensors.com
Advertisement
Table of Contents

Subscribe to Our Youtube Channel
Related Manuals for AST P250


Summary of Contents for AST P250
- Page 1 Accurate Sensors Technologies We measure accurate temperature in extreme conditions AST P250/P450 Non-contact Infrared Pyrometers USER MANUAL AST - Accurate Sensors Technologies Misgav Industrial Park , Misgav 20173, Israel Tel: +972-4-9990025, Fax: +972-4-9990031 Email: info@accuratesensors.com Web: www.accuratesensors.com...
- Page 2 2. Chapter - 2 ........................Introduction 2.1 Application, range and working principle 2.2 Technical specification 2.3 Optical Data 2.4 Standard Item Supplied with AST P250/P450 3. Chapter - 3 ........................Operation of the pyrometer 3.1 Overview 3.1.1 Adjustment of the diopter adaptor 3.2 Installation of pyrometer...
-
Page 3: General Information
AST reserves the right to revise this document and to make change from time to time in the content hereof without obligation to notify any person or persons of such revisions or changes. AST instruments have a warranty of two year from the invoice date. - Page 4 Chapter - 2 Introduction AST P250/P450 is specially designed highly accurate digital pyrometer to provide high performance and low maintenance of non contact temperature measurement in demanding industrial environment. 2.1 Application, Range and Working Principle P250/P450 are specially designed portable IR pyrometer for non contact temperature measurement between 210°C to 3000°C in demanding industrial environments.
-
Page 5: Physical Characteristics
LCD outside : 0.1°C upto 1000°C after this 1°C Serial Interface USB 2.0 Alarm Visual (LCD Blinking Facility) Mounting Tripod Standard Item supplied with AST P250/P450 :- þ Pyrometer with through the lens sighting. þ USB interface, USB 2.0 Cable. þ Calibration certificate. -
Page 6: Optical Data
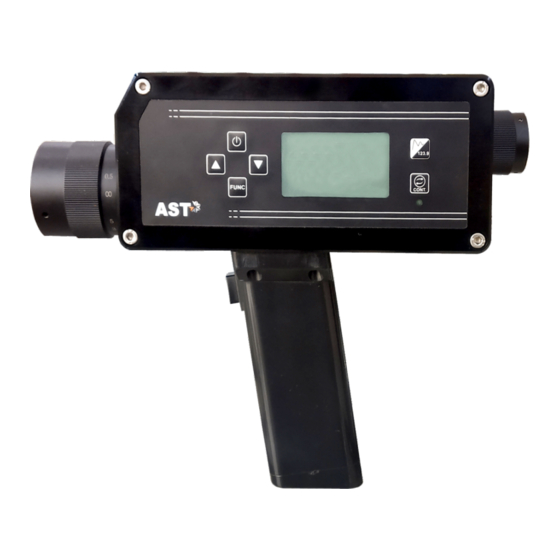
Measuring distance between 500mm to ∞ infinity ( ) with small spot size can be 500 mm achieved with the pyrometer. infinity (∞) 2.4 Standard Item supplied with AST P250/P450 Calibration certificates & Operation manual. Software CD Carry Box USB interface, USB 2.0 Cable... - Page 7 Chapter - 3 Operation of the Pyrometer Overview Numeric Display Graphic Display Power Key (ON/OFF Key) Numerical or Graphical Mode Switch UP & DOWN View Finder with Spot Indication and built in Digital Display Focusable Optics ∞ between 500 mm to Storage Data Display Switch Choosing the Measuring Function: Normal Temp.
- Page 8 Installation of Pyrometer 3.2.1 Battery Insertion Handle Battery Case For operating the pyrometer 3 batteries (rechargeable batteries) are required (Note :- Alkaline- manganese batteries should not be used). They must be inserted into the battery holder (Note:- polarity of battery should be correct). And installed afterward into Battery Holder the pyrometer handle (Note :- position and direction of battery should be correct).
- Page 9 3.2.3 Display Functions The pyrometer is controlled by adjustment button on left side of instruments. FUNC Function key :- There are different uses of function key first one, this key is use to see different parameters in device and other one is set the value of parameter which is adjusted by UP & DOWN key.
- Page 10 Up/ Down Key :- These key is use to change the present value of any parameter (which given in function key) either upward or downward. Graphic /Numeric key :- This key is used switch the display either graphical to numerical and Vice - versa.
-
Page 11: Pc Software Installation
Chapter - 4 A. PC Software Installation The provided AST software offers possibilities to connect pyrometer for parameter Setting, offline graph and to evaluate measuring data. A. 4.1 Installation Install the pyrometer software using the installation guide file on CD ROM. After installation of the software restart the computer and double click on application, it will open software screen. - Page 12 A. 4.2.2Parameter Setting All user selectable device parameters can be set by using the software in the Panel "Parameter". A) Emissivity settings : The emissivity can be set by clicking on "Parameters” and select or type in the desired emissivity directly in the description field.
- Page 13 Auto : “Auto” mode is used for discontinuous measuring task, such as object being transported on a conveyor belt in such a case the maximum value for each object has to be indicated. When the object passes the measuring beam of the pyrometer, the maximum value is stored until a new hot object appears in the measuring beam.
- Page 14 A. 4.4.1 Data To see particular block data click on particular block number. All the data of this block shown on screen, this particular block contain all events, Date, time, temperature and emissivity. A. 4.4.2 Graph Mode To see particular block data graphically, user can click on graph mode. Graph mode’s X axis denotes time scale & Y axis denotes temperature scale.
- Page 15 A. 4.4.3 Numeric Mode To see particular block data numerically, user can click on numeric mode. The data in this particular block contain all events, time, temperature and emissivity. A. 4.4.4 Save Events To save particular block, user can click on save events. After clicking on save events, a pop-up appears on screen. The name of file and location is user defined.
- Page 16 A. 4.5 Clear Memory To clear all data, blocks, events, user can click on clear memory. After clicking on clear memory all data of pyrometer will erase.
- Page 17 Slave device. The request contains an address of polling “Slave” device. Slave device reply only on the requests issued by the Master. Each Slave has its own address to recognize the issued request. AST sensors always operate as Slave devices.
- Page 18 Device model number (read '0E00' '01' 10 bytes “AST450C “', if less than 10 byte pad with space at end only) Firmware version '1300' '01' Firmware version number of device (read only) Sensor serial number (read 6 bytes in hex, if less than 6 bytes pad with '0' at start. Only numbers '1400' '01' only)
- Page 19 Reply to above command if address '0000' contains value 1497 and address '0001' contains value 0000. Byte 1 Bytes 2, 3 Bytes 4, 5 Bytes 6-9 Bytes 10-13 Byte 14-15 059D 0000 0x02 0x30, 0x41 0x52, 0x44 0x30,0x35,0x39,0x44 0x30, 0x30, 0x30, 0x30 0x39, 0x43 in the event of an error, the reply is Byte 1...
-
Page 20: Error Code Description
Error Codes: Error Code Description Comments Invalid check sum See how to calculate a check sum Unknown command Protocol uses only RD (Batch Read) and WD (Batch Write) commands Data length error Number of items in WD (Batch Write) command doesn't match number of data bytes ETX not found ETX (0x03) not present in command... -
Page 21: Maintenance
Liability regarding any direct or indirect damage caused by this software is excluded. Limit of liability AST not liable for any damages that arise from the use of any examples or processes mentioned in this manual. Specifications are subject to change without notice Copyright: ©... - Page 22 Based on these technologies, AST/3T has bought to the market a line of pyrometers for the remote measurement of target temperatures using no physical contact. AST/3T pyrometers use a totally new approach for remote temperature measurement achieving high accuracy.
Need help?
Do you have a question about the P250 and is the answer not in the manual?
Questions and answers