Table of Contents
Advertisement
Quick Links
Advertisement
Table of Contents

Subscribe to Our Youtube Channel
Related Manuals for Zline TALLAC Series


Summary of Contents for Zline TALLAC Series
- Page 1 User Manual TALLAC DISHWASHERS www.zlinekitchen.com...
- Page 2 ZLINE Kitchen and Bath provides Attainable Luxury, where the kitchen and bath of your dreams is never out of reach. Through our unique designs and unparalleled quality, we’re dedicated to providing you an elevated experience in the heart of your home. With an endless selection of...
- Page 3 ZLINE is fueled by a passion for innovation; A relentless pursuit of bringing the highest end luxury designs and professional features into everyone’s homes. Because we continually strive to improve our products, we may change specifications and designs without prior notice.
-
Page 4: Table Of Contents
TABLE OF CONTENTS IMPORTANT SAFETY INSTRUCTIONS OPERATION • Controls and Specifications • Before Using the Appliance • Operation Tips • Detergent Usage • Loading the Dishwasher • Height Setting • Programs MAINTENANCE AND CLEANING TROUBLESHOOTING WARRANTY... -
Page 5: Important Safety Instructions
IMPORTANT SAFETY INSTRUCTIONS If the information in this manual is not followed exactly, a fire or explosion may result causing property damage, personal injury, or death. WARNING When using the dishwasher, carefully follow the precautions in this manual. These are provided in order to save time and effort and to help ensure optimum dishwasher performance. - Page 6 IMPORTANT SAFETY INSTRUCTIONS Read these installation instructions completely before installing and follow them carefully. Save these installation instructions and pass them on to any future user. WARNING CAUTION NOTICE • In addition to these instructions, the dishwasher shall be installed in accordance with all local codes, or in absence of a local code: •...
- Page 7 • Do not operate the appliance if it's damaged, malfunctioning, partially disassembled, or has missing or broken parts. If the unit arrives damage, contact ZLINE at 1-614-777-5004 for help. • If the dishwasher is a new installation, please note that most of the work must be done before the dishwasher is moved into place.
- Page 8 IMPORTANT SAFETY INSTRUCTIONS • When loading items into the dishwasher: • Locate sharp items so that they are not likely to damage the door seal. • Load sharp knives with the handles up to reduce the risk of type injuries. •...
- Page 9 IMPORTANT SAFETY INSTRUCTIONS • To avoid floor damage and possible mold growth, do not allow wet areas to remain around or under the dishwasher. • RISK OF INJURY: To avoid risk of injury, always use caution when opening the door during or following a wash cycle, as hot water or steam may escape. •...
-
Page 10: Operation
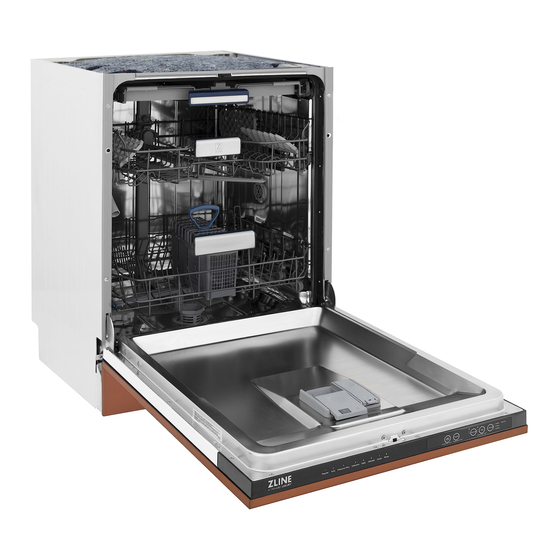
OPERATION (18") Upper Basket with Racks 2. Upper Spray Arm 3. Lower Basket 4. Lower Spray Arm 5. 3rd Basket 6. Top Nozzle Filters 8. Rating Plate Location Control Panel 10. Detergent and Rinse-Aid Dispenser 1 1. Upper Basket Track Latch 12. - Page 11 OPERATION (24") Upper Basket with Racks 2. Upper Spray Arm 3. Lower Basket 4. Lower Spray Arm 5. 3rd Basket 6. Top Nozzle Filters 8. Rating Plate Location Control Panel 10. Detergent and Rinse-Aid Dispenser 1 1. Upper Basket Track Latch 12.
-
Page 12: Before Using The Appliance
OPERATION BEFORE USING THE APPLIANCE PREPARING THE DISHWASHER FOR FIRST USE • Make sure the electricity and supply water specifications match the values indicated in the installation instructions for the dishwasher. • Open the door of the dishwasher. • Remove all packaging material inside the dishwasher. •... - Page 13 OPERATION MAINTENANCE INFORMATION If the dishwasher isn’t going to be used for an extended amount of time: • Disconnect the plug and close the tap. • Leave the door slightly open to prevent odor formation. 2. Select the Dry option to reduce the amount of time to air dry the residual water droplets 3.
-
Page 14: Detergent Usage
OPERATION DETERGENT USAGE WARNING: Use a detergent specifically designed for use in domestic dishwashers. WARNING • Use powder, gel, and tablet detergents that have been appropriately designated for use in household dishwashers. • Detergent should be put into the compartment prior to starting the dishwasher. •... - Page 15 5. Detergent Usage Should you need more information concerning the detergent you will use, contact detergent manufacturers directly. WARNING: Use a detergent OPERATION ecifically designed for use in Check that the detergent dispenser is mestic dishwashers. empty after the completion of each wash program u can find powder, gel,and tablet tergents in the market that have been...
- Page 16 OPERATION USING COMBINED DETERGENTS • Detergent manufacturers also manufacture combined detergents that are called 2-in-1, 3-in-1, 5-in-1, etc. • The 2-in-1 detergents contain detergent salt or rinse-aid. While using the 2-in-1 detergents, be sure you know what the tablet consists of. •...
- Page 17 OPERATION NOTE: If using a detergent pod from brands like Tide, All, etc., it’s recommended to place the pod in the detergent dispenser and close the dispenser door before starting a cycle. Consult the detergent pod manufacturer if wash results are not optimal. CAUTION: Solubility of the tablet detergents produced by different companies can vary depending on the temperature and time.
- Page 18 setting, NOTE: When the Rinse Aid indicator 5. The amount of rinse aid is adjuste lights up, the rinse aid reservoir contains pressing “Program Selection + Canc sufficient rinse aid for 2 - 3 programs only. OPERATION 6. After the adjustment, turn off (by p When using “Tab”...
-
Page 19: Loading The Dishwasher
OPERATION LOADING THE DISHWASHER Placing dishes into the dishwasher properly is best for energy consumption, as well as washing and drying performance. • Load round and deep items, such as pots with long handles, pot lids, plates, salad plates, and cutlery sets into the lower basket. •... - Page 20 OPERATION NOTE: Do not overload the dishwasher; pay attention to manufacturer instructions regarding which dishes and utensils are appropriate for use in a dishwasher. Only with suitable dishes will there be optimal washing results and appropriate use of energy. NOTE: High temperature water and dishwasher detergent may form a chemical reaction that can damage certain items.
- Page 21 e cutlery NOTE: While the appliance is running if esult. To you open the door all functions are OPERATION (18") ays place automatically interrupted. Once the door is nted dishes closed functions will continue to work. with their zontally on Upper Rack UPPER RACK Load the upper rack with dessert plates,...
- Page 22 OPERATION (18") 6.3. Incorrect Loads 6.3. Incorrect Loads EXAMPLES OF INCORRECT LOADS USA-CAN - 19 USA-CAN - 19 USA-CAN - 19...
- Page 23 OPERATION (24") 6.1 Upper Rack 6.2. Lower Rack Load the upper rack with dessert plates, You can load into the lower basket such UPPER RACK cups, glasses etc. round and deep items as pots with long handles, pot lids, plates, salad plates, Top rack load pattern for 10 place settings.
- Page 24 OPERATION (24") 6.2. Lower Rack plates, You can load into the lower basket such LOWER RACK round and deep items as pots with long handles, pot lids, plates, salad plates, Load round and deep items, such as pots with long handles, pot lids, plates, salad cutlery sets.
- Page 25 OPERATION (24") 1: Salad Fork 2: Teaspoon 3: Dinner fork 4: Knife-solid handle 5: Serving spoon 6.4. Incorrect Loads 6: Serving fork EXAMPLES OF INCORRECT LOADS settings . Cutlery Basket load pattern for 8 place settings . may have WARNING: Sharp cutlery may have h operation shifted position during the wash operation ry.
- Page 26 Upper Cutlery Basket OPERATION Upper Cutlery Basket ( Model Depending ) ( Model Depending ) The upper cutlery basket is designed for the The upper cutlery basket is designed for the placement of large and small cutlery and The upper cutlery basket is designed for the placement of large and small cutlery and placement of large and small cutlery and utensils.
- Page 27 OPERATION Top Basket Rack with height adjustment TOP BASKET These racks are designed to increase the capacity of top basket. You can place your Rack with height adjustment: cups and glasses on these racks. Thanks • These racks are designed to increase the capacity of the top basket. Place cups to adjustable feature of the racks, you can place glasses of different sizes under the and glasses on these racks.
- Page 28 OPERATION The horizontal wires located on the top basket allow for placement of plates and bowls. You can wash various-sized kitchenware such as pots and pans by flipping the height adjustment brackets closed (see 24" model for reference). Top Basket Rack with height adjustment crease the These racks are designed to increase the...
- Page 29 OPERATION Lower Basket Folding Racks 2) Height setting - when basket is filled Lower Basket Folding Racks et is filled ( model depending ) LOWER BASKET FOLDING RACKS Folding racks consisting of four parts that Folding racks consisting of four parts that The upper basket includes a mechanism chanism are located on the lower basket of your...
-
Page 30: Height Setting
OPERATION HEIGHT SETTING (WHEN BASKET IS EMPTY): The height setting of the upper rack may be changed using the wheels, which are preset at two height levels. CAUTION: Make sure that the rack is empty. Changing the height setting while the rack contains tableware could cause the contents to dislodge, CAUTION causing personal injury or damage to the tableware or dishwasher. - Page 31 OPERATION HEIGHT SETTING (WHEN BASKET IS FILLED): 2) Height setting - when basket is filled Lower Basket Folding Racks ( model depending ) The upper basket includes a mechanism that enables the height of the basket 2) Height setting - when basket is filled Folding racks consisting of four parts that Lower Basket Folding Racks The upper basket includes a mechanism...
- Page 32 OPERATION 8. OPERATING THE PRODUCT OTE: The program duration may ge according to the amount of dishes, 18" ater temperature, the ambient erature and selected additional 18" ons. OTE: The energy-usage label is d on the “Regular” program. This 1. Display am is the most efficient in terms of its 1.
- Page 33 OPERATION BUTTONS ON/OFF BUTTON This button is used as the On/Off button if it is held down for 3 seconds. Otherwise, it can be used as the Start/Pause button. It is used to turn on or turn off the dishwasher. Dishwasher will turn on with Regular program, and the number and the duration of the Regular program will appear on the display.
- Page 34 OPERATION PROGRAM SELECTION Press the On/Off button to turn on the dishwasher. Note that the door of the dishwasher is in the OPEN position. 2. Refer to the “Programs Table” to determine a washing program suitable for the dishes. 3. Press program selection button until the number of the program selected appears on the display.
-
Page 35: Programs
OPERATION Programs Duration Descriptions (min) Regular Soiled Standard program for daily, regular, or typical use to completely wash a load of normally soiled dishes. Clean Auto Soiled This program automatically adjusts the temperature and the quantity of water, the energy consumption, and the program duration. - Page 36 This program automatically adjusts the temperature and the quantity wash a load of normally soiled dishes. This program automatically adjusts the temperature and the qua This program automatically adjusts the tempe This program automatically wash a load of normally so Delicate Delicate Suitable for lightly soiled delicate dishes.
- Page 37 OPERATION OPTIONAL FUNCTIONS The dishwasher's washing programs are designed to give the best cleaning effect based on the type of the soil, soiling degree, and properties of the dishes to be washed. Optional functions are provided in order to save time, water, and energy and to perform a more comfortable washing cycle with conditions specific to every customer.
- Page 38 OPERATION SANITIZE OPTION The Sanitize function raises the water temperature in the final rinse. At the end of a successful sanitization, “00” is displayed on the display. HI-TEMP OPTION When this option is selected, both the water temperature and the washing time are increased.
- Page 39 OPERATION PROGRAMMING THE WASHING TIME DELAY TIMER If a peak power schedule is in the region, use the Delay Timer function to wash dishes during appropriate hours. The start of the selected program can be delayed up to 19 hours. Delay Timer cannot be set after the program starts. Press the Delay Timer function button after selecting the washing program and other optional functions.
- Page 40 OPERATION CANCELING THE PROGRAM Press program Selection + Cancel button for 3 seconds to cancel the program. 2. After 3 seconds, “1” will appear on the display. For a couple of minutes the dishwasher will fulfill the necessary operations required to cancel the program. •...
- Page 41 OPERATION OVERFLOWING WARNING If the dishwasher intakes too much water or there are leaks, the dishwasher will detect this and “F1” will flash on the display. As long as overflowing continues, the dishwasher's overflow protector will remain active. If overflowing stops and safety is assured, “F1”...
-
Page 42: Maintenance And Cleaning
MAINTENANCE AND CLEANING • Oil and lime may accumulate in the dishwasher’s washing section. In case of such accumulation: • Fill the detergent compartment without loading any dishes into the dishwasher, select a program that runs at high temperature, and start the dishwasher. - Page 43 MAINTENANCE AND CLEANING CLEANING THE SPRAY ARMS Clean the spray arms at least once a week in order for the dishwasher to operate efficiently. Lower Spray arm Check if the holes on the lower spray arm (1) are clogged. If they are clogged, remove and clean the spray arm.
- Page 44 MAINTENANCE AND CLEANING MAINTENANCE AND CLEANING ning The Impellers UPPER IMPELLER Check if the holes on the upper impeller mpellers at least once a week in e machine operates efficiently. 1 are clogged. If they are clogged, remove PELLER and clean the impeller. Turn its nut to left to e holes on the lower impeller (1 re-move the upper impeller (A, B) d.
-
Page 45: Troubleshooting
TROUBLESHOOTING POSSIBLE FAULT POSSIBLE FAULT WHAT TO DO Make sure the water inlet tap is open and water is flowing. Separate the inlet hose from the tap and clean Water inlet system failure the filter of the hose. Contact customer service at 1-614- 777-5004 if the error continues. - Page 46 TROUBLESHOOTING FAULT POSSIBLE CAUSE TROUBLESHOOTING The breaker is not in the Switch the breaker to the on position. on position. The screen does not come The supply cord is not Plug in the supply cord. plugged in. Your dishwasher is not Plug your dishwasher in plugged in Switch your dishwasher...
- Page 47 Filters or water drain Check the drain hose pump clogged or filter and filters are correctly misplaced. fitted. Need to purchase a part or accessory for your ZLINE product? Visit www.zlineparts.com, ZLINE's official parts distribution partner.
-
Page 48: Warranty
WARRANTY COVERAGE ZLINE Kitchen and Bath dishwasher products will be warrantied for one year from the original purchase date for the original purchaser of the product. This warranty covers all parts and labor for necessary repairs if any part of the product proves to be defective in materials or workmanship. - Page 49 WARRANTY WHAT IS NOT COVERED 1. Installation or start-up damages or problems caused by improper installation or use. 2. Damage related to unauthorized service or unauthorized parts. 3. Installation in any commercial or non-residential application. 4. Aesthetic damage, scratches, or natural wear caused by normal use. 5.
- Page 50 1.5.1 www.zlinekitchen.com 1-614-777-5004 contact@zlinekitchen.com...
Need help?
Do you have a question about the TALLAC Series and is the answer not in the manual?
Questions and answers