
Subscribe to Our Youtube Channel
Related Manuals for Bivocom TR323 Series


Summary of Contents for Bivocom TR323 Series
- Page 1 ® Industrial 5G/4G Mini IoT Router TR323 Series User Guide Note: interfaces of hardware for different models (5G and 4G version, GNSS) will be different. 1 / 50...
-
Page 2: Copyright
Product specifications and information in this document are subject to change without any notice, and BIVOCOM reserves the right to improve and change this user guide at any time. Users should take full responsibility for their application of products, and Xiamen Bivocom Technologies Co., Ltd. -
Page 3: About This Guide
Industrial 5G Mini IoT Router TR323-LF Industrial 4G LTE Mini IoT Router Note: please contact Bivocom team to choose the version of hardware you need for your IoT application, as different interfaces on hardware will have different part number, such as, WIFI, GPS/GNSS, etc. -
Page 4: Table Of Contents
Table of Contents Copyright ..........................2 Trademark ..........................2 Disclaimer ..........................2 About This Guide ........................3 Table of Contents........................4 1. Introduction ..........................6 1.1 Overview ........................... 6 1.3 Dimensions(103.5x78.2x24.1mm) ................7 1.4 Physical Characteristics ....................7 2. Getting Started ........................... 7 2.1 Package Checklist ...................... - Page 5 3.4.3 OpenVPN ......................36 3.5 Advanced ........................37 3.5.1 Static Routing ...................... 37 3.5.2 Net Flow ....................... 37 3.5.3 GPS Location(Option) ..................38 3.5.4 DHCP and DNS ....................39 3.6 Data Collect ........................39 3.6.1 Basic Setting ....................... 39 3.6.2 Interface Setting ....................39 3.6.3 Modbus Rules Setting ..................
-
Page 6: Introduction
1. Introduction 1.1 Overview The TR323 is an industrial mini 5G NR IoT router designed for IoT, M2M, and eMBB applications requiring higher speed, lower latency data transmission. It provides OpenWRT based Linux OS embedded environment that allows IoT developers and engineers to program and install their own applications based on Python, C/C++ to the hardware. -
Page 7: Dimensions(103.5X78.2X24.1Mm)
2. Getting Started 2.1 Package Checklist The following components are included in your standard TR323 package. Check the list before installation. If you find anything missing, please feel free to contact Bivocom. 1. TR323 Router 1PCS 2. Power Adapter 1PCS (DC 12V/1.5A, EU/US/UK/AU plug optional) -
Page 8: Installation
5G version: 4PCS 4G version: 2PCS 4. RS232 Cable 1PCS (DB9 Female, 1 meter) 5. Ethernet Cable(1 meter) 1PCS 6. 8-Pin Terminal Block 1PCS 7. DIN-Rail Mount Kits 1PCS 2.2 Installation 2.2.1 Insert SIM Card TR323 supports 2 micro SIM, so if you’re using a Nano SIM card, you will have to use a Nano SIM to Micro SIM adapter, which normally comes with your SIM card package. -
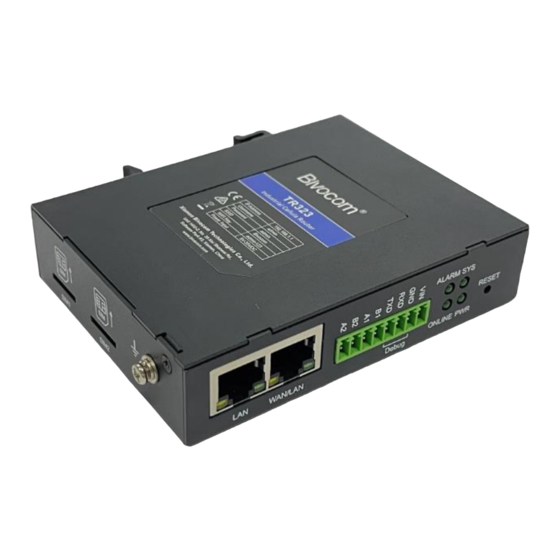
Page 9: Interfaces Connection
Image 4: Side view of TR323 with dual SIM 2.2.2 Interfaces connection Hardware Interfaces Instruction (standard TR323-NR and TR323-LF as an example) Before we start to install and configure the TR323, let’s have a quick view of the interfaces of it.(image 5-6 and table 1) Image 5: TR323-NR 5G version Interfaces Image 6: TR323-LF 4G version Interfaces 9 / 50... - Page 10 1) Definition for I/O Item Description RS485 port, used for connecting to sensors, controllers RS485 port, used for connecting to sensors, controllers RS232 port, used debug only VIN+GND power input, to power the router Table 1: I/O of TR323 TR323 supports 1x RS232(Debug only) and 2x RS485 serial ports, which can be used for IoT sensors/controllers, firmware upgrade, system log checking, debug, etc.
-
Page 11: Power Supply
Table 3: definition of RS485 2.2.3 Power Supply We suggest you use Bivocom standard power adapter (1.5A/12VDC) from the standard package mentioned-above. If you have to use your own DC power supply, make sure the power range is 5-35VDC and it is stable enough(Ripple shall be less than 300mV, and Instantaneous voltage shall not larger than 35V), meanwhile, power shall over 4W. -
Page 12: Led Indicators
Use an Ethernet cable to connect the LAN port of TR323 to your laptop, or use your laptop or mobile phone to connect to WIFI hotspot ‘Bivocom’ of TR323, login with password of WIFI: admin123, normally your laptop will get an IP address from TR323 DHCP as 192.168.1.xx, otherwise please manually configure your laptop IP to... -
Page 13: View
After enter into the web config page, you’ll see a list of menu on left side, as below. 3.1 View To check the following system information. 3.1.1 System Display system related information, such as firmware version, local time, SN, uptime, etc. 13 / 50... -
Page 14: Network
3.1.2 Network Display WAN, LAN, WiFi, DHCP network information. 3.1.3 Routes Display routing tables. 14 / 50... -
Page 15: System Log
Display system log. 3.1.5 VPN Status Display VPN status. Bivocom TR323 supports IPsec, PPTP, L2TP, OpenVPN, GRE protocols, after it’s successfully connected to your VPN server, it’ll display some info as below, such as, Type, Connect Status, Uptime, Subnet Mask, etc. -
Page 16: Setup
3.2 Setup Main menu of this page includes, WAN, LAN, Wireless, Online Detection, Diagnostics. 3.2.1 WAN 1) Connection Type WAN supports DHCP/Static IP/PPPoE/3G/4G/5G connection type. Choose the mode you need to configure the related parameters, then you can connect to the internet. - Page 17 2) Network Type Type of network, the default value is AUTO, you can keep it as default or choose your own preference, such as 5G only, LTE only or 3G only, etc. 3) APN For standard SIM card, just keep it as blank, while if you’re using SIM card with APN required, then you have to input the APN from your Telcos, and different Telcos might have different APN, please ask your Telco if you have no idea of what your APN is.
-
Page 18: Lan
blank. 7) Authentication Type If there have username and password, you need to choose authentication type. Normally, just keep it as default. ⚫ PAP, Plaintext Authentication ⚫ CHAP, Handshake authentication You need to choose the authentication type according to Telco’s network, or you may fail to dial up. - Page 19 2) IPv4 Netmask The netmask of LAN port IP address. 3) DHCP Server ⚫ Disable DHCP Click to disable DHCP server. ⚫ Start Assign the IP address of DHCP server. For example, 100 means IP address starts from 192.168.1.100. ⚫ Limit Assignable number of IP address, to ensure numbers of IP address of start and limit not exceed 250.
-
Page 20: Wireless
Menu of wireless are mainly for configuring parameters of WIFI hotspot, such as, SSID, work mode, password, etc. Note: standard package of TR323 only supports 2.4G WIFI, and it’s an option feature, please ask Bivocom representative for more info when place the order. WIFI 2.4G Click ‘Enable’, to enable the WIFI function. -
Page 21: Online Detection
4) Encryption You can choose different encryption type as below. 5) Key Password of WIFI hotspot, user needs to input it to access the internet shared by WIFI. The minimum length of password is 8 bytes. 6) Hide SSID When Hide SSID is enabled, SSID is invisible, and user need to enter the SSID to access the WIFI hotspot. - Page 22 1) Detection Type There are 3 types: ping, traceroute and DNS. ⚫ Ping Router will ping an IP address or DNS, if works, that means router is online. ⚫ Traceroute Traceroute will trace routing path, if achieves the target address, that means router is online.
-
Page 23: Diagnostics
4) Retry Times You can set up retry time in case detection fails. 5) Retry Interval The interval time between 2 detections. 6) Enable Reboot Click enable, and router will reboot within the time set if it fails to reconnect. 7) Reboot After Interval You can specify the time for offline, to reboot the router. -
Page 24: Secure
2) Traceroute Click traceroute, then you can see similar response as below. 3) Nslookup Click nslookup, then you can see similar response as below. 3.3 Secure Menu of Secure are for configuring the firewall, to ensure the security of accessing to internet, and implement the port forwarding, access control, data packet filtering, and 24 / 50... -
Page 25: Dmz Host
other functions. 3.3.1 DMZ Host DMZ can forward the port of WAN to a host of LAN; all packet from WAN will be forwarded to specified host of LAN. 1) DMZ You can enable or disable the DMZ. 2) DMZ Host An IP address of a host of LAN you want to map. -
Page 26: Traffic Rules
2) Protocol You can choose TCP, UDP, or TCP/UDP. 3) External Port Destination port before port forwarding. 4) Internal IP Address The Host IP address to forward. 5) Internal Port The destination port after port forwarding. Normally, external port and internal port are the same, but also can be different. - Page 27 1) Name You can name the rule yourself. 2) Source Zone You can choose where to start the data packet. 3) Destination Zone You can choose where to forward the data packet. Click ‘Add and Edit’, then you can get more detailed matching condition. 1) Restrict to Address Family You can choose IPv4, IPv6, or Pv4/IPv6.
-
Page 28: Custom
3) Source MAC Address To choose the source MAC address of data packet. 4) Source Address To choose the source IP address of data packet. 5) Source Port To choose the source port of data packet. 6) Destination Address To choose the destination IP address of data packet. 7) Destination Port To choose the destination port of data packet. -
Page 29: Pptp
TR323 support VPN: PPTP, L2TP, OpenVPN and IPSec. PPTP/L2TP are layer 2 VPN, and OpenVPN is VPN based on SSL, while IPSec is layer 3 VPN. PPTP/L2TP are more convenient to use, while OpenVPN and IPSec is more complex, as they need complex certification management, meanwhile, they offer more secured encrypted data. - Page 30 can enter remote subnet 192.168.2.0. 5. Remote Subnet Mark To enter the remote subnet mask, normally it is 255.255.255.0. 6. NAT If click NAT, all packets come from ppp0, and the source IP of the packets will be replaced as IP of ppp0. 7.
-
Page 31: L2Tp
For example, if you want to create a username: test, password: test, it is as below, Test * testing * Please ask for Bivocom support if you need an example of how to set up the PPTP client and server work mode. - Page 32 1) L2TP Client 1. L2TP Client You can enable or disable L2TP client. 2. Server Address To enter the IP address or Domain Name of L2TP server. 3. User Name and Password To enter the username and password provided by server. 4.
- Page 33 For example, if you want to create a username: test, password: test, it is as below, Test * test * Please ask for Bivocom support if you need an example of how to set up the L2TP client and server work mode.
-
Page 34: Ipsec
3.4.3 IPSec On IPsec page, system will display the IPsec connection and status. 1) Peer Address To enter peer IP address or Domain Name, if TR323 chosen as an IPsec server, you don’t need to input it. 2) Negotiation Method You can choose ‘Main’... - Page 35 Peer identifier of channel, can be an IP address or domain name. 10) ESP Encryption Algorithm The encryption method of ESP. For more info about how to set up IPsec, please contact Bivocom support to get quick guide. 35 / 50...
-
Page 36: Openvpn
3.4.3 OpenVPN 1) OpenVPN You can enable or disable OpenVPN. 2) Topology Choose the topology, it can be point to point or subnet Note: For point to point, a tunnel will be established between 2 devices. While for subnet, multi devices will be connected to one server. 3) Role When topology is subnet, you need to choose you want it be a server or client. -
Page 37: Advanced
When topology is point to point, and authentication type is certification, you need to choose if it is server or client. For more info, please contact Bivocom support to get quick guide. 3.5 Advanced You can set up some advanced functions here. -
Page 38: Gps Location(Option)
will be saved, and when you power on the router, the traffic will be counted based on your last time traffic. 3.5.3 GPS Location(Option) GPS location will report GPRMV information regularly, saying longitude and latitude information. And this function is used for accurate location of outdoor open area. Server Address: The IP address of server that you want the router to report the location, which is based on TCP connection. -
Page 39: Dhcp And Dns
3.5.4 DHCP and DNS General DHCP and DNS settings base on Dnsmasq tool on TR323. Please refer to Dnsmasq for more information. 3.6 Data Collect Data Collect settings is for TR323 to acquire data from slave devices in serial ports, Ethernet ports, I/O ports, with Modbus protocol and other customized protocols. -
Page 40: Modbus Rules Setting
Besides, TR323 can connect up to 5 TCP servers, which means you can receive the data from remote sites in different servers, it’s also a backup solution for data storage at server. 3.6.3 Modbus Rules Setting Modbus Rules Setting is for TR323 as a Modbus master to acquire data from slave devices base on Modbus protocol. -
Page 41: Server Setting
3.6.4 Server Setting Server setting menu allows user set the data center address with multiple protocols, the 41 / 50... -
Page 42: Administrate
standard TR323 supports TCP, UDP, HTTP, MQTT, and Modbus TCP. For the data format, TR323 supports different Encapsulation type, include “Transparent”, “Json”, and “HJ212” (special for some Environment SCADA in China). Also TR323 accepts customized specific protocols for your data center. 3.7 Administrate In this menu, you can set up time zone, language (English and Chinese only now), time setting, firmware upgrade, etc. -
Page 43: Password
1) Host Name The host name of router, default name is router. 2) Time Zone Set up the time zone of system, default time zone is GMT8. 3) Language Change the language of configuration interface, default language is English. 4) Enable Telnet Access To enable the telnet server, the default function is enabled. -
Page 44: Time Setting
If the new password and confirmation password you type is different, then it fails to revise the password. After password revised, router will return to login page, then you can enter your username and password. 3.7.3 Time Setting System time type includes RTC (Real Time Clock) and NTP (Network Time Protocol). RTC will save time even router is powered off, while for NTP, router will connect to NTP server which requires internet connection, time won’t be saved once powered off. -
Page 45: Log Settings
⚫ NTP Time Server You can select the NTP time server through drop-down menu, or you can customize it yourself. Port NTP time server port, default port is 123. Update Interval How long to sync the time with NTP server, default time is 600 seconds. 3.7.4 Log Settings Log settings is for configuring the output parameters of system log. -
Page 46: Backup And Restore
3) Log Server Set up the IP address of log server. 4) Log Server Port Set up the port of log server, default value is 514 5) Output Level There are several levels supported, including ‘Debug’, ’Info’, ‘Notice’, ‘Warning’, ‘Error’, and level increased in sequence, the higher level, the less output log. -
Page 47: Router Upgrade
recover the previous configuration. Click ‘upload archive’, select and upload the backup configuration file, and a pop-up confirmation box with ‘Really Restore’ will display, then click ‘OK’, to recover the configuration. 3.7.6 Router Upgrade Before you upgrade the firmware for router, make sure the firmware you’re planning to upload is correct. -
Page 48: Remote Configured
3.7.7 Remote Configured Remote Configured feature allows TR323 work with Bivocom Device Management Platform(Option service) for remote management, like firmware upgrade, configuration change, etc. You can configure the IP address and port of remote DMP server, device number and phone number of router, etc., as below. - Page 49 5) Device Number Device ID of router. 6) Device Phone Number The phone number of SIM card insert in router. 7) Device Type Type of the device, default is router. You can also remote upgrade the firmware for router, as below. 8) Remote Upgrade Click ‘Enable’...
-
Page 50: Manual Reboot
‘OK’ to reboot the router. 3.7.9 Schedule Reboot Schedule Reboot allows user configure the period or dedicate time for device reboot. Note: if you have any other questions about Bivocom products, please contact Bivocom support@bivocom.com. 3.8 Logout Click the Logout menu to logout the web UI of TR323.
Need help?
Do you have a question about the TR323 Series and is the answer not in the manual?
Questions and answers