Advertisement
Available languages
Available languages
Quick Links
4863408COM
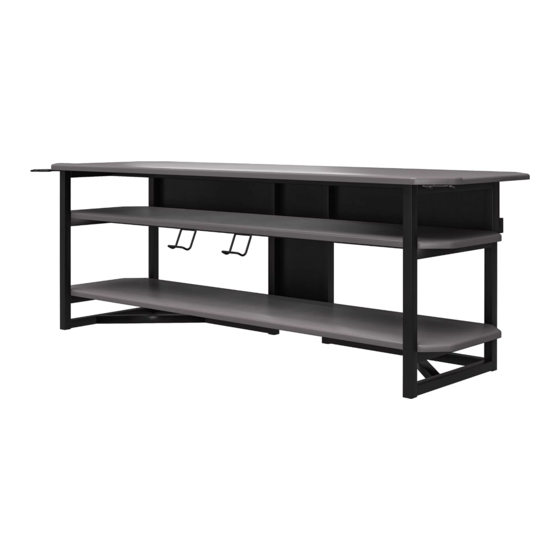
Gaming TV Stand-Graphite/Black metal
Date of Purchase ___ / ___ / ___
Lot Number:
Do Not Return This Product!
Contact our customer service team for help first.
Call: 1-800-489-3351 (toll free)
Monday-Friday 9am - 5pm CST
Visit: www.ameriwoodhome.com
WARNING
Easy
Assembly Difficulty Meter
Tough
Advertisement

Subscribe to Our Youtube Channel
Related Manuals for NTense 4863408COM


Summary of Contents for NTense 4863408COM
- Page 1 4863408COM Gaming TV Stand-Graphite/Black metal Date of Purchase ___ / ___ / ___ Lot Number: Do Not Return This Product! Contact our customer service team for help first. Call: 1-800-489-3351 (toll free) Monday-Friday 9am - 5pm CST Visit: www.ameriwoodhome.com Easy...
-
Page 2: Helpful Hints
Contact Us! Helpful Hints PEOPLE NEEDED FOR ASSEMBLY: 2 ESTIMATED ASSEMBLY TIME: 1 HOUR ameriwoodhome.com... -
Page 3: Before You Start
Before You Start Read through each step carefully and follow the proper order Separate and count all your parts and hardware Give yourself enough room for the assembly process Have the following tools: Flat Head Screwdriver, #2 Phillips Head Screwdriver and Hammer Caution: If using a power drill or power screwdriver for screwing, please be aware to slow down and stop when screw is tight. -
Page 4: Board Identification
Board Identification Not Actual Size ameriwoodhome.com... - Page 5 Board Identification Not Actual Size Lower support tube Back panel Support tube T4863408100KX T4863408110KX T4863408120KX QTY:3 PCS QTY:2 PCS ameriwoodhome.com...
- Page 6 Board Identification Not Actual Size ameriwoodhome.com...
-
Page 7: Part List
Hardware Bag Reference Number: 24863408COM1KX Part List Actual Size Ø8X30 mm Ø4X35 mm Ø1/4"X12 mm × 4 × 6 × 20 Wood dowel Screw Bolt TKX1005 TKX1236 TKX1033 Ø1/4"X38 mm Ø1/4"X25 mm M6X20 mm × 16 × 3 × 4 Bolt Cam bolt Bolt... - Page 8 Part List Actual Size Not Actual Size Ø1/4"X10 mm Ø1/4"X16 mm × 40 × 40 × 1 × 1 Hex key Washer Spring washer Glue TKX1004 TKX1003 TKX1002 TKX1014 Ø15X 9mm × 2 × 2 × 1 × 3 Headphone holder Warning label Game controller holder Cam lock...
- Page 9 STEP 1 Ø8X30 mm M6X20 mm × 3 × 4 1.1 Attach (1) to (I) as illustrated. 1.2 Attach (5) to (H) as illustrated. ameriwoodhome.com...
- Page 10 STEP 2 Ø15X 9mm × 3 2.1 Attach (I) to (H) with (14) as illustrated. ameriwoodhome.com...
- Page 11 STEP 3 Ø1/4"X16 mm Ø1/4"X10 mm Ø1/4"X12 mm × 3 × 3 × 3 3.1 Attach (D) to (B) with (3), (8) & (7) as illustrated. 3.2 Attach (K) to (B) & (D) with (3), (8) & (7) as illustrated. ameriwoodhome.com...
- Page 12 STEP 4 Ø1/4"X16 mm Ø1/4"X10 mm Ø1/4"X12 mm × 3 × 3 × 3 4.1 Attach (E) to (C) with (3), (8) & (7) as illustrated. 4.2 Attach (K) to (C) & (E) with (3), (8) & (7) as illustrated. ameriwoodhome.com...
- Page 13 STEP 5 Ø1/4"X16 mm Ø1/4"X10 mm Ø1/4"X12 mm × 4 × 4 × 4 5.1 Attach (11) to (A) with (3), (8) & (7) as illustrated. × 2 ameriwoodhome.com...
- Page 15 STEP 7 Ø4X35 mm Ø1/4"X38 mm Ø1/4"X16 mm Ø1/4"X12 mm × 2 × 2 × 4 × 6 7.1 Attach (C), (B) to (A) with (4), (8) & (7) as illustrated. 7.2 Attach (J) to (B) and (C) with (3), (8) & (7) as illustrated. 7.3 Attach (J) to (A) with (2) as illustrated.
- Page 16 STEP 8 Ø1/4"X38 mm Ø1/4"X16 mm Ø1/4"X10 mm × 4 × 4 × 4 8.1 Attach (H) to (B), (C), (D) & (E) with (4), (8) & (7) as illustrated. ameriwoodhome.com...
- Page 17 STEP 9 Ø4X35 mm Ø1/4"X38 mm Ø1/4"X16 mm Ø1/4"X12 mm × 2 × 2 × 4 × 6 9.1 Attach (F) to (B) & (C) with (4), (8) & (7) as illustrated. 9.2 Attach (J) to (B) & (C) with (3), (8) & (7) as illustrated. 9.3 Attach (J) to (F) with (2) as illustrated.
- Page 18 STEP 10 Ø4X35 mm Ø1/4"X38 mm Ø1/4"X16 mm Ø1/4"X12 mm × 2 × 2 × 4 × 6 10.1 Attach G) to (B) & (C) with (4), (8) & (7) as illustrated. 10.2 Attach (J) to (B) & (C) with (3), (8) & (7) as illustrated. 10.3 Attach (J) to (G) with (2) as illustrated.
- Page 19 STEP 11 Ø1/4"X16 mm Ø1/4"X10 mm Ø1/4"X25 mm × 4 × 4 × 4 11.1 Attach (L) to (D) & (E) with (6), (8) & (7) as illustrated. ameriwoodhome.com...
- Page 20 Maximum Loads This unit has been designed to support the maximum loads shown. Exceeding these load limits could cause sagging, instability, product collapse, and/or serious injury. Notice: Please apply the TV warning label to your unit so you'll always have the model's weight and TV size limits.
- Page 21 Register your product to receive the following: * New trend details - sneak peek on what's new * Surveys - have a voice within our community * Exclusive deals and discount codes * Quick and easy replacement part service To register your product, visit ameriwoodhome.com Visit your local retailer's website, rate your purchased product and leave us some feedback! We would like to extend a big "Thank You"...
- Page 22 Español Cubierta Delantera Este libro de instrucciones contiene información IMPORTANTE de seguridad. Por favor lea y manténgalo para referencia en el futuro. No Regrese este producto! Comuniquese con nuestro amistoso equipo de servicio al cliente para obtener ayuda. Llamenos al: 1-800-489-3351 (Gratis) Lunes - Viernes 9am - 5pm CST Visitar: www.ameriwoodhome.com PRECAUCION Este mueble puede volcarse y causar graves heridas y/o muerte.
- Page 23 Español Identificación de los Paneles (Página 4-6) Este no es el tamaño real ESTANTE SUPERIOR ESTRUCTURA DE LA PATA IZQUIERDA ESTRUCTURA DE LA PATA DERECHA PATA TRASERA IZQUIERDA PATA TRASERA DERECHA ESTANTE DEL MEDIO ESTANTE INFERIOR PANEL SUPERIOR TRASERO BANDEJA TRASERA TUBO DE SOPORTE TUBO DE SOPORTE INFERIOR PANEL TRASERO...
- Page 24 Español 9.3 Fije (J) a (F) con (2) como se ilustra. Nota: NO apriete el perno para garantizar que el ensamblaje se realice correctamente en este paso. Página 18 10.1 Fije G) a (B) y (C) con (4), (8) y (7) como se ilustra. 10.2 Fije (J) a (B) y (C) con (3), (8) y (7) como se ilustra.
- Page 25 Français Couverture Avant CE LIVRET D'INSTRUCTION CONTIENT DES INFORMATIONS IMPORTANTES SUR LA SÉCURITÉ. VEUILLEZ LIRE ET GARDER POUR UNE RÉFÉRENCE FUTURE Ne retournez pas ce produit! Contactez notre équipe de service à la clientèle amicale d'abord pour obtenir de l'aide. Appelez-nous: (sans frais) du Lundi au Vendredi de 9h à...
- Page 26 Français Identification des matériaux (Page 4~5) Pas de taille réelle PLATEAU SUPÉRIEUR CADRE DE PIED GAUCHE CADRE DE PIED DROIT JAMBE ARRIERE GAUCHE JAMBE ARRIÈRE DROITE TABLETTE DU MILIEU ÉTAGÈRE INFÉRIEURE PANNEAU ARRIÈRE SUPÉRIEUR PLATEAU ARRIÈRE TUBE SUPPORT TUBE DE SUPPORT INFÉRIEUR PANNEAU ARRIÈRE Page 9 1.1 Fixez (1) à...
- Page 27 Français 9.3 Fixez (J) à (F) avec (2) comme illustré. Remarque : NE PAS serrer le boulon pour assurer le succès de l'assemblage à cette étape. Page 18 10.1 Fixez G) à (B) et (C) avec (4), (8) et (7) comme illustré. 10.2 Fixez (J) à...
Need help?
Do you have a question about the 4863408COM and is the answer not in the manual?
Questions and answers