Table of Contents
Advertisement
CONTENTS
Contents ................................................................... 1
Introduction .............................................................. 2
About Oregon Scientific .......................................... 2
Product Overview .................................................... 3
Front View .............................................................. 3
Side View ............................................................... 4
Back View .............................................................. 5
Remote Sensor (THGR122NX) ............................. 6
Getting Started ......................................................... 7
Batteries ................................................................. 7
AC Adapter (Main Unit) .......................................... 7
Change Settings .................................................... 7
Table Stand ............................................................ 7
Remote Sensor (THGR122NX) ................................ 8
Setup Sensor ......................................................... 8
Data Transmission ................................................. 9
Search for Sensor .................................................. 9
Clock ......................................................................... 9
Turn Atomic Clock ON/OFF ................................. 10
Set Clock ............................................................. 10
Switch Clock Display ........................................... 10
Alarm ....................................................................... 10
View Alarm Settings ............................................. 10
Set Alarm .............................................................
Activate Alarm ...................................................... 11
RMR606HGPA_R5
Temperature and Humidity .................................... 11
Backlight ................................................................. 12
Projector ................................................................. 12
Reset System .......................................................... 13
Safety and Care ...................................................... 13
Warnings ................................................................. 13
Troubleshooting ..................................................... 14
Specifications ......................................................... 14
FCC Statement ....................................................... 15
11
1
1
Snooze Alarm ...................................................... 11
Select Temperature Unit ...................................... 11
Select Sensor Channel ........................................ 11
Minimum / Maximum Records ............................. 12
Temperature and Humidity Trend ........................ 12
Project Time ......................................................... 12
Rotate Image ....................................................... 12
Focus Image ........................................................ 12
Continuous Projection .........................................
Main Unit Dimensions .......................................... 14
Remote Sensor Dimensions ................................ 14
Temperature ......................................................... 14
Relative Humidity ................................................. 14
Remote Sensor (THGR122NX) ........................... 15
Clock .................................................................... 15
Power ................................................................... 15
9/3/04, 4:16 PM
12
Advertisement
Table of Contents

Related Manuals for Oregon Scientific RMR606HGPA


Summary of Contents for Oregon Scientific RMR606HGPA
-
Page 1: Table Of Contents
CONTENTS Contents ... 1 Introduction ... 2 About Oregon Scientific ... 2 Product Overview ... 3 Front View ... 3 Side View ... 4 Back View ... 5 Remote Sensor (THGR122NX) ... 6 Getting Started ... 7 Batteries ... 7 AC Adapter (Main Unit) ... -
Page 2: Introduction
RMR606HGPA_R5 ABOUT OREGON SCIENTIFIC Visit our website (www.oregonscientific.com) to learn more about Oregon Scientific products such as digital cameras; MP3 players; children’s electronic learning products and games; projection clocks; health and fitness gear; weather stations; and digital and conference phones. -
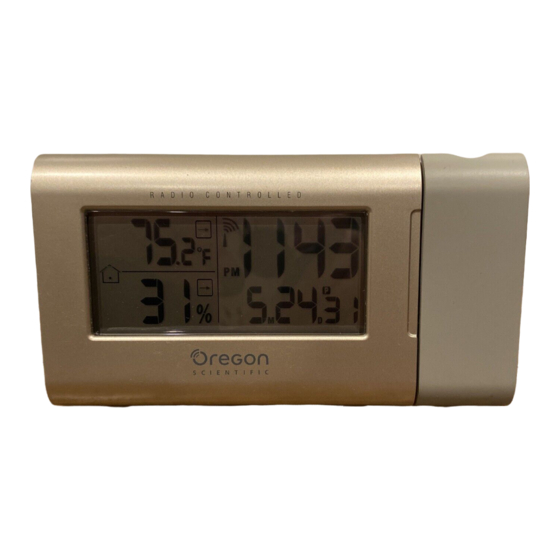
Page 3: Product Overview
PRODUCT OVERVIEW FRONT VIEW RMR606HGPA_R5 SNOOZE / LIGHT: Press to activate backlight or snooze Temperature Area: Readings, trend line, sensor reception status and channel number Humidity Area: Readings; trend line, and battery status Clock / Alarm Area: Time, time zone, day of week, month, date, alarm, and Atomic Clock reception status Projector: projects the time... -
Page 4: Side View
SIDE VIEW MODE CHANNEL RMR606HGPA_R5 : Press to increase setting, activate Atomic Clock signal reception : Press to decrease setting MODE: Press to change display / settings CHANNEL: Press to switch remote sensor ((.)): Press to view alarm settings, activate alarm 9/3/04, 4:16 PM... -
Page 5: Back View
BACK VIEW MODEL NO. RMR606HGPA FOCUS "AA" UM3 1.5V "AA" UM3 1.5V DC 4.5V ZONE C / F RESET I M AGE ROTATI ON 5 6 7 8 9 RMR606HGPA_R5 Projector Focus knob Image rotation knob Projection on/off switch Battery compartment... -
Page 6: Remote Sensor (Thgr122Nx)
REMOTE SENSOR (THGR122NX) LCD display LED Status indicator RMR606HGPA_R5 Wall mount hole RESET Channel number (1 - 3) Battery compartment (Battery compartment cover not shown) 9/3/04, 4:16 PM... -
Page 7: Getting Started
GETTING STARTED BATTERIES Batteries are not supplied with this product. You will need to purchase 2 x UM-3 (AA) 1.5V alkaline batteries for the main unit, and 2 x UM-4 (AAA) 1.5V alkaline batteries for the remote sensor. Insert batteries before first use, matching the polarity as shown in the battery compartment. -
Page 8: Remote Sensor (Thgr122Nx)
REMOTE SENSOR (THGR122NX) This product is shipped with a THGR122NX Thermo/ Hygro Sensor that collects Temperature and Humidity data. Data can be collected from up to 3 sensors. Additional sensors sold separately. SETUP SENSOR Open the remote sensor battery compartment with a small Phillips screwdriver. -
Page 9: Data Transmission
Wireless ranges can be impacted by a variety of factors such as extremely cold temperatures. Extreme cold may temporarily reduce the effective range between the sensor and the base station. If the unit’s performance fails due to low temperature, the unit will resume proper functioning as the temperature rises to within the normal temperature range (i.e no permanent damage will occur to the unit due to low temperatures). -
Page 10: Turn Atomic Clock On/Off
To force a manual search for Atomic Clock signals, press and hold UP for 2 seconds. If no signal is found, check the batteries. TURN ATOMIC CLOCK ON/OFF Perform this step if you cannot receive Atomic Clock signals. Press and hold ZONE (located in the battery compartment) for 2 seconds. -
Page 11: Set Alarm
SET ALARM Press ((.)). Press and hold ((.)) again for 2 seconds. The Alarm settings will blink. Select the hour and minute. Press UP or DOWN to change settings. Press ((.)) to confirm. ACTIVATE ALARM ((.)) Press to activate or deactivate the Alarm. in the Clock Area when the Alarm is activated. -
Page 12: Minimum / Maximum Records
MINIMUM / MAXIMUM RECORDS Press MEM to toggle between current, maximum (MAX) and minimum (MIN) records for the selected sensor. To clear the records, press and hold MEM for 2 seconds. A beep will sound to confirm that the memory has been cleared. -
Page 13: Reset System
RESET SYSTEM The RESET buttons are located in the battery compartments for the main unit and sensors. Press RESET when you change the batteries and whenever performance is not behaving as expected (for example, unable to establish radio frequency link with remote sensor or radio-controlled clock). -
Page 14: Troubleshooting
TROUBLESHOOTING Check here before contacting our customer service department. Problem Symptom Remedy Calendar Change language Strange date / month Clock Cannot adjust Disable Atomic Clock clock Cannot auto- 1. Adjust batteries. synch 2. Press RESET 3. Manually activate Atomic Clock feature ( Temp Shows “LLL”... -
Page 15: Remote Sensor (Thgr122Nx)
REMOTE SENSOR (THGR122NX) RF frequency 433 MHz Range 30 meters (98 feet) with no obstructions Transmission every 40 seconds Channel No. 1 - 3 CLOCK Atomic Clock Auto or manual (disabled) Clock display HH:MM:SS Hour format 12hr AM/PM Time zone Pacific (P), Mountain (M), Central (C), or Eastern (E) Calendar... - Page 16 Please call our customer service number (listed on our website at www.oregonscientific.com, or on the warranty card for this product) for all inquiries instead. Name: Oregon Scientific, Inc. Address: 19861 SW 95 Tualatin, Oregon 97062 USA Telephone No.: 1-800-853-8883 Fax No.:...