Advertisement
- 1 FEATURE DETAILS
- 2 GENERAL SPECIFICATIONS
- 3 FEATURE DETAILS
-
4
OPERATING INSTRUCTIONS
- 4.1 INSTALLING BATTERIES
- 4.2 POWER ON
- 4.3 POWER OFF
- 4.4 SOUND CONTROL
- 4.5 BACKLIGHT
- 4.6 UNIT OF MEASURE
- 4.7 ADDITION/SUBTRACTION
- 4.8 CANCEL/CLEAR
- 4.9 MEMORY STORAGE
- 4.10 REFERENCE POINT
- 4.11 VOLUME MEASUREMENT
- 4.12 INDIRECT MEASUREMENT (PYTHAGORAS)
- 4.13 SINGLE DISTANCE MEASUREMENT
- 4.14 CONTINUOUS MEASUREMENT (MIN/MAX)
- 4.15 AREA MEASUREMENT
- 5 TROUBLESHOOTING
- 6 CLEANING
- 7 STORAGE
- 8 WARRANTY
- 9 DISPOSAL / RECYCLE
- 10 CUSTOMER SERVICE
- 11 Videos
- 12 Documents / Resources
FEATURE DETAILS
- SINGLE OR CONTINUOUS DISTANCE MEASUREMENT
- ADD OR SUBTRACT MEASUREMENTS
- AREA
- PERIMETER
- VOLUME
- DIRECT AND INDIRECT MEASUREMENT
- LCD DISPLAY
- BACKLIGHT
- AUDIBLE BEEP

NOTE: There are no user-serviceable parts inside.
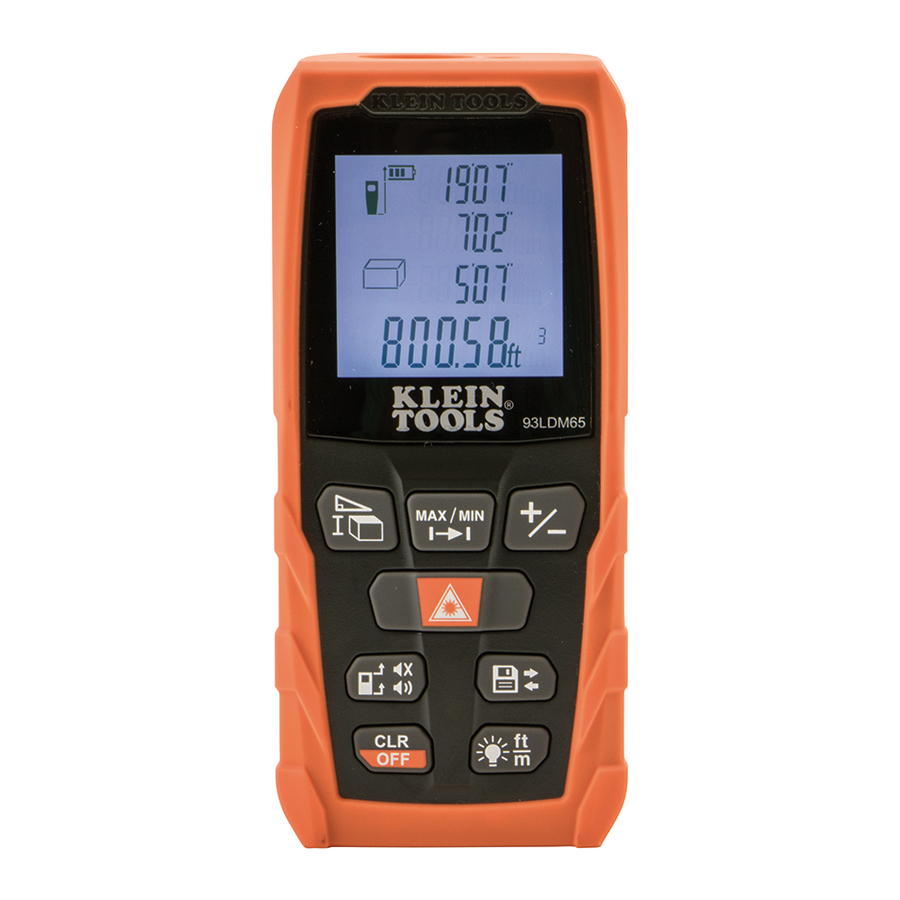
DEVICE
- Power on/Measurement button
- Measurement options button
- Continuous measurement button
- Add/subtract measurements button
- Reference point, Sound on/off button
- Clear/Power Off button
- Memory storage button
- Backlight/Unit of measure button
- Backlit LCD screen (see below)
- Battery cover
- Battery cover screw
- Depth gauge stick (flips out)
GENERAL SPECIFICATIONS
Klein Tools 93LDM65 Laser Distance Measurer easily calculates distance, area, perimeter and volume up to 65' (20 m) using direct and indirect measurements with an accuracy of +/- 1/16" (1.6 mm). It provides both imperial and metric readings and takes single, continuous (Max/Min) and cumulative measurements.
- Units: Feet / Inches / Meters
- Laser class: Class 2 • Laser Type: 635nm. < 1mW
- Range: 8" to 65 ft. (0.2 to 20 m)
- Accuracy: +/- 1/16" (1.6 mm)
- Memory / Storage: 20 readings or sets
- Auto-Off - Laser: 30 seconds
- Auto-Off - Device: 3 minutes
- Operating Temp: 32° to 104°F (0° to 40°C)
- Storage Temp: 14° to 140°F (-10° to 60°C)
- Dimensions: 4.5" x 2.0" x 1.4" (115 x 52 x 32 mm)
- Weight: 4.5 oz. (118 g)
- Battery Type: 2 x AAA
- Ingress Protection: IP54
- Drop Protection: 3.3 ft. (1m)
NOTE: Measurement range and accuracy are based on typical conditions and may deteriorate under unfavorable conditions such as bright sunlight or poor reflectivity.
Specifications subject to change.

FEATURE DETAILS

LCD DISPLAY
- Laser on
- Reference point (Top)
- Reference point (Bottom)
- Reference point (Depth gauge stick)
- Indicates unit is actively measuring
- Error message
![]() Area function icon
Area function icon![]() Volume function icon
Volume function icon![]() Pythagoras 2-Point function icon
Pythagoras 2-Point function icon![]() Pythagoras 3-Point function icon
Pythagoras 3-Point function icon- Battery status
- Memory readings
- Value 1 / Min value
- Value 2 / Max value
- Value 3
- Summary Line / Latest Value / Calculation Result


OPERATING INSTRUCTIONS
INSTALLING BATTERIES
Loosen screw  on battery cover
  (do not remove screw from cover), extend the depth gauge stick
 , remove cover. Insert included batteries, replace cover, stow the depth gauge stick and tighten screw.
POWER ON
A long press of the Power on/Measurement button will power on the device and go to single distance measurement mode.
POWER OFF
Manual Power Off: A long press of the Power Off button will power off the device.
Automatic Power Off: The device will automatically power off after 3 minutes of inactivity.
SOUND CONTROL
A long press of the Sound On/Off button  will mute or unmute the speaker.
BACKLIGHT
Quick-press the Backlight button  to turn backlight on and off. Backlight will automatically turn off after 20 seconds of inactivity.
UNIT OF MEASURE
Long-press the Backlight/Units button to toggle between "ft+in" (feet and inches), "in" (inches), "ft" (feet), and "m" (meters). Unit will power on with last unit of measure selected.
ADDITION/SUBTRACTION
Take a measurement, press the Add/Subtract measurement button (quick-press for addition "+" or long-press for subtraction "-"), then press the Power on/Measurement button to take the second measurement. The second value will automatically be added to/ subtracted from the first value in the displayed result.
CANCEL/CLEAR
Quick-press Power Off buttonat any time to cancel the last action or clear measured data.
MEMORY STORAGE
Press the Memory Storage button  to view saved data. The last 20 measurements will be displayed, most recent first.
REFERENCE POINT

Quick-press the Reference Point button  to toggle the measurement reference point between the top, bottom, and depth gauge stick of the tester. A beep will sound when the reference point is changed.
NOTE: When the unit is powered on, the default reference point automatically resets to the bottom.
VOLUME MEASUREMENT
- Press the Measurement Options button
![]() twice; the volume icon
twice; the volume icon ![]() will appear on the display.
will appear on the display. - Press the Power on/Measurement button
![]() to take the first measurement (e.g. Length).
to take the first measurement (e.g. Length). - Press the Power on/Measurement button
![]() again to take the second measurement (e.g. Width).
again to take the second measurement (e.g. Width). - Press the Power on/Measurement button
![]() again to take the third measurement (e.g. Height).
again to take the third measurement (e.g. Height). - The results of length, width and height will be displayed as volume.
 twice; the volume icon
  will appear on the display.
INDIRECT MEASUREMENT (PYTHAGORAS)
This device calculates indirect distance using the Pythagorean Theorem. NOTE: Target points should be in the same plane, and the second measurement should be taken perpendicular to the surface of the dimension being measured.
Pythagoras - 2 points (Fig. 2):

- Press the Measurement Options button
![]() three times; the Pythagoras 2-Point icon
three times; the Pythagoras 2-Point icon ![]() will appear on the display.
will appear on the display. - Press the Power on/Measurement button
![]() to take the first measurement (e.g. Length).
to take the first measurement (e.g. Length). - Press the Power on/Measurement button
![]() again to take the second measurement (e.g. Width). The result will show in the display.
again to take the second measurement (e.g. Width). The result will show in the display.
 will appear on the display.
Pythagoras - 3 points (Fig. 3):

- Press the Measurement Options button
![]() four times; the Pythagoras 3-Point icon
four times; the Pythagoras 3-Point icon ![]() will appear on the display.
will appear on the display. - Press the Power on/Measurement button
![]() to take the first measurement (e.g. first corner).
to take the first measurement (e.g. first corner). - Press the Power on/Measurement button
![]() again to take the second measurement (center).
again to take the second measurement (center). - Press the Power on/Measurement button
![]() again to take the third measurement (e.g. second corner). The result will show in the display.
again to take the third measurement (e.g. second corner). The result will show in the display.
 will appear on the display.
SINGLE DISTANCE MEASUREMENT
Press the Power on/Measurement button to activate the laser. Press again to take a measurement. The result is displayed immediately.
CONTINUOUS MEASUREMENT (MIN/MAX)
Press the Continuous Measurement button  to activate Continuous Measurement mode. The display will show the maximum
  and minimum
  distance values. The last measured value will display in the Summary Line
  . Pressing the Power on/Measurement or Power Off button will exit this mode.
AREA MEASUREMENT
- Press the Measurement Options button
![]() once; the area icon
once; the area icon ![]() will appear on the display.
will appear on the display. - Press the Power on/Measurement button
![]() to take the first measurement (e.g. Length).
to take the first measurement (e.g. Length). - Press the Power on/Measurement button
![]() again to take the second measurement (e.g. Width). The results of length, width and area will show in the display.
again to take the second measurement (e.g. Width). The results of length, width and area will show in the display.
 will appear on the display.
TROUBLESHOOTING
All errors are displayed as codes, as explained below:
| Code | Cause | Corrective Measure |
| 204 | Calculation error | Repeat steps in manual |
| 208 | Component failure | Contact Klein Tools |
| 220 | Low battery | Replace batteries (2 x AAA) |
| 252 | Temperature too high | Use only in temperatures 32° to 104°F (0° to 40°C) |
| 253 | Temperature too low | Warm up device |
| 255 | Signal too weak / takes too long to register | Use target plate or change measurement angle |
| 256 | Signal too strong | Use target plate or change measurement angle |
| 261 | Measurement out of range | Measure within 65' (20 m) |
| 500 | Hardware error | Power unit on/off several times. If error persists, contact Klein Tools. |
CLEANING
Be sure power is turned off and wipe with a clean, dry lint-free cloth. Do not use abrasive cleaners or solvents.
STORAGE
Remove the batteries when meter is not in use for a prolonged period of time. Do not expose to high temperatures or humidity. After a period of storage in extreme conditions exceeding the limits mentioned in the General Specifications section, allow the meter to return to normal operating conditions before using.
WARRANTY
DISPOSAL / RECYCLE

Do not place equipment and its accessories in the trash. Items must be properly disposed of in accordance with local regulations. Please see www.epa.gov or www.erecycle.org for additional information.
CUSTOMER SERVICE
KLEIN TOOLS, INC.
450 Bond Street, Lincolnshire, IL 60069
1-877-775-5346
customerservice@kleintools.com
www.kleintools.com

VideosLaser Distance Measurer 98-Foot 93LDM65 Usage Video
Documents / Resources
References
![www.kleintools.com]() Warranty | Klein Tools
Warranty | Klein Tools![www.epa.gov]() U.S. Environmental Protection Agency | US EPA
U.S. Environmental Protection Agency | US EPA![www.erecycle.org]() Electronic Waste Management - CalRecycle Home Page
Electronic Waste Management - CalRecycle Home Page![www.kleintools.com]() Klein Tools - For Professionals since 1857 | Klein Tools
Klein Tools - For Professionals since 1857 | Klein Tools
Download manual
Here you can download full pdf version of manual, it may contain additional safety instructions, warranty information, FCC rules, etc.
Download Klein Tools 93LDM65 - Laser Distance Measurer Manual
Advertisement


Need help?
Do you have a question about the 93LDM65 and is the answer not in the manual?
Questions and answers