Table of Contents
Advertisement
Quick Links
Advertisement
Table of Contents
Troubleshooting

Related Manuals for Homemed glucoChek ConneKT

Summary of Contents for Homemed glucoChek ConneKT
- Page 1 Blood Glucose and Ketone Monitoring System GKTM ver 1.0 20220822 OWNER’S MANUAL...
- Page 3 Please read the owner's manual thoroughly before using this product. If you have any additional questions regarding this product, please contact the place of purchase or Homemed (Pty) Ltd customer service on 0861 106 150. Version 1.0 2022/08...
- Page 4 8. Proper maintenance and a control solution test performed periodically is essential to the longevity of your device. If you are concerned about the accuracy of measurements, please contact the place of purchase or Homemed (Pty) Ltd for assistance. KEEP THESE INSTRUCTIONS IN A SAFE PLACE...
-
Page 5: Table Of Contents
TABLE OF CONTENTS BEFORE YOU BEGIN Important Information Intended Use Test Principle Meter Overview Display Screen Test Strip SETTING THE METER Entering the Setting Mode QUALITY CONTROL TESTS When to Perform a Control Solution Test? How to Perform a Control Solution Test Important Control Solution Information TESTING WITH A BLOOD SAMPLE Preparing the Lancing Device and Puncture Site... - Page 6 METER MEMORY Reviewing Test Results Reviewing Blood Glucose Day Average Results DATA TRANSFER VIA BLUETOOTH Bluetooth Indicator on the Meter Data Transfer to a Computer Data Transfer to a Mobile Device MAINTENANCE Meter Cleaning and Disinfecting Caring for Your Test Strips BATTERIES Low Battery Signal Replacing the Batteries...
-
Page 7: Before You Begin
BEFORE YOU BEGIN Important Information Please read the following carefully before use: • Severe dehydration and excessive water loss may cause readings that are lower than actual values. If you believe you are suffering from severe dehydration, consult a healthcare professional immediately. •... -
Page 8: Test Principle
control. It is intended to be used for the quantitative measurement of blood glucose and β-ketones in whole blood. It should NOT be used for diagnosis or screening of diabetes. Please refer to the table below for the type of whole blood sample* to obtain: Home Use* Professional Use... -
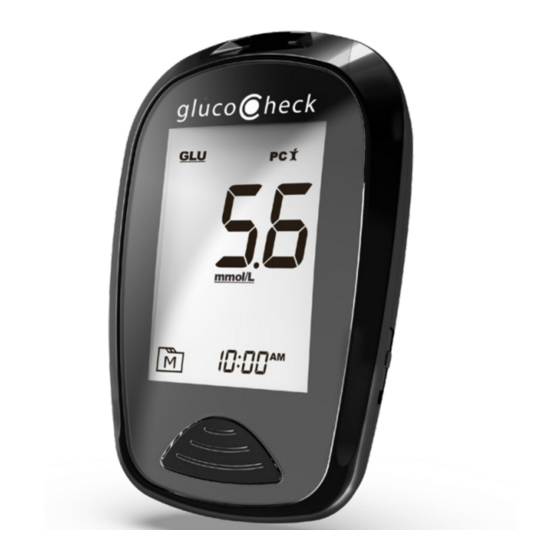
Page 9: Meter Overview
Meter Overview SIDE LEFT FRONT SIDE RIGHT BACK Test Strip Slot Insert test strip here to switch the meter on for testing. Bluetooth Indicator Light Bluetooth is available for data transmission. Test Strip Ejector Eject the used test strip by sliding this button upwards. Display Screen Main Button (M) Bluetooth Switch... -
Page 10: Display Screen
Display Screen Blood Glucose Symbol Alarm Reminder Ketone Symbol Measuring Mode Test Result QC – control solution test Error Message / Ketone Warning Gen – any time of day Low Battery Symbol AC – before meal Day Average PC – after meal Memory Mode Test Strip Symbol Date / Time... -
Page 11: Test Strip
Test Strip (Glucose) (β-Ketone) Absorbent Hole Test Strip Handle Confirmation Window Contact Bars NOTE • The front side of the test strip should face up when inserting into the test strip slot. Test results might be inaccurate if the contact bars are not fully inserted into the test strip slot. -
Page 12: Setting The Meter
SETTING THE METER Before using the meter for the first time or after changing the meter batteries, you should check and update the settings. Setting your meter to the correct date and time will ensure the accuracy of the download results. Entering the Setting Mode Start with the meter off (no test strip inserted). - Page 13 5. Setting the Reminder Alarms Your meter has 4 reminder alarms. The meter will display “On” or “OFF” and “AL1”. If you don’t want to set an alarm, press S to skip this step. Or press M to select “On”, then press S. With the HOUR / MINUTE flashing in sequence, press M to select the correct HOUR / MINUTE.
-
Page 14: Quality Control Tests
QUALITY CONTROL TESTS When to Perform a Control Solution Test? • if you suspect the meter or test strips are not working properly • if your test results are not consistent with how you feel, or if you think the results are not accurate •... - Page 15 4. Apply the control solution Shake the control solution bottle thoroughly before use. Squeeze out the first drop and wipe it off, then squeeze out another drop and place it on the tip of the bottle cap. Hold the meter to move the test strip absorbent hole to the droplet.
-
Page 16: Important Control Solution Information
Important Control Solution Information • Use only the control solutions provided by Homemed, with this meter. • Do not use the control solution beyond the expiry date or 3 months after first opening. Write the opening date on the control solution bottle and discard the remaining solution after 3 months. -
Page 17: Testing With A Blood Sample
TESTING WITH A BLOOD SAMPLE Preparing the Lancing Device and Puncture Site WARNING To reduce the chance of transmission and infection: • Never share a meter, lancet or lancing device • Always use a new, sterile lancet • Lancets are for single use only •... -
Page 18: Performing A Blood Test
Performing a Blood Test To perform a blood test, you will need: Meter Test Strip Lancet Lancing Device Code Strip (β-ketone only) 1. Calibrate the meter (For β-ketone testing) For more information, please consult page 19. 2. Insert the test strip to switch the meter on Wait for the meter to display the “... - Page 19 Discard the used test strip and retest with a new one. • If you have trouble filling the confirmation window, please contact your healthcare professional or Homemed (Pty) Ltd for assistance. 7. Read Your Result The result of your test will appear after the meter counts down to 0. The...
- Page 20 8. Eject the used test strip Eject the test strip by sliding the eject button upwards. Use a sharps bin to dispose of used test strips. The meter will switch off automatically. WARNING • Always follow the instructions in the lancing device insert when removing the lancet.
-
Page 21: Blood Glucose Testing
BLOOD GLUCOSE TESTING Blood glucose monitoring plays an important role in diabetes control. The results provided by this system can help you and your healthcare professional monitor and adjust your treatment plan to gain better control of your diabetes. Measuring Modes The meter provides you with three measuring modes: General, AC and PC. -
Page 22: Result Readings
Result Readings MESSAGE WHAT IT MEANS Result is < 1.1 mmol/L Out of measurement range. Result is Result is between Result is between between 1.1 to 3.9 mmol/L 1.1 to 4.9 mmol/L 1.1 to 3.9 mmol/L Result is between Result is Result is between 4.0 to 9.9 mmol/L between... -
Page 23: Β-Ketone Testing
β-KETONE TESTING The GlucoCheck ConneKT meter needs to be calibrated each time a new box of β-ketone test strips are opened. Calibrate the meter by inserting the Code Strip into the Test Strip Slot. The meter will automatically switch on and display the code on the meter screen. -
Page 24: Result Readings
developing diabetic ketoacidosis (DKA). : Dhatariya K. Blood Ketones: Measurement, Interpretation, Limitations, and Utility in the Management of Diabetic Ketoacidosis. Rev Diabet Stud. 2016 Winter; 13(4): 217–225. Result Readings MESSAGE WHAT IT MEANS Result is outside measurement range: < 0.1 mmol/L Ketones detected at a value of: 0.1 - 8.0 mmol/L Result is outside measurement range:... -
Page 25: Meter Memory
METER MEMORY The meter stores the most recent 1000 test results along with respective dates and times in its memory. To enter the memory mode, start with the meter switched off. Reviewing Test Results 1. Press and release M. “ ”... -
Page 26: Data Transfer Via Bluetooth
You can use the Health Care Management System to view test results on a Windows 10 (or above) computer / laptop. To learn more about the Health Care Management System, please contact Homemed (Pty) Ltd customer service on 0861 106 150. Please note that you need to complete the pairing... -
Page 27: Data Transfer To A Mobile Device
Pairing with your computer 1. Obtaining and installing the software To download the Health Care Management System, please visit the Homemed website: www.homemed.co.za. The software will appear under Diabetes Care / GlucoCheck ConneKT / Software and Downloads. 2. Connecting to a computer Activate the Bluetooth function on the meter and your computer, then pair the meter with your computer. -
Page 28: Maintenance
MAINTENANCE Meter Cleaning and Disinfecting Caring For Your Meter • To clean the meter exterior, wipe it clean with a soft damp cloth or mild cleaning agent, then dry the device with a soft dry cloth. • Do NOT use organic solvents to clean the meter. •... - Page 29 • Touch the test strip with clean, dry hands. • Do not bend, cut or alter a test strip in any way. • Keep the strip vial away from children since the cap and the test strip may be a choking hazard. If swallowed, promptly seek medical assistance.
-
Page 30: Batteries
BATTERIES Your meter comes with two 1.5V AAA size alkaline batteries. Low Battery Signal The meter will display one of the messages below to alert you when the meter power is getting low. 1. The “ ” symbol appears along with display messages: The meter is functioning properly and the result remains accurate, but it is time to change the batteries. - Page 31 NOTE • Replacing the batteries does not affect the test results stored in the meter. • All batteries should be kept away from children. If swallowed, seek medical assistance immediately. • Batteries might leak chemicals if left unused for a long time. Remove the batteries if you are not going to use the device for an extended period of time (i.e.
-
Page 32: System Troubleshooting
SYSTEM TROUBLESHOOTING If you follow the recommended action but the problem persists, please contact Homemed (Pty) Ltd customer service on 0861 106 150. Error Messages MESSAGE WHAT IT MEANS WHAT TO DO The batteries are too Replace the batteries low. -
Page 33: Troubleshooting
Troubleshooting 1. If the meter does not display a message after inserting a test strip: POSSIBLE CAUSE WHAT TO DO Batteries exhausted. Replace the batteries. Test strip inserted upside Insert the test strip with contact bars end down or incompletely. first and facing up. -
Page 34: Symbol Information
SYMBOL INFORMATION SYMBOL REFERENT SYMBOL REFERENT Authorised In vitro diagnostic representative medical device in the European Community Consult instructions Manufacturer for use Temperature limit Caution Use-by date Humidity limitation Batch code CE mark Serial number RoHS compliance This device does not belong to household waste and must be returned to a collection point for recycling electric and electronic devices according to local laws. -
Page 35: Specifications
SPECIFICATIONS Model No.: GlucoCheck ConneKT (TD-4279) Dimension: 96 (L) x 61 (W) x 26 (H) mm Weight: 67.2 g (without batteries) Power Source: Two 1.5V AAA alkaline batteries Display: LCD with backlight Memory: 1000 External Output: Bluetooth Auto sample loading detection Auto electrode insertion detection Auto reaction time count-down Auto switch-off after 3 minutes without action... - Page 36 This device has been tested to meet the electrical and safety requirements of: IEC/EN 61010-1, IEC/EN 61010-2-101, IEC/EN 61326-1, IEC/EN 61326-2-6, EN 300 328.
- Page 40 Authorised distributor: Homemed (Pty) Ltd, Co Reg 2003/022932/07 Route 21 Corporate Park, 100 Sovereign Dr, Irene, 0157, South Africa T: 0861 106 150, W: www.homemed.co.za, E: sales@homemed.co.za TaiDoc Technology Corporation B1-7F, No.127, Wugong 2nd Rd., Wugu Dist., 24888 New Taipei City, Taiwan For self-testing.
Need help?
Do you have a question about the glucoChek ConneKT and is the answer not in the manual?
Questions and answers