Table of Contents
Advertisement
USA | UPPAbaby, 276 Weymouth Street, Rockland, MA 02370
uppababy.com | 1.844.823.3132
Model 1001-MSM-US
All rights reserved. © 2022 UPPAbaby. UPPAbaby and all associated logos are trademarks. All product specifications
are correct at time of print. UPPAbaby reserves the right to change anything at any time without prior notice.
Color representation is as close as print processes allow. Not all colors available at all retailers. UbMAN106-V11
From 4-35 lbs
Advertisement
Table of Contents

Subscribe to Our Youtube Channel
Related Manuals for UPPAbaby MESA MAX


Summary of Contents for UPPAbaby MESA MAX
- Page 1 All rights reserved. © 2022 UPPAbaby. UPPAbaby and all associated logos are trademarks. All product specifications are correct at time of print. UPPAbaby reserves the right to change anything at any time without prior notice. Color representation is as close as print processes allow. Not all colors available at all retailers. UbMAN106-V11...
- Page 2 Limited Lifetime Warranty, you MUST register within three months of purchase and provide a valid purchase receipt form an authorized UPPAbaby retailer. The “lifetime” of the product is defined as the period of use by the registrant for use with his/her children up to 7 years from date of manufacture.
-
Page 3: Table Of Contents
Before You Begin Base Installation With Lower Anchors Carrier Installation with Vehicle Seat Belt Stroller Compatibility Registration Leveling Base Determining Best Installation Method Fitting Carrier to Stroller Frame Certification Base Installation With Lower Anchors Leveling the Carrier Releasing Carrier from Stroller Frame Child Use Recommendations Installing Load Leg Lap/Shoulder Belt Preferred Routing Method... -
Page 4: Before You Begin
Model Number: system conforms to all UPPAbaby advises that all infants and toddlers should ride in a rear-facing car safety seat (CSS) as long as possible, until they applicable Federal Motor Vehicle reach the highest weight or height allowed by their CSS’s manufacturer. This child restraint is for use by children who meet Manufactured Date: Safety Standards (FMVSS). -
Page 5: Notice Of Expiration
BEFORE YOU BEGIN WARNINGS + GENERAL SAFETY INFORMATION WARNING NOTICE OF EXPIRATION Discontinue use of this child restraint after 7 years from the date of manufacture or after a crash. Refer to labels on bottom of Carrier and Base. DEATH OR SERIOUS INJURY CAN OCCUR According to accident statistics, children are safer when properly restrained in the rear seating positions than in the front seating positions. - Page 6 WARNINGS + GENERAL SAFETY INFORMATION WARNINGS + GENERAL SAFETY INFORMATION Snugly adjust the belts provided with this child restraint around your child. A snug • NEVER leave child in carrier when straps are loose or undone. strap should not allow any slack. It lies in a relatively straight line without sagging. •...
- Page 7 WARNINGS + GENERAL SAFETY INFORMATION WARNINGS + GENERAL SAFETY INFORMATION • DO NOT remove or cover up any of the warning or product labels on this Child WARNING Restraint. All labels include information required by law. • DO NOT lubricate buckles and fasteners. FALL HAZARD: The carrier can fall from the shopping cart.
- Page 8 • DO NOT use any accessories, pads, or products supplied by other manufacturers the harness. with this Child Restraint, unless approved and tested by UPPAbaby. Items not tested with this restraint could injure your child. • DO NOT use this Child Restraint system if the top of the child’s head is less than 1"...
-
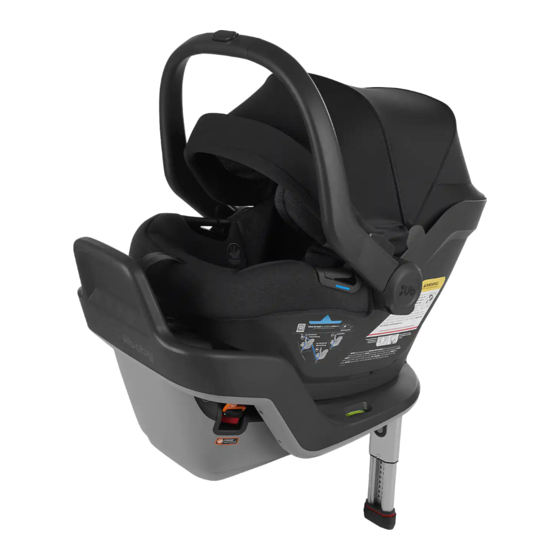
Page 9: Features Overview
FEATURES OVERVIEW – Overview of Base FEATURES OVERVIEW – Overview of Base 1 Vehicle Belt Path (2) 2 Lower Anchor Connector Release Buttons (2) 3 Anti-Rebound+ Panel 4 Tightness Indicator 5 Lower Anchor Connectors 6 Lower Anchor Connector Webbing 7 Vehicle Belt Lock-Off (Closed) 8 Level Adjust Handle 9 Instruction Manual Storage 10 Vehicle Belt Lock-Off (Open) -
Page 10: Overview Of Carrier
FEATURES OVERVIEW – Overview of Carrier FEATURES OVERVIEW – Overview of Carrier 1 Side Impact Protection (SIP) 2 Harness Covers (2) 3 Buckle 4 Infant Insert 5 Harness Adjuster Release Harness Adjuster Strap 6 Buckle Latch Plates (2) 7 Vehicle Seat Belt Guides (2) 8 Retainer Clip 9 Harness Straps 10 Canopy... -
Page 11: Choosing A Vehicle Seating Location
BASE INSTALLATION CARRIER INSTALLATION instruction book. If the MESA MAX does not install best in the rear center seating location, it is recommended to move to one of the outboard seating positions. -
Page 12: Latch (Lower Anchors And Tethers For Children)
VEHICLE COMPATIBILITY VEHICLE COMPATIBILITY LATCH (Lower Anchors and Tethers for Children) Overview of Vehicle Seat Belt Systems Most vehicles manufactured after September 1, If you do not use lower anchor to VEHICLE SEAT (LAP/SHOULDER BELT) VEHICLE SEAT (LAP BELT ONLY) 2002 are equipped with LATCH (Lower... -
Page 13: Unsafe Vehicle Seat Belt Systems + Seating
VEHICLE COMPATIBILITY – Unsafe Vehicle Seat Belt Systems + Seating VEHICLE COMPATIBILITY – Unsafe Vehicle Seat Belt Systems + Seating This Child Restraint can only be installed on vehicle seats that face forward. DO NOT use this Child Restraint with the following seat belt systems: DO NOT install in seats that face to the sides or rear of the vehicle. -
Page 14: Base Installation With Lower Anchors
BASE INSTALLATION WITH LOWER ANCHORS BASE INSTALLATION WITH LOWER ANCHORS We recommend using the load leg to optimize safety of the child in the seat. Load leg should be placed in stowed position when not in use. If installing without the load leg, bypass step 1 and proceed to step 2. LEVELING BASE 1 Press the load leg release button on bottom of the base and pull load leg out from storage. -
Page 15: Installing Load Leg
RED showing. This is an easy issue to resolve by following the steps below: 1 Uninstall your MESA MAX base. 2 Adjust the level adjustment foot to achieve proper recline level. NOTE: After installing the load leg, check 3 Push the base into the seat back. -
Page 16: Safety Check
BASE INSTALLATION WITH LOWER ANCHORS – Safety Check BASE INSTALLATION WITH LOWER ANCHORS – Safety Check Make sure the load leg is secured and contacts the vehicle floor. Check that the Base doesn’t move more than 1" side-to-side and front-to-back at the belt path. load leg angle indicator is GREEN. -
Page 17: Uninstalling Base
BASE INSTALLATION WITH LOWER ANCHORS BASE INSTALLATION WITH LOWER ANCHORS UNINSTALLING BASE STORING LOAD LEG 1 Press the red button on the lower anchor connector while 1 Push load leg extension release button on back of load pulling the connector off the vehicle anchor. leg and bring foot up until it locks into place. - Page 18 BASE INSTALLATION WITH VEHICLE SEAT BELT BASE INSTALLATION WITH VEHICLE SEAT BELT We recommend using the load leg to optimize safety of the child in the seat. Load leg should be placed in stowed position when not in use. If installing without the load leg, bypass step 1 and proceed to step 2. LEVELING BASE 1 Press the load leg release button on bottom of the base and pull load leg out from storage.
-
Page 19: Base Installation With Vehicle Seat Belt
BASE INSTALLATION WITH VEHICLE SEAT BELT BASE INSTALLATION WITH VEHICLE SEAT BELT Lap/Shoulder Routing Method Lap/Shoulder Routing Method 3 While holding the shoulder belt firmly, check the indicator. If green, close the top of the lock-off over the lap/shoulder belt. NOTE: Tightness indicator should be green. -
Page 20: Lap Belt Only Routing Method
BASE INSTALLATION WITH VEHICLE SEAT BELT BASE INSTALLATION WITH VEHICLE SEAT BELT Lap Belt Only Routing Method Lap Belt Only Routing Method 1 Route the vehicle belt through the belt path while guiding the 3 While holding the excess lap belt webbing, firmly check the lap portion of the belt as close as possible to the topside of indicator. -
Page 21: Installing Load Leg
RED showing. This is an easy issue to resolve by following the steps below: 1 Uninstall your MESA MAX base. 2 Adjust the level adjustment foot to achieve proper recline level. NOTE: After installing the load leg, check 3 Push the base into the seat back. -
Page 22: Safety Check
BASE INSTALLATION WITH VEHICLE SEAT BELT BASE INSTALLATION WITH VEHICLE SEAT BELT Safety Check Safety Check Lock-off must be used at all times when installing with a vehicle seat belt. Make sure the load leg is secured and contacts the vehicle floor. Vehicle Belt is secure and untwisted. -
Page 23: Uninstalling Base And Storing Load Leg
BASE INSTALLATION WITH VEHICLE SEAT BELT CARRIER INSTALLATION WITH VEHICLE SEAT BELT DETERMINING BEST INSTALLATION METHOD Carrier-only Installation can only be performed using the vehicle seat belt. There are (3) methods of carrier-only installation. UNINSTALLING BASE AND STORING LOAD LEG LAP/SHOULDER PREFERRED LAP/SHOULDER OPTIONAL LAP BELT ONLY METHOD... -
Page 24: Leveling The Carrier
CARRIER INSTALLATION WITH VEHICLE SEAT BELT CARRIER INSTALLATION WITH VEHICLE SEAT BELT Lap/Shoulder Belt Preferred Routing Method If shoulder belt does not route around the back of the MESA MAX carrier, follow LAP/SHOULDER BELT OPTIONAL ROUTING METHOD page 48. 1 Route the lap portion of the seat belt through both lap belt guides on the carrier, and buckle the seat belt. - Page 25 CARRIER INSTALLATION WITH VEHICLE SEAT BELT CARRIER INSTALLATION WITH VEHICLE SEAT BELT Lap/Shoulder Belt Preferred Routing Method Lap/Shoulder Belt Preferred Routing Method 3 Lock vehicle seat belt. 4 Push the carrier into the vehicle seat bight (crease of the seat) and gently apply pressure from behind the carrier into the vehicle seat back.
- Page 26 CARRIER INSTALLATION WITH VEHICLE SEAT BELT CARRIER INSTALLATION WITH VEHICLE SEAT BELT Lap/Shoulder Optional Routing Method Lap/Shoulder Optional Routing Method 1 Route the lap portion of the seat 4 Feed excess webbing into the vehicle belt through both lap belt guides retractor.
-
Page 27: Lap Belt Only Routing Method
1 Route the lap belt through both guides on the carrier, and buckle the seat belt. Seating position is permitted by both UPPAbaby and your vehicle manufacturer 2 Push the carrier into the vehicle seat bight (crease of the seat) and gently apply for use with the type of Vehicle Seat Belt. -
Page 28: Aircraft Installation
When you can achieve all fit criteria without the insert, it can be removed. UPPAbaby and The FAA recommend that a child weighing up to 40 lbs (18 kg) use a certified harnessed NOTE: You may continue use beyond 11 lbs until all criteria are being met. -
Page 29: Sip Carriage + Harness Positioning
1” of space locked. between child’s shoulders and headrest. 1" WARNING! DO NOT place rolled towel or small blanket around head or SIP carriage. NEVER use non-regulated products with this child restraint, unless approved by UPPAbaby. -
Page 30: Attaching Carrier To Base
GENERAL USE – Securing Your Child GENERAL USE – Attaching Carrier to Base 4 Pull up on the harness to remove excess slack around the child’s legs. 1 Place carrier on base until a click is heard. 5 Pull the harness adjuster strap to snugly adjust the harness straps around 2 Check for a secure connection by pulling up on carry handle. -
Page 31: Removing Carrier From Base
GENERAL USE – Removing Carrier from Base GENERAL USE – Using Canopy 1 Pull and hold carrier release button Hide-away canopy easily adjusts to one of three on back of the carrier. (3) positions. 2 Lift carrier off base. TO EXTEND CANOPY Slowly pull forward on main canopy frame until resting in desired position. -
Page 32: Using Carry Handle
The carry handle must be locked in • The back seat is the safest place for children aged 13 and under. any four (4) positions when in use: • NEVER use non-regulated products with this child restraint, unless approved by UPPAbaby. stand , store... -
Page 33: Stroller Compatibility
STROLLER COMPATIBILITY – Releasing Carrier from Stroller Frame 1 Engage and hold the stroller release button on the Prior to fitting MESA MAX carrier to stroller frame, engage brake on stroller and remove toddler seat from frame. top of the carry handle. -
Page 34: Sip Padding Removal
CARE + MAINTENANCE – SIP Padding Removal CARE + MAINTENANCE – Seat Padding Removal Following are fabric removal instructions for cleaning. 1 Unbuckle retainer clip and harness. Remove harness pads. 2 Pull forward on SIP padding releasing harness straps. 3 Pull SIP padding down from bottom and release. 1 Remove buckle cover. -
Page 35: Seat Padding Installation
CARE + MAINTENANCE – Seat Padding Removal CARE + MAINTENANCE – Seat Padding Installation 5 Slide SIP to lowest position to remove top 1 With the SIP in the lowest position, lay seat pad portion of seat fabric. over carrier, open Velcro flap and fit opening around SIP/headrest. -
Page 36: Sip Padding Installation
CARE + MAINTENANCE – Seat Padding Installation CARE + MAINTENANCE – SIP Padding Installation 3 While the Velcro flap is still open, adjust SIP headrest to highest position, 1 Insert lower part of SIP carriage into pocket on the back of SIP padding. bring the harness straps to the front, then secure the Velcro underneath. -
Page 37: Cleaning
Air dry completely before re-use or storage. Your UPPAbaby product is warranted to be free from any manufacturing defects for a period of 2 years from the date of purchase under Spot clean using warm water with mild detergent. DO NOT bleach. - Page 38 • Products Involved in an accident. UPPAbaby reserves the right to determine if warranty terms and conditions have been met. For warranty service: In the US and CA please contact UPPAbaby customer service (844) 823-3132 and visit uppababy.com/support to send an email.
Need help?
Do you have a question about the MESA MAX and is the answer not in the manual?
Questions and answers