Advertisement
Table of Contents
- 1 Table of Contents
- 2 Safety Information
- 3 Notice
- 4 Product Description (General Overview)
- 5 Touch Panel (Operation User Interface)
- 6 Description of Button Operation
- 7 System Settings
- 8 Diagrams of Machine's Internal Workings
- 9 Troubleshooting Guide
- 10 Technical Specifications
- 11 Warranty
- Download this manual
Operating Instructions
RASLOK
Model: HCM-T1
© 2012 RASLOK Pte. Ltd. All rights reserved.
RASLOK™ is a trademark of RASLOK Pte. Ltd., Singapore.
Website: www.raslok.com Email: sales@raslok.com
Design and color may differ from the picture.
●
Unit appearance, specification, etc. are subject to change without prior notice if necessary for improving unit performance.
●
The rated voltage of this unit is AC 220V/50Hz only.
●
RASLOK
Better Water, Better Life
Water Purifier
TM
Page 1 of 18
Advertisement
Table of Contents

Related Manuals for RASLOK HCM-T1

Summary of Contents for RASLOK HCM-T1
- Page 1 Water Purifier RASLOK Model: HCM-T1 © 2012 RASLOK Pte. Ltd. All rights reserved. RASLOK™ is a trademark of RASLOK Pte. Ltd., Singapore. Website: www.raslok.com Email: sales@raslok.com Design and color may differ from the picture. ● Unit appearance, specification, etc. are subject to change without prior notice if necessary for improving unit performance.
-
Page 2: Table Of Contents
Table of Contents Safety Information ..................3 NOTICE ....................4 Product Description (General Overview) ............. 5 Touch Panel (Operation User Interface) ............6 Description of Button Operation ..............8 System Settings ..................9 Diagrams of Machine’s internal workings ............13 Troubleshooting guide ................ -
Page 3: Safety Information
Intended Use: The RASLOK Water Purifier HCM-T1 is intended for use in filtering tap water for drinking purposes. The system is typically installed at point of use and must be installed by a RASLOK authorized professional installer according to installation instructions. -
Page 4: Notice
Safety Information Important guide during installation / Use To reduce the risks associated with fire and explosion: Do not place the equipment in area with potential gas leak, or near heating devices. ● Do not put candles, lit cigarettes, or any heating devices on the unit. ●... -
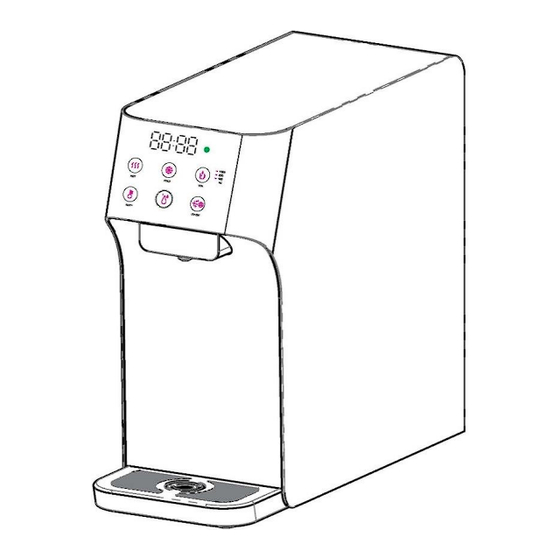
Page 5: Product Description (General Overview)
Product Description (General Overview) User Interface/UI Decorative plate Waterspout Front Panel Top Cover Drip Collector Control Panel Side Panel Black Panel Power Cord Water Inlet Heating System Switch Filter (Sediment & Carbon Filter (UF&ACF Composite) Composite) Page 5 of 18... -
Page 6: Touch Panel (Operation User Interface)
Touch Panel (Operation User Interface) Description of button functions - Hot Water Dispensing Button (Red & White lights); used to start dispensing of Hot water. light will turn red when the machine is heating and turn back white when heating is finished. light will remain red during dispensing of hot water. - Page 7 cooling is finished. light will remain blue during dispensing of cold water. Press any Button to stop dispensing. - Volume selection Button (White light); used to select volume of water dispensed from one of 3 values: 180ml, 220ml, or 1000ml. * To avoid over dispensing, machine will automatically stop dispensing if more than 1.5L of water has been dispensed continuously, or if it has been dispensing for more than 2 minutes.
-
Page 8: Description Of Button Operation
Description of Button Operation Press the button, which will turn red. Press the Button Hot Water while button is still red to dispense a predetermined amount of hot water, after which will turn back white. Press any button during the dispensing to stop immediately. Note:1. -
Page 9: System Settings
System Settings 1.Time setting 1.1 Press and hold button for 5 seconds to enter time setting status. will start flashing, allowing you to adjust the hours. Press to increase and to decrease. 1.2 Pressing button again will cause to flash, allowing you to adjust the minutes. - Page 10 5. UVC LED Sterilizer (Default is always “ON”) 5.1 After the cold water temperature setting is completed, press to enter UVC setting mode status. Press to “ON” UVC LED Sterilizer mode to “OFF”. light will turn blue when the UVC LED Sterilizer is in use. Every 8 hours, the UVC LED Sterilizer will be activated for the first 4 hours.
- Page 11 6.5 Filter Replacement instructions Step 1: Take out Water Tray Step 2: Take out Front Panel Step 3: Twist to take out old Step 4: Reinstall Front Panel and Water Tray filter and replace with new Item No. Description Function Lifespan Sediment-r emoves sand, dust, impurities,...
- Page 12 7. Energy-Saving Mode (Default is “OFF”) 7.1 After the filter life setting is completed, press to enter energy-saving setting status. Press to “ON” and to “OFF” energy-saving mode. 7.2 If the energy-saving sensor detects less than 0.5Lux for more than 3 minutes (Dark environment), machine will enter energy-saving mode.
-
Page 13: Diagrams Of Machine's Internal Workings
Diagrams of Machine’s internal workings WATERWAY Circuit Diagram Page 13 of 18... - Page 14 Installing and Unpackaging Warning: Please switch off water supply to the dispenser before replacing filters. Unpack the product, install the drip tray. Use of the Quick Connector: Connect the tubing The system includes push-in fittings for quick tubing connection. Review the following instructions before connecting the tubes in the next step.
- Page 15 When installing the machine, please pay attention to the installation dimension in case there is blocking of air inlet and outlet. Drip tray must be properly placed within the counter. Do not suspend it mid air or it may fall off. 6.
-
Page 16: Troubleshooting Guide
Troubleshooting guide Failure & Error Cause Solutions Code Low water pressure Check the tap water Small Water flow Filter Lifespan is up Contact local service agency to replace filter Pipe not connected properly Inspect the connector and connect the pipe properly Water leakage Water and PE pipe bursting Replace the water and PE pipe... -
Page 17: Technical Specifications
Technical specifications Item Power Supply 220-240 volts Voltage 230V, 1 phase Frequency 50/60Hz Cooling Power Heating Power 500W UVC LED Power 0.4W Total Power 580.4W Current Refrigerant gas R134a/38G Climate class ST/T Cold water Output 3.0L/H Cold water Temp range 3-10°... -
Page 18: Warranty
Limitation of Liability: RASLOK Pte Ltd will not be liable for any loss or damage arising from this product, whether direct, indirect, special, incidental, or consequential, regardless of the legal theory asserted, including warranty, contract, negligence or strict liability. Some countries do not allow the exclusion of limitation of incidental or consequential damages, so the above limitation or exclusion may not apply to you.
Need help?
Do you have a question about the HCM-T1 and is the answer not in the manual?
Questions and answers
Showing Err 1
Err 1 (E1:00) on the RASLOK HCM-T1 indicates a Cold water NTC error. The recommended action is to contact the local service agency for support.
This answer is automatically generated