Dive Gear Express DGX Gears XTRA Service Manual
First stage
Hide thumbs
Also See for DGX Gears XTRA:
- Second stage service manual (29 pages) ,
- Service manual (32 pages)
Advertisement
Quick Links
Advertisement

Subscribe to Our Youtube Channel
Related Manuals for Dive Gear Express DGX Gears XTRA


Summary of Contents for Dive Gear Express DGX Gears XTRA
- Page 1 DGX Gears XTRA First Stage Service Manual...
- Page 2 Copyright © 2022 Dive Gear Express All Rights Reserved Revision 7 Published 09/23/2022 Revision Date Changes 08/17/2020 Initial publication 09/28/2020 Minor technical edits for clarity; edited photos for clarity and added part numbers; replaced Figs. 26, 30, 32, 33; updated...
- Page 3 Improper service of dive equipment can lead to severe injury or death. Dive Gear Express recommends that non-qualified individuals seek professional training/mentoring before attempting repairs or servicing on any diving equipment.
- Page 4 Cleaning and Rinsing - General Considerations (11) Cleaning and rinsing of the components should be done using clean, fresh water. (12) Only use degreasers that leave no organic residue (e.g., Extreme Simple Green, Blue Gold Cleaner, or any clear liquid dish soap that does not contain scents or dyes). (13) To remove corrosion, use a 50/50 vinegar/water solution and nylon brushes.
- Page 5 Cleaning of Regulator Parts (16) Cleaning of parts that are going to be reused is one of the most critical steps in servicing the regulator. As was stated earlier, use the proper solutions for the job at hand. Removal of hydrocarbons and debris should be accomplished before attempting removal of corrosion.
-
Page 6: Inspection After Cleaning
Inspection After Cleaning (21) Before assembling the regulator, it is necessary to inspect all the cleaned components. Using a magnifying glass or inexpensive USB microscope, ensure all parts are clean and contaminant-free, and check the components for damage that may have been hidden by corrosion or lubricant. Look for scratches that may affect the sealing of the regulator. - Page 7 This involves using a small clean plastic bag containing a small amount of lubricant. The O-ring is inserted into the bag, worked around to evenly coat with lube while squeezing off excess, then taken out of the bag and used in its location - Fig. 2. Fig.
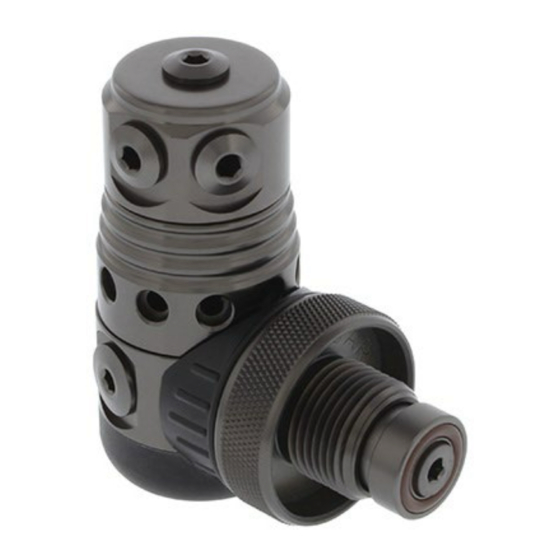
- Page 8 Fig. 3 (1) The First Stage Body Holding Tool, Thin Jaw Adjustable Wrench, Spanner Wrench and Brass O-Ring Pick Set can be found at Dive Gear Express using the link below. https://www.divegearexpress.com/tools/scuba-tools (2) Tools may also be purchased from Scuba Tools at the link below.
- Page 9 3. Preliminary Testing (1) Preliminary testing of the regulator is necessary to identify any issues with the first and second stages and verify the overall regulator function. This testing will include: Visual inspection of the first and second stages Inspection of the hoses Intermediate Pressure (IP) check Cracking effort and second stage negative pressure test Visual inspection is done to identify issues that could affect servicing and to ensure that pressurizing...
- Page 10 Caution Note: If the second stage is leaking even slightly, IP will be affected. If it is leaking, turn the adjustment knob to stop the flow or use a second stage that is not leaking when paired with the first stage. It is a clear indication that the second stage requires rebuilding if turning the adjustment knob does not stop the flow.
- Page 11 4. First Stage Disassembly (1) Additional tips for performing disassembly of the XTRA First Stage can be found in our video at: https://www.youtube.com/watch?v=KOl-oxsuBAE (2) Ensure the system is depressurized. Document the position of all hoses and port plugs. The use of small, clean containers to hold parts is recommended.
- Page 12 2. Remove the Shutter Valve (D2) using a 4mm hex and Shutter Crown (D4), which contains the Spring (D6) and two small nylon Washers (D5*) - Fig. 5. Fig. 5 3. Remove the Retainer Housing (D8) with the 4mm hex and lift the Handwheel (D9) from the body - Fig.
- Page 13 4. Insert the First Stage Body Holding Tool into one of the high pressure ports and clamp the tool into a vise - Fig. 7. NEVER CLAMP THE FIRST STAGE BODY INTO THE JAWS OF A VISE! Fig. 7 Caution Note: Clamping the body of the regulator into the jaws of a vise may result in damage to the body that will require replacement of the regulator.
- Page 14 6. Carefully remove the O-rings (D1*, D3*, D7*) from the Shutter Valve, Shutter Crown, Retainer Housing and Filter Retainer. Use the pinch method and a brass or nylon pick. Do not use a steel pick that could damage the sealing surface. Remove the Filter (D11) and set aside. Retain the Spring (D6) and items listed above with the parts to be reused - Fig 9.
- Page 15 8. Loosen the HP Seat Retainer with a 5mm hex wrench and remove it from the body, exposing the HP Seat (31*) - Fig. 12. Fig. 12 9. Push out the HP Seat with a blunt pick or thin hex key, remove the O-ring (32*) and Spring (29). Remove O-ring (30*) with a brass or nylon pick from its groove in the body of the regulator - Fig.
- Page 16 10. Using the universal wrench or a pin spanner with an appropriate pin, and with the first stage handle secure - Fig. 14, loosen the End Cap (19)/Port Swivel (23) assembly so that a gap is visible - Fig. 15. Fig.
- Page 17 12. Remove O-ring (15*) from the piston using the pinch method to avoid scratching the piston sides - Fig. 18. Fig. 18 13. Carefully remove the following components from the HP side of the regulator Body: Washer (28), O-ring (27*), and Teflon Washer (26*) using the Piston Stem Bushing Assembly Tool - Fig. 19. Turn the Body over and remove the other O-ring (27*) with a nylon pick - Fig.
- Page 18 14. Disassemble the turret by inserting a first stage handle into one of the low pressure ports, then using a 6 mm hex wrench to unscrew the Nut (16) from the Port Swivel (23) - Fig. 21. Fig. 21 15. This allows access to the Washer (17a). Remove the Washer. Pull the End Cap from the Port Swivel and remove the Washer (17b) and O-ring (20*) from the Port Swivel - Fig.
- Page 19 (4) The photographs below show the disassembled first stage - Fig. 23 and First Stage Service Parts Kit - Fig. 24. All the parts not in the service kit need to be washed, rinsed and dried, as discussed previously. O-rings and washers that will be replaced with new from the service kit should be discarded. Fig.
- Page 20 5. First Stage Assembly (1) Additional tips for performing reassembly of the XTRA First Stage can be found in our video at: https://www.youtube.com/watch?v=1b8Xx3VVf2o (2) Before starting the first stage assembly, complete a thorough inspection of all parts to be reused. Refer to the Overview Inspection section for details.
- Page 21 2. Next, take the End Cap (19) and press it onto the Port Swivel. Install the other smaller Washer (17a) into the recess for it - Fig. 27. Install the Nut (16) and torque this to 70 in-lbs/81 kgf-cm/7.9 N⋅m using a 6mm hex, with the first stage handle installed in one of the open LP ports - Fig.
- Page 22 4. Next, lubricate the O-ring (15*) and install it on the Piston (14) - Fig. 31. Carefully insert a piston bullet into the shaft of the Piston to protect the knife edge. Now place the Washer (12-1*) on the Piston, followed by the Spring (13) - Fig. 32, and the Washer (12*) - Fig. 33. Fig.
- Page 23 6. Reverse the tool to hold the stack, protecting the Piston end with a piston bullet - Fig. 36. Insert the Piston/End Cap/Port Swivel assembly into the Body and screw it on hand tight - Fig. 37. Remove the bushing tool and piston bullet from the high pressure end of the Body. Fig.
- Page 24 8. Set the assembly aside and install the O-ring (30*) in the HP side of the body, using a heavy nylon pick or thin wooden dowel, and place the Spring (29) on top of the Washer Stack - Fig. 40. Install the O- ring (32*) onto the HP Seat Retainer (33) and place the HP Seat (31*) into the HP Seat Retainer.
- Page 25 10. Once the HP Seat Retainer is torqued to its proper specification, install the rubber End Cap (34) onto the regulator body. Orient the groove in the side to line up with the DIN Inlet on the Body - Fig. 43. Fig.
- Page 26 12. Torque the Filter Retainer to 260 in-lbs/300 kgf-cm/30 N⋅m. Set the Handwheel (D9) on the Filter Retainer. Lubricate the three remaining O-rings (D7*) and install them on the Retainer Housing (D8) - Fig. 45. Fig. 45 13. Insert the Retainer Housing into the Handwheel and torque this to 86 in-lbs/100 kgf-cm/9.7 N⋅m using a 4mm hex.
- Page 27 14. Slide the Shutter Crown assembly onto the Retainer Housing - Fig. 47. It is best to do this as illustrated or even hold the reg upside down and slide the crown up into it to prevent the washers/spring from falling out. Fig.
- Page 28 First Stage Torque Specifications (3) For a successful rebuild, it is necessary to use proper torque on all connections that require it. The following specifications should be used, listed in the order they occur in the assembly: Nut (16) to Port Swivel (23) to End Cap (19) 70 in-lbs/81 kgf-cm/7.9 N⋅m HP Seat Retainer (33) to Body (11)
- Page 29 You will need to move the regulator between the cylinders, and each time it is pressurized, be sure to have the purge button depressed slightly and allow the supply pressure to come up with this safety measure used. A transfill whip like the one from Dive Gear Express will make setting up the cylinders easier.
- Page 30 (7) General Trouble Shooting – Not all possibilities may be noted. No airflow Check supply pressure Free flowing Excessive IP; HP Seat bad; Piston edge damaged Excessive IP Bad HP Seat; HP Seat or Piston O-ring(s) bad Leaks between seams on Body Bad O-rings;...
Need help?
Do you have a question about the DGX Gears XTRA and is the answer not in the manual?
Questions and answers