Table of Contents
Advertisement
Available languages
Available languages
Advertisement
Chapters
Table of Contents

Subscribe to Our Youtube Channel
Related Manuals for Moes TV01


Summary of Contents for Moes TV01
- Page 1 HOME, SMART MOES HOME TV01 Zigbee Thermostat Radiator Valve User Guide...
-
Page 2: Table Of Contents
Table of contents 1. Information about this manual......2. Product Description......... 3. Device Overview..........4. Start-up............. 4.1 Before we get started......4.2 Inserting(replacing) batteries....4.3 Set date and time........5. Installation of the radiator thermostat..5.1 Unscrew your existing radiator thermostat.. 5.2 M30 x 1.5........... - Page 3 8.5 Offset Temperature........ 8.6 Eco and Comfortable Temprerature..8.7 Child Lock..........8.8 Anti-Freezing Mode....... 8.9 Heating stop(Power Saving)Mode..8.10 Anti-Calification(Descaling)Protection..8.11 Boost............9. Setting..............9.1 Date............. 9.2 Week Programming Stage...... 9.3 Open Window..........9.4 Comfortable Temperature...... 9.5 ECO Temperature........9.6 Offset............9.7 Holiday Setting..........
-
Page 4: Information About This Manual
2. Product Description The device moves a valve to intelligently control the flow of heat to the radiator. With the Thermostat Radiator Valve TV01 you can conveniently adjust the room temperature between 5-30°C, and save more than 15% of energy. -
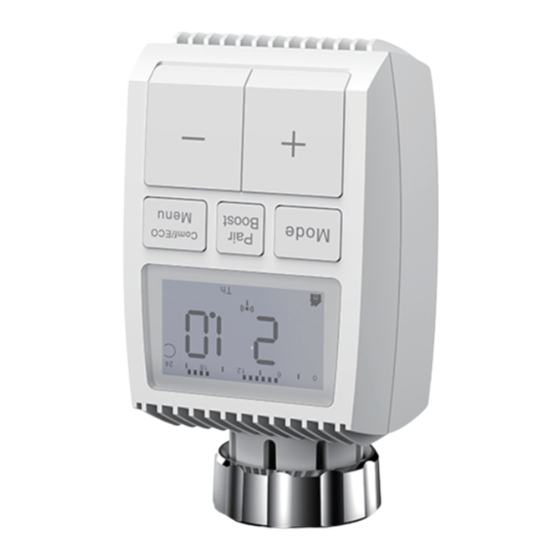
Page 5: Device Overview
Pair/Boost/Return key Adjust temperature/date/time (Press or hold press) 4. Start-up 4.1 Before we get started 2×AA batteries are required for TV01 to work, • please get prepared. A smart gateway hub is required for the TV01 to • work. -
Page 6: Inserting(Replacing) Batteries
Temperature is shown in degrees Celsius. • 4.2 Inserting(replacing) batteries. Pull off the battery compartment cover on the • underside of the device. Insert 2 new LR6(mignon/AA) batteries in the • battery compartment making sure they are the right way round. Reattach the battery compartment cover and latch •... -
Page 7: Set Date And Time
4.3 Set date and time If batteries are inserted or replaced, the date and time is automatically requested after a brief display of the fimware version number. Set the year, month, dayhour and minute with the • +/- button, and confim with Menu button. You can press the Boost button to retum to the previous menu during the setting of date and time. -
Page 8: Installation Of The Radiator Thermostat
5. Installation of the radiator thermostat The radiator thermostat is easy to install and can be done without draining heating water or intervening in the heating system. No special tools are required, nor does the heating have to be switched off. The ring nut attached to the radiator thermostat can be used universally and without accessories for all valves with a thread size of M30×1.5 from the... - Page 9 5.2 M30×1.5 Screw the TV01 smart radiator thermostat • directly onto the radiator if the connector type is M30x 1.5(picture shown as below). You can adjust the angle to make the screen facing the viewer properly. Rotate the thermostat dial to the maximum value, •...
-
Page 10: Danfoss Ravl Valve
5.3 Danfoss RAVL Valve Check the is active. • The valve bodied have elongated notches around • their circumference, which ensure that the adapter is properly seated when it snaps on: snap on the adapter completely, so that the pins inside the adapter are lined up with the notches on the valve. -
Page 11: Danfoss Rav Valve
5.4 Danfoss RAV Valve Rotate the thermostat dial to the maximum value, • the max value may be 6 or 8. Check the is active. • The valve bodied have elongated notches around • their circumference, which ensure that the adapter is properly seated when it snaps on: snap on the adapter completely,so that the pins inside the adapter are lined up with the notches on the valve. -
Page 12: Danfoss Ra Valve
5.5 Danfoss RA Valve Rotate the thermostat dial to the maximum value, • “N” Align Dial. Check the is active. • The valve bodied have elongated notches around • their circumference, which ensure that the adapter is properly seated when it snaps on: snap on the adapter completely, so that the pins inside the adapter are lined up with the notches on the valve. -
Page 13: M28X1.5Mm
5.6 M28x1.5mm 1. Select the length of the ejector rod according to the following brands or valve sizes, and the size of ejector rod is 15 / 17 / 19 / 24mm. 2. To install the ejector rod with the correct size into the hole. -
Page 14: Giacomini
5.7 Giacomini 1.To install the adapter onto the Giacomini valve in the correct direction; 2.To install the GIA ejector rod into the hole. 5.8 Caleffi 1.Open the valve flow to the maximum, as shown in pic 1; 2. To install the adapter onto the Caleffi valve in the correct direction. -
Page 15: Use The Ejector Rod
pic① Rotate the thermostat dial to the maximum value 5.9 Use the Ejector rod Due to the dimensional and assembly tolerance of the metal valve, it may result in the following situations: 1. When the device is failure, F2 is displayed. 2. -
Page 16: Interface Screen
If not, please uninstall and re install the batteries and redo step 4. 7. Software Installation MOES App is upgraded as much more compatibility than Tuya Smart/Smart Life App, functional well for scene controlled by Siri, widget and scene recommendations as the fully new customized service. -
Page 17: Product Features
Open MOES App, use your phone number or email • address to register and login. Tap + on the top right, choose Gateway Control->Wireless Gateway (ZigBee) and simply follow the inbuilt setup wizard for device installation and configuration. After the ZigBee smart gateway hub is added •... -
Page 18: Manual Mode
Press the mode button to select icon. • Default temperature: 17°C and 21°C. • Temperature range: 5-30 °C, step: 0.5 °C. • App operation: Click the auto mode icon in the App control panel. 8.2 Manual Mode In manual mode, the temperature is controlled in accordance with the current temperature set via ‘+/-’... -
Page 19: Open Window Detection
App operation: Click the Mode icon to switch to the holiday mode in the App control panel, and switch to any other mode to cancel the holiday mode. 8.4 Open Window Detection The device automatically stop heating when it detects a sudden temperature drop(5°C in 5 minutes as default). -
Page 20: Eco And Comfortable Temprerature
Long press the menu button for 5 seconds, it will • enter the setting interface. Select “Offset” option via ‘+/-’ button, and press • menu button to enter the offset temperature interface. Set the desired offset temperature using ‘+/-’ • button and confirm with the menu button. -
Page 21: Child Lock
8.7 Child Lock Operation of the device can be locked to avoid settings being changed unintended(e.g. through involuntary touch). To activate/deactivate the child lock, please proceed as follows: Long press the mode button for 5 seconds, it will • show LOC symbol on the screen and the device button cannot be used. -
Page 22: Heating Stop(Power Saving)Mode
8.9 Heating stop (Power Saving) Mode Battery life can be prolonged by switching the heating off. To achieve this, the valve is closed fully. To activate the heating stop, please proceed as follows: The device operation In manual mode, manually adjust the temperature •... -
Page 23: Setting
Press the boost button to activate the boost • function. The remaining time for the function will be counted • down in seconds(‘299’to‘000’). After these 5 minutes have elapsed, the actuator • changes to the mode which was previously active (auto/manual) with the previously set temperature. -
Page 24: Week Programming Stage
the menu button. To confirm, the time flashes three times. Use the boost button to return. • Note: When the device is successfully paired with the phone, the divice time is synchronized with the phone time. 9.2 Week Programming Stage In this menu item, you can create a heating profile with heating and cooling phases according to your personal needs. -
Page 25: Open Window
Select the desired temperature for the next time • period using the “+/-” button and confirm with the menu button. Temperature range: 5-30°C, step: 0.5 °C. • Repeat this procedure until temperatures are • stored for the entire period between 0:00 and 24:00 h. -
Page 26: Eco Temperature
configuration menu. (Select comfortable temperature icon( ) via the • “+/-” button in the menu. Confirm with the menu button. • Select the desired temperature using the “+/-” • button and confirm with the menu button. To confirm, the temperature flashes three times. Temperature range: 5-30°C, step: 0.5°C. -
Page 27: Holiday Setting
configuration menu. Select offset icon( )via the “+/-” button in • the menu. Confirm with the menu button. • Select the desired temperature using the “+/-” • button and confirm with the menu button. To confirm, the temperature flashes three times. Temperature range: -5~5°C, step:0.1°C. -
Page 28: Amazon Alexa
APP operation: Click the holiday mode icon ( )in the App settings screen. Note: if there is no operation in the setting interface within one minute, the setting will exit automatically. 10. Voice Control 10.1 Amazon Alexa Amazon Alexa is an intelligent personal assistant developed by Amazon, and is capable of voice interaction. - Page 29 Note: If Alexa is asked to increase the temperature by 2°C, then Alexa will add 2°C to your set-point. If the ambient temperature is already > 2°C above the current set-point then the actual temperature will not change and smart radiator thermostat will not turn the heating ON.
-
Page 30: Google Home
10.2 Google Home Google Home is a brand of smart speakers that work similary to Amazon Echo. Google’s intelligent PA, Google Assistant, is equivalent to Amazon’s Alexa. Google Home is also available on all Android devices and does not require the use of the ‘Smart Speakers’. -
Page 31: Set An Automation Scenarios Linkage
11. Set an automation scenarios linkage lf you have a door sensor installed in your home, then you can realize an automation scenarios linkage between TRV and door sensor. Under “Automation” in the “Smart” page, click • “+” on the upper right comer, you will see a page called Create Smart that will guide you through the setting. -
Page 32: Low Battery
12. Low Battery When the battery power is less than 12%, the low power prompt icon ( )will be displayed. Please replace the battery as soon as possible, When the screen displays( )the device is not available. 13. Reset The device operation: Press the “+” and “-” buttons for 5 seconds to enter the reset mode, and the screen will display “FAC”... -
Page 33: Technical Data
15. Technical Data Batteries: 2×1.5 V LR6/mignon/AA Battery life: 1.5 years Temperature range: 5-30°C Degree of protection: Ip20 Display: LCD with LED RF: ZigBee Frequency: 2.4GHz Maximum radiated power: 10dBm Dimensions(W xHx D): 55.3×54×98.3 mm Weight: 190g(ind. batteries) Working temperature: -10°C~40°C Working environment: Indoor Safety: CE/ROHS 16. -
Page 34: Safety Information
17.Safety Information 1.Do not disassemble, reassemble, modify, or attempt to repair the product by yourself. If there iare any issues, please contact the company's professional maintenance. 2.The product's battery should be recycled or disposed of separately from household waste according to local environmental regulations. 18.Storage Products should be put in the warehouse where the temperature is between the range -10℃... -
Page 35: Instructions For Disposal
19. Instructions for disposal Do not dispose of the device with regular domestic waste! Electronic equipment must be disposed of at local collection points for waste electronic equipment in compliance with the Waste Electrical and Electronic Equipment Directive. The device is not a toy, do not allow children to play with it. - Page 36 SERVICE 1.During the free warranty period, if the product breaks down during normal use, we will offer free maintenance for the product. 2.Natural disasters/man-made equipment failures, disassembly and repair without the permission of our company, no warranty card, products beyond the free warranty period, etc., are not within the scope of free warranty 3.Any commitment (oral or written) made by the third party (including the dealer/service provider)
- Page 37 RECYCLING INFORMATION All products marked with the symbol for separate collection of waste electrical and electronic equipment (WEEE Directive 2012/19 / EU) must be disposed of separately from unsorted municipal waste. To protect your health and the environment, this equipment must be disposed of at designated collection points for electrical and electronic equipment designated by the government or...
- Page 38 WARRANTY CARD Product Information Product Name____________________________________ Product Type_____________________________________ Purchase Date____________________________________ Warranty Period__________________________________ Dealer Information________________________________ Customer's Name_________________________________ Customer Phone__________________________________ Customer Address________________________________ _________________________________________________ Maintenance Records Failure date Cause Of Issue Fault Content Principal...
- Page 39 Thank you for your support and purchase at we Moes, we are always here for your complete satisfaction,just feel free to share your great shopping experience with us. If you have any other need,please do not hesitate to contact us first,we will try to meet your demand.
- Page 40 EVATOST CONSULTING LTD Address: Suite 11, First Floor, Moy Road Business Centre, Taffs Well, Cardiff, Wales, CF15 7QR Tel: +44-292-1680945 Email: contact@evatmaster.com AMZLAB GmbH Laubenhof 23, 45326 Essen Made In China Manufacturer: WENZHOU NOVA NEW ENERGYCO.,LTD Address: Power Science and Technology Innovation Center, NO.238, Wei 11 Road, Yueqing Economic Development Zone, Yueqing, Zhejiang, China...
- Page 41 HOME, SMART MOES HOME Moeshouse Smart Thermostatisches Heizkörperventil Bedienungsanleitung...
- Page 42 Inhaltsverzeichnis 1. Informationen über diese Anleitung....2. Produktbeschreibung........3. Beschreibung der Einrichtung......4. Inbetriebnahme..........4.1 Vor dem ersten Gebrauch....... 4.2 Einlegung (Austausch) der Batterien..4.3 Einstellung von Datum und Zeit....5. Installation des Heizkörperthermostats..5.1 Schrauben Sie Ihren bestehenden Heizkörperthermostat ab......5.2 M30 x 1.5...........
- Page 43 8.5 Temperaturverschiebung....... 8.6 Ökologische und komfortable Temperatur.. 8.7 Kindersicherung........8.8 Einfrierschutzmodus....... 8.9 Heizungsstopp (Energiesparmodus)..8.10 Schutz gegen Beheizung (Entkalkungsfunktion)........8.11 Boost ............9. Einstellung............9.1 Datum............9.2 Phasen des Wochenprogramms..... 9.3 Geöffnetes Fenster........9.4 Komfortable Temperatur......9.5 ECO-Temperatur........9.6 Verschiebung..........9.7 Urlaubsmodus..........
-
Page 44: Informationen Über Diese Anleitung
1. Informationen über diese Anleitung Vor dem Gebrauch des Geräts lesen Sie die ganze Bedienungsanleitung durch. Diese Anleitung umfasst wichtige Informationen bezüglich der beabsichtigten Nutzung des Geräts. Beachten Sie vor allem Sicherheitshinweise. Bewahren Sie die Anleitung zur eventuellen künftigen Verwendung auf. -
Page 45: Beschreibung Der Einrichtung
Ventil für 5 Minuten öffnen und den Heizkörper für kurze Zeit schnell erwärmen. Die von dem Heizkörper ausgegebene Wärme beheizt den Raum sofort angenehm. 3.Beschreibung der Einrichtung Ring nut Indicator icon in week programming stage 9 Set date/time Prg:Programming Date/Temperature display Open window ZigBee signal Comfortable temperature... -
Page 46: Einlegung (Austausch) Der Batterien
4.2 Einlegung (Austausch) der Batterien •Nehmen Sie die Abdeckung des Batteriefachs an der Unterseite des Geräts ab. •Legen Sie 2 neue LR6 (Mignon/AA) Batterien in das Batteriefach ein und vergewissern Sie sich, dass sie richtig angebracht sind. •Setzen Sie die Abdeckung des Batteriefachs erneut auf und schnappen Sie sie ein. -
Page 47: Einstellung Von Datum Und Zeit
4.3 Einstellung von Datum und Zeit Wenn die Batterien eingelegt oder ersetzt wurden, wird die Einstellung von Datum und Zeit nach der kurzen Abbildung der Nummer der Firmware-Version automatisch angefordert. •Mit Hilfe der Taste +/- stellen Sie das Jahr, den Monat, den Tag, die Uhr und die Minute ein und bestätigen Sie diese durch die Menü-Taste. -
Page 48: Installation Des Heizkörperthermostats
5.Installation des Heizkörperthermostats Die Installation eines Heizkörperventils ist einfach und es ist nicht nötig, das Wasser auszulassen oder in das Heizsystem einzugreifen. Es wird kein spezielles Werkzeug erforderlich und es ist nicht nötig, die Beheizung auszuschalten. Die an dem Heizkörperthermostat angeschlossene Ringmutter kann universal und ohne Zubehör mit allen Ventilen mit der Gewindegröße M30 x 1,5 von bekannten Herstellern genutzt werden, wie sind:... - Page 49 5.2 M30×1.5 •Im Falle des Steckers M30 x 1,5 schrauben Sie den intelligenten Heizkörperthermostat TRV direkt auf den Heizkörper auf. Sie können den Winkel so anpassen, dass der Bildschirm auf den Anwender gerichtet ist. •Drehen Sie mit dem Zifferblatt des Thermostats in die Position des maximalen Werts, der maximale Wert kann 6 oder 8 sein.
-
Page 50: Ventil Danfoss Ravl
5.3 Ventil Danfoss RAVL •Überprüfen Sie, ob aktiv ist. •Der Ventilkörper hat am Umkreis längliche Rillen, die absichern, dass der Adapter nach der Installation richtig aufgesetzt ist: setzen Sie den Adapter vollständig so auf, dass die Stifte innerhalb des Adapters mit den Rillen am Ventil ausgeglichen sind. -
Page 51: Ventil Danfoss Rav
5.4 Ventil Danfoss RAV •Drehen Sie mit dem Zifferblatt des Thermostats in die Position des maximalen Werts, der maximale Wert kann 6 oder 8 sein. •Überprüfen Sie, ob aktiv ist. •Der Ventilkörper hat am Umkreis längliche Rillen, die absichern, dass der Adapter nach der Installation richtig aufgesetzt ist: setzen Sie den Adapter vollständig so auf, dass die Stifte innerhalb des Adapters mit den Rillen am Ventil ausgeglichen sind. -
Page 52: Ventil Danfoss Ra
5.5 Ventil Danfoss RA •Drehen Sie mit dem Zifferblatt des Thermostats in die Position des maximalen Werts, „N“ Align Dial. •Überprüfen Sie, ob aktiv ist. •Der Ventilkörper hat am Umkreis längliche Rillen, die absichern, dass der Adapter nach der Installation richtig aufgesetzt ist: setzen Sie den Adapter vollständig so auf, dass die Stifte innerhalb des Adapters mit den Rillen am Ventil ausgeglichen sind. -
Page 53: M28X1.5Mm
5.6 M28x1.5mm 1. Wählen Sie die Länge der Auswerferstange gemäß den folgenden Marken oder Ventilgrößen aus, und die Größe der Auswerferstange beträgt 15/17/19/24 mm. 2. Um die Auswerferstange mit der richtigen Größe in das Loch einzubauen. 3. So installieren Sie den Adapter auf dem M28 * 1,5- Ventil. -
Page 54: Giacomini
5.7 Giacomini 1. Um den Adapter in der richtigen Richtung auf das Giacomini-Ventil zu installieren; 2. Um die GIA-Auswerferstange in das Loch zu installieren. 5.8 Caleffi 1. Öffnen Sie den Ventilfluss bis zum Maximum, wie in Bild 1 gezeigt; 2. Um den Adapter in der richtigen Richtung auf das Caleffi-Ventil zu montieren. -
Page 55: Verwenden Sie Die Auswerferstange
Bild① Drehen Sie den Thermostatregler auf den Maximalwert 5.9 Verwenden Sie die Auswerferstange Aufgrund der Maß- und Montagetoleranz des Metallventils kann es zu folgenden Situationen kommen: 1. Wenn das Gerät ausfällt, wird F2 angezeigt. 2. Das Metallventil kann nicht vollständig geschlossen werden und wird ständig erhitzt. -
Page 56: Bildschirm Der Schnittstelle
Sie die Batterien heraus und legen Sie diese wieder ein und wiederholen Sie den Schritt 4. 7. Installation der Software Die MOES App ist viel kompatibler als die Tuya Smart/Smart Life App und funktioniert auch für die Steuerung von Szenen durch Siri, Widgets und Szenenempfehlungen als völlig neuer, maßgeschneiderter... -
Page 57: Produktfunktion
der E-Mail-Adresse und melden Sie sich an. Wenn Sie kein Zutrittstor (Steuereinheit) installiert haben, klicken Sie auf das Symbol „+“ in der rechten oberen Ecke, wählen Sie „Gateways“ > „Tuya Smart ZigBee Hub “aus und gehen Sie nach den Weisungen des Begleiters durch die Installation und Konfigurierung des Geräts vor. -
Page 58: Manueller Modus
•Drücken Sie die Modus-Taste und wählen Sie aus. •Ausgangseinstellung: 17℃ a 21℃ •Temperaturbereich: 5 - 30 ℃, Abweichung: 0,5℃ Applikation: Klicken Sie in der App-Systemsteuerung auf das Symbol für den automatischen Modus. 8.2 Manueller Modus Im manuellen Modus wird die Temperatur mit Hilfe der Tasten (“+”... -
Page 59: Detektion Des Geöffneten Fensters
App-Betrieb: Klicken Sie auf das Modus-Symbol, um in der App-Systemsteuerung in den Urlaubsmodus zu wechseln, und wechseln Sie in einen beliebigen anderen Modus, um den Urlaubsmodus abzubrechen. 8.4 Detektion des geöffneten Fensters Wenn das Gerät die plötzliche Temperatursenkung detektiert, stoppt es die Beheizung automatisch (Ausgangseinstellung: bei der Senkung um 5°C innerhalb von 5 Minuten). -
Page 60: Ökologische Und Komfortable Temperatur
der Raum nur 18 °C aufweist, muss ein Offset von -2,0°C eingestellt werden. In den Einstellungen ist eine Offsettemperatur von 0,0°C eingestellt. Um die Offset- Temperatur einzustellen, gehen Sie bitte wie folgt vor. •Halten Sie die Menütaste 5 Sekunden lang gedrückt, um das Einstellungsmenü... -
Page 61: Kindersicherung
8.7 Kindersicherung Die Betätigung des Geräts kann verschlossen werden und man kann so die unerwünschte Änderung der Einstellung (z. B. infolge des zufälligen Kontakts) verhindern. Wenn Sie die Kindersicherung aktivieren wollen, gehen Sie wie folgt vor: •Drücken Sie und halten Sie die Taste für die Einstellung des Modus für die Dauer von 5 Sekunden, auf dem Bildschirm erscheint das Symbol LOC und das Gerät kann nicht genutzt werden. -
Page 62: Heizungsstopp (Energiesparmodus)
Anmerkung: Sobald diese Funktion aktiviert wird, werden weitere Funktionen bis zu deren folgenden Deaktivierung nicht zur Verfügung stehen. 8.9 Heizungsstopp (Energiesparmodus). Gerät: •Im manuellen Modus stellen Sie die Temperatur auf mehr als 30 °C manuell ein, auf dem Bildschirm erscheint „HS“... -
Page 63: Einstellung
Ventil für 5 Minuten vollständig geöffnet. Das Aufheizen eines Raumes dauert länger als 5 Minuten, aber die vom Heizkörper abgegebene Wärme ist sofort spürbar. •Wenn Sie den Modus der schnellen Beheizung aktivieren wollen, drücken Sie die Taste der schnellen Beheizung. •Die restliche Zeit wird in den Sekunden („299“... -
Page 64: Phasen Des Wochenprogramms
•Mit Hilfe der „+/-“-Tasten wählen Sie die Möglichkeit „Date/Time“ („Datum/Zeit“) aus und durch das Drücken der Menü-Taste wechseln Sie in die Schnittstelle der Einstellung von Datum/Zeit. •Mit Hilfe der „+/-“-Taste stellen Sie das erforderte Jahr/Monat/Tag/Stunde/Minute(n) ein und bestätigen Sie durch das Drücken der Menü-Taste. Die Zeit blinkt dreimal, wodurch die Speicherung der Einstellung bestätigt wird. -
Page 65: Geöffnetes Fenster
• Auf dem Display wird die nächste Zeit angezeigt. Sie können die Zeit mit Hilfe der Taste „+“ oder „-“ anpassen. • Wählen Sie die erforderte Temperatur für die nächste Zeit des Starts mit Hilfe der Taste „+“ oder „-“ aus und bestätigen Sie durch das Drücken der Menü-Taste. -
Page 66: Eco-Temperatur
• Wählen Sie im Menü mittels der „+/-“-Taste das Bildzeichen der komfortablen Temperatur ( ) aus. • Bestätigen Sie durch das Drücken der Menü-Taste. • Mit Hilfe der „+/-“-Taste wählen Sie die erforderte Temperatur aus und bestätigen Sie durch das Drücken der Menü-Taste. -
Page 67: Urlaubsmodus
• Bestätigen Sie durch das Drücken der Menü-Taste. • Wählen Sie durch das Drücken der Taste „+“ oder „-“ aus und bestätigen Sie durch das Drücken der Menü- Taste. Die Temperatur blinkt dreimal, wodurch die Speicherung der Einstellung bestätigt wird. •... -
Page 68: Reset
10.Reset Gerät: Drücken Sie und halten Sie die Tasten „+“ und „-“ für 5 Sekunden, auf dem Bildschirm wird „FAC“ angezeigt. Während des Resets kommt es zur Datenlöschung und es wird nötig sein, das Gerät erneut zu paaren. Applikation: Klicken Sie auf die Schaltfläche des Resets in der Einstellung. -
Page 69: Technische Parameter
12.Technische Parameter Batterie: 2x 1,5 V LR6 /AA Lebensdauer der Batterie: 1,5 Jahre Temperaturbereich 5~30°C Schutzstufe: IP20 Display: LCD-Display mit LED RF: Zigbee Frequenz: 2,4 GHz Maximale Austrittsleistung: 10 dBm Abmessungen (B x H x T): 55,3 x 54 x 98,3 mm Gewicht: 190 g (einschließlich der Batterien) Arbeitstemperatur: -10°C~40°C Arbeitsumfeld: Innenraum... -
Page 70: Informationen Zur Sicherheit
14.Informationen zur Sicherheit 1. nehmen Sie das Produkt nicht auseinander, bauen Sie es nicht wieder zusammen, verändern Sie es nicht und versuchen Sie nicht, es selbst zu reparieren. Wenn es Probleme gibt, wenden Sie sich bitte an die professionelle Wartung des Unternehmens. -
Page 71: Hinweise Zur Entsorgung
16.Hinweise zur Entsorgung Werfen Sie das Gerät in den üblichen Hausmüll nicht weg! Elektronische Einrichtungen sind im Einklang mit den Vorschriften zur Entsorgung der elektrischen und elektronischen Einrichtungen in den bestimmten Sammelstellen zu entsorgen. Die Einrichtung ist kein Spielzeug, erlauben Sie den Kindern nicht, dass sie mit der Einrichtung spielen. - Page 72 SERVICE 1. Wenn das Produkt während der kostenlosen Garantiezeit bei normalem Gebrauch ausfällt, bieten wir eine kostenlose Wartung für das Produkt an. 2. Naturkatastrophen / vom Menschen verursachte Geräteausfälle, Demontage und Reparatur ohne Genehmigung unseres Unternehmens, keine Garantiekarte, Produkte nach Ablauf der kostenlosen Garantiezeit usw. fallen nicht unter die kostenlose Garantie 3.
- Page 73 RECYCLING INFORMATION Alle Produkte, die mit dem Symbol für die getrennte Sammlung von Elektro- und Elektronik- Altgeräten (WEEE-Richtlinie 2012/19/EU) gekennzeichnet sind, müssen getrennt vom unsortierten Siedlungsabfall entsorgt werden. Um Ihre Gesundheit und die Umwelt zu schützen, muss dieses Gerät an ausgewiesenen Sammelstellen für elektrische und elektronische Geräte abgegeben werden, die von der Regierung oder...
- Page 74 GARANTIEKARTE Produktinformation Produktname______________________________________ Produktart________________________________________ Kaufdatum________________________________________ Garantiezeit_______________________________________ Händlerinformationen______________________________ Kundenname______________________________________ Kundentelefon_____________________________________ Kundenadresse____________________________________ __________________________________________________ Wartungsaufzeichnungen Ursache des Fehlerinhalt Rektor Ausfalldatum Problems...
- Page 75 Vielen Dank für Ihre Unterstützung und Ihren Kauf bei uns Moes. Wir sind immer für Ihre Zufrieden- heit da. Teilen Sie uns einfach Ihr großartiges Einkaufserlebnis mit. Wenn Sie weitere Bedürfnisse haben, zögern Sie bitte nicht, uns zuerst zu kontaktieren. Wir werden versuchen, Ihre Nachfrage zu befriedigen.
- Page 76 EVATOST CONSULTING LTD Address: Suite 11, First Floor, Moy Road Business Centre, Taffs Well, Cardiff, Wales, CF15 7QR Tel: +44-292-1680945 Email: contact@evatmaster.com AMZLAB GmbH Laubenhof 23, 45326 Essen Made In China Manufacturer: WENZHOU NOVA NEW ENERGYCO.,LTD Address: Power Science and Technology Innovation Center, NO.238, Wei 11 Road, Yueqing Economic Development Zone, Yueqing, Zhejiang, China...
Need help?
Do you have a question about the TV01 and is the answer not in the manual?
Questions and answers