Advertisement
Quick Links
Advertisement

Related Manuals for DS18 JK-HARNESS


Summary of Contents for DS18 JK-HARNESS
- Page 1 JK-HARNESS USER MANUAL...
-
Page 2: Tools Required
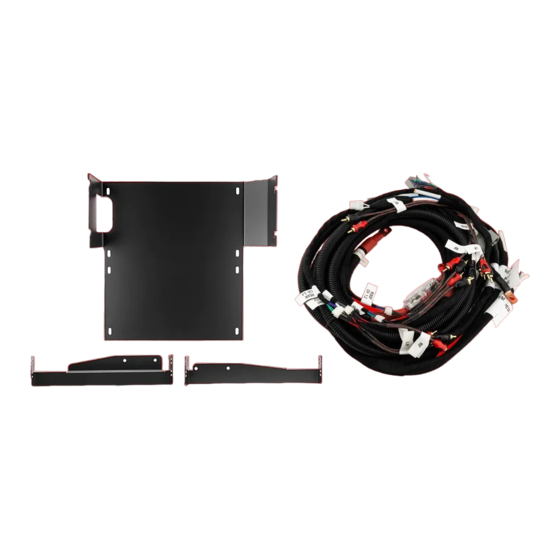
JK-HARNESS for JEEP: SERIES Item included: • JK Soundbar Wiring Kit Harness • SQBASS Brackets • Amp Rack X-4, M5x16mm X-4, 2x8mm X-8, 3.5x8mm screws, and nuts screws screws, and nuts Tools required: A. Pin Remover B. #2 Philips Screwdriver C. -
Page 3: Installation
ATTENTION Installation of mobile audio and video components requires experience with a variety of mechanical and electrical procedures. Although this manual provides general installation and operation instructions, it does not show the exact installation methods for your vehicle. If you do not have the required knowledge and experience to successfully complete the installation, consult an authorized dealer about professional installation service. - Page 4 JK-HARNESS Locate the Connector holder plate and remove it using the clip remover for the connector and the T27 socket for the two screws that hold it. Relocate this wiring under the seat to one side using the same pin spots as you can see in...
- Page 5 Using the ¼ Drill Bit open up this two holes where the factory bolts was located, then locate the SQBASS bracket “B” and secure it using a pair of the “A” screws but do not tight them yet. Locate the SQBASS Bracket “A” and secure it on the SQBASS using the “B” screws supplied and tight them just enough but not too hard (Screw can break easy).
- Page 6 JK-HARNESS Now it’s time to install the amplifiers to the Amp Rack using the supplied “C” screws, tight them well using a 7mm socket and the #2 Philips screwdriver. Check the position of the amp as you can see in the picture for easy wiring access, before putting this under the seat...
- Page 7 Slide in the bracket into the gap between the SQBASS bracket and the seat bracket and tight up all the screws using a 10mm socket with the impact wrench. Now it’s time to connect all the wires for the SQBASS and the amplifiers then get ready to put back the seat into the Jeep and route the rest of the wiring: Ground...
- Page 8 JK-HARNESS JEEP JK/JKU Sound Bar + Amp + Under Seat SubWOOFER Wiring Harness Kit Installation FUSE HOLDER RADIO BATTERY SIDE RADIO SUBWOOFER AMP SIDE SOUNDBAR AMP SIDE LED-BTC SOUNDBAR SPEAKER SIDE FACTORY SOUND...
- Page 9 RADIO REMOTE AUDIO FACTORY RADIO A - Connect the DS18 T-Harness connector between the factory radio unit and the radio harness. B - Factory radio Harness C - Factory radio unit D - DS18 Harness (Radio Side) 1 - Front Audio Input connector (white/gray)
- Page 10 JK-HARNESS Radio side Installation using Aftermarket Radio (With RCA pre-output) FACTORY RADIO HARNESS DS18 T-HARNESS RADIO DS18 HARNESS CONNECTED (RADIO SIDE) REMOTE RADIO HARNESS ADAPTER (Not Included) AFTERMARKET RADIO FRONT REAR SUB-W SUPPLIED RCA CONNECTOR...
- Page 11 Radio side Installation using Aftermarket Radio (With RCA pre-output) A - Connect the DS18 T-Harness connector between the factory radio unit and the radio harness using a radio harness adapter from JEEP JK to the brand radio that you will install (not included).
-
Page 12: Audio Input
JK-HARNESS Amplifier Side Installation FRONT CANDY AMP 4 CH TO LED BTC ROOF HARNESS ROOF CANDY AMP 4 CH LED-BTC (Sold separately) SQBASS SUBWOOFER REMOTE AUDIO INPUT... - Page 13 (with RCA pre-output) connect this using the supplied RCA connector and connect this to the amplifier RCA input. 9. DS18 HARNESS AMPLIFIER SIDE. 10. DS18 SOUNDBAR HARNESS AMPLIFIER SIDE. 11. RGB LED LIGHTS FROM THE SOUNDBAR: connect this to the LED-BTC module. (LED-BTC sold separately)
-
Page 14: Soundbar Side
JK-HARNESS SoundBar Side ROOF HARNESS FACTORY ROOF LIGHT TW 1 TW 2 DR 1 DR 2 TW 3 TW 4 SPEAKER SPEAKER SPEAKER SPEAKER RGB BADGE... - Page 15 C. Factory Soundbar Connector: connect this to the OEM connector for the Soundbar. D. 12 pin Harness Connector: this goes to the DS18 roof harness from the amplifier side. 1. Speaker 1 connector: connect this to the speaker, Green: +, Green/Black: - 2.
- Page 16 FOR MORE INFORMATION PLEASE VISIT DS18.COM We LIKE IT LOUD...
Need help?
Do you have a question about the JK-HARNESS and is the answer not in the manual?
Questions and answers