Table of Contents
Advertisement
LOVE YOUR NEW VIVO SETUP?
Ready to share that new amazing
setup? Want to brag about that
amazing new ergonomic solution?
Tag us in your photo!
VIVO-us
@vivo_us
FOR MORE GREAT VIVO PRODUCTS,
CHECK OUT OUR WEBSITE AT: WWW.VIVO-US.COM
LAST UPDATED: 01/06/2023
REV1.1LF
Electric Dual Motor Desk Frame
SKU: DESK-V103E/EW
Instruction Manual
ASSEMBLY VIDEO AVAILABLE:
Follow along step-by-step with our video walk through by scanning
the QR code with your mobile device or by following the product
link: vivo-us.com/products/desk-v103e
help@vivo-us.com
309-278-5303
www.vivo-us.com
Advertisement
Table of Contents

Subscribe to Our Youtube Channel
Related Manuals for Vivo DESK-V103E/EW


Summary of Contents for Vivo DESK-V103E/EW
- Page 1 VIVO-us @vivo_us FOR MORE GREAT VIVO PRODUCTS, ASSEMBLY VIDEO AVAILABLE: CHECK OUT OUR WEBSITE AT: WWW.VIVO-US.COM Follow along step-by-step with our video walk through by scanning the QR code with your mobile device or by following the product link: vivo-us.com/products/desk-v103e LAST UPDATED: 01/06/2023 REV1.1LF...
-
Page 2: Need Assistance
Give us a Call: Chat Us: Email Us: 309-278-5303 www.vivo-us.com help@vivo-us.com Chat Us: www.vivo-us.com Average Resolution Time: < 15m We’re Here for You! Our customer-minded support team is here for YOU, Monday-Friday 7am-7pm CST. Email Us: help@vivo-us.com We o er immediate assistance with rapid response times... -
Page 3: Weight Capacity
For the most up to date details on your product’s warranty, please visit the product’s listing on our website or reach out to customer support. VIVO is more than a brand of ergonomic o ice furniture. We are a team of vivo-us.com/products/desk-v103e creative and innovative indivuduals working together to o er high quality, a ordable ergonomic solutions. -
Page 4: Package Contents
TOOLS NEEDED: DIFFICULTY LEVEL To Save the Customized Settings at one time Level Drill Phillips Screwdriver A er adjusting one setting, press “T” to go back and enter another setting. Once finished, press “M” to save all settings. PACKAGE CONTENTS To Reset the Customized Settings Press “M”, “T”... -
Page 5: Assembly Steps
When screen lock is enabled, the display will read “- - -” a er resting 60 seconds. Press and hold “M” for 3 seconds to unlock. Screen may be locked before 60 seconds by holding “M” again for 3 seconds. Have a question? Give us a quick call / chat! 309-278-5303 or vivo-us.com... -
Page 6: Step 2: Attaching The Brackets
STEP 2: Attaching the Brackets Place the Li ing Columns (C) into the Telescopic Crossbar (A) and secure using M6x10mm Screws (S-A) and the Allen Wrench (T-A). Assemble the Feet (D) to the columns using M6x16mm Screws (S-B) and the Allen Wrench (T-A). -
Page 7: Step 3: Installing The Crossbar
See Desk Reset on pg 3 Motor #1 power cable needs replaced. Motor #1 running in reverse Please contact customer service. Overloaded Remove excess weight from desk. 3/4” Screw Have a question? Give us a quick call / chat! 309-278-5303 or vivo-us.com... -
Page 8: Troubleshooting
STEP 5: Install the Control Panel Place the Control Panel (H) at the desired location and mark drilling locations with a pencil. Drill 5/8” (16mm) deep pilot holes under the desktop with a 5/64” (or 2mm) drill bit. Attach the Control Panel (H) to the desktop with 3/4”... -
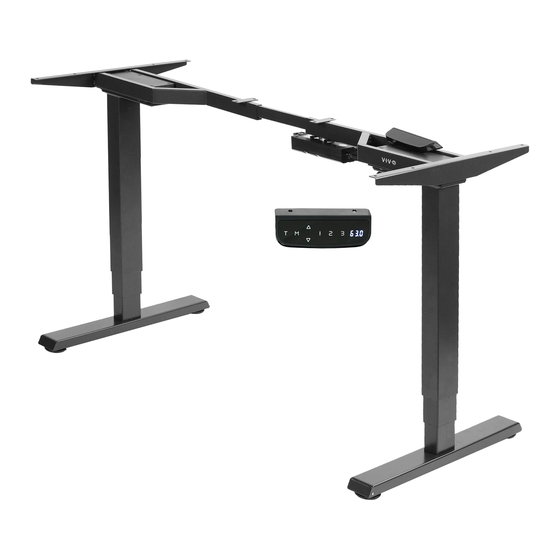
Page 9: Controller Overview
To deactivate the timer, press “T” five times or until the current height is displayed and the light in the upper right corner is turned o . Have a question? Give us a quick call / chat! 309-278-5303 or vivo-us.com... -
Page 10: Step 7: Installing The Cable Clips
STEP 7: Installing the Cable Clips STEP 8: Plug In Cable Connect the Power Cable (G) to a wall outlet to power on desk for operation. In the case of uneven floor Connect motor cables, Control Panel (H) and Power Cable (G) to the Control Unit (F). Determine the surface, adjust stabilizing foot pads as needed to make desk level.
Need help?
Do you have a question about the DESK-V103E/EW and is the answer not in the manual?
Questions and answers