Schwinn 230 Assembly Manual
Hide thumbs
Also See for 230:
- Assembly manual / owner's manual (42 pages) ,
- Assembly manual (24 pages) ,
- Service manual (60 pages)
Table of Contents
Advertisement
Advertisement
Table of Contents

Subscribe to Our Youtube Channel
Related Manuals for Schwinn 230


Summary of Contents for Schwinn 230
- Page 1 230 / 510R ASSEMBLY MANUAL / OWNER’S MANUAL...
-
Page 2: Table Of Contents
If purchased in US/Canada: To register your product warranty, go to: www.SchwinnFitness.com/register Or call 1 (800) 605–3369. If purchased outside US/Canada: To register your product warranty, contact your local distributor. For details regarding product warranty or if you have questions or problems with your product, please contact your local distributor. To find your local distributor, go to: www.nautilusinternational.com or www.nautilus.cn Nautilus, Inc., 5415 Centerpoint Parkway, Groveport, OH 43125 USA, www.NautilusInc.com - Customer Service: North America (800) 605-3369, csnls@nautilus.com | Nautilus (Shanghai) Fitness Equipments Co, Ltd, Room 1701 &1702, 1018 Changning Road, Changning District, Shanghai, China 200042, www.nautilus.cn - 86 21 6115 9668 | outside U.S. www.nautilusinternational.com | © 2020 Nautilus, Inc. | Schwinn, the Schwinn Quality logo, Schwinn 230, Schwinn 510R, Schwinn Toolbox, Bowflex, and Nautilus are trademarks owned by or licensed to Nautilus, Inc., which are registered or otherwise protected by common law in the United States and other countries. Google Play is a trademark of Google Inc. App Store is a service mark of Apple Inc. The Bluetooth word mark ® and logos are registered trademarks owned by Bluetooth SIG, Inc., and any use of such marks by Nautilus, Inc. is under license. ORIGINAL MANUAL - ENGLISH VERSION ONLY... -
Page 3: Important Safety Instructions
IMPORTANT SAFETY INSTRUCTIONS This icon means a potentially hazardous situation which, if not avoided, could result in death or serious injury. Obey the following warnings: Read and understand all warnings on this machine. Carefully read and understand the Assembly instructions. •... - Page 4 • Make the Pedals stable before you step on them. Use caution when you step on and off the machine. • Disconnect all power before servicing this machine. • Do not operate this machine outdoors or in moist or wet locations. Keep the foot pedals clean and dry. • Keep at least 0.6 m (24”) on each side of the machine clear. This is the recommended safe distance for access and passage around and emergency dismounts from the machine. Keep third parties out of this space when machine is in use. • Do not over exert yourself during exercise. Operate the machine in the manner described in this manual. • Correctly adjust and safely engage all Positional Adjustment Devices. Make sure that the Adjustment Devices do not hit the user. • Exercise on this machine requires coordination and balance. Be sure to anticipate that changes in speed and resistance level can occur during workouts, and be attentive in order to avoid loss of balance and possible injury. • This appliance is not intended for use by persons (including children) with reduced physical, sensory or mental capabilities, or lack of experience and knowledge, unless they have been given supervision or instruction concerning use of the appliance by a person responsible for their safety. • Children should be supervised to ensure that they do not play with the appliance.
-
Page 5: Safety Warning Labels / Serial Number
SAFETY WARNING LABELS AND SERIAL NUMBER WARNING! WARNING! • Injury or death is possible if • Keep hands • caution is not used while using and feet away. this machine. • • K eep children and pets away. • Read and follow all warnings on this machine. • Refer to the Owner’s Manual 54.8mm for additional warnings and safety information. -
Page 6: Specifications
SPECIFICATIONS Maximum User Weight: 136 kg ( 300 lb ) Total Surface Area (footprint) of equipment: 11,423.8 cm 111.8 cm Machine Weight: 37 kg ( 81.57 lb ) (44”) Power Requirements (AC Adapter): Input Voltage: 100 - 240V AC, 50/60Hz, 0.4A Output Voltage: 9VDC, 1.5A 162.5 cm (64”) 70.3 cm (27.7”) DO NOT dispose of this product as refuse. This product is to be recycled. For proper disposal of this product, please follow the prescribed methods at an approved waste center. Before Assembly Select the area where you are going to set up and operate your machine. For safe operation, the location must be on a hard, level surface. Allow a workout area of a minimum 1.9 m x 2.8 m ( 75” x 112” ). Basic Assembly Tips Follow these basic points when you assemble your machine: •... -
Page 7: Parts
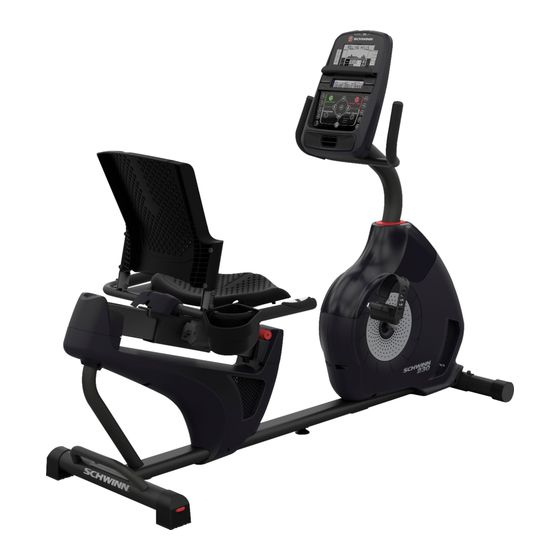
PARTS 14 (R) 13 (L) Item Description Item Description Main Frame Upper Shroud Front Stabilizer Shroud Cap Rear Stabilizer Console Seat Frame Assembly Left Pedal (L) Seat Back Right Pedal (R) Seat Bottom Water Bottle Holder Cover AC Adapter Seat Adjustment Handle Console Mast... -
Page 8: Hardware
HARDWARE / TOOLS Item Description Item Description Button Head Hex Screw, M8x20 Phillips Head Screw, M5x12 Button Head Hex Screw, M6x12 Lock Washer, M6 Flat Washer, M8 Curved Washer, M6 Lock Washer, M8 Phillips Head Screw, M6x25 Flat Washer, M6 Curved Washer, M8 Note: S elected pieces of Hardware have been provided as spares on the Hardware Card. Be aware that there may be remaining Hardware after the proper assembly of your machine. Tools Included Not Included (recommended) 4 mm 6 mm... -
Page 9: Assembly
ASSEMBLY 1. Attach Stabilizers to Frame Note: H ardware(*) is pre-installed and not on the Hardware Card. Make sure the Schwinn decal on the rear ™ stabilizer faces outward from the machine. - Page 10 2. Attach the Seat Frame Assembly to the Seat Rail NOTICE: Do not crimp the Heart Rate Cable. Once all hardware has been inserted, be sure to fully tighten it.
- Page 11 3. Attach Seat Pads to Seat Frame Assembly...
- Page 12 4. Attach Cover to Frame Assembly...
- Page 13 5. Attach Seat Adjustment Handle to Frame Assembly...
- Page 14 6. Connect the Cables and Attach the Console Mast to Frame Assembly NOTICE: Do not crimp cables.
- Page 15 7. Remove Hardware from Console NOTICE: Do not crimp the cables. Note: H ardware(*) is pre-installed and not on the Hardware Card. 8. Connect Cables and Attach Console to Frame Assembly NOTICE: Align the clips on the cable connectors and make sure the connectors lock. Do not crimp cables.
- Page 16 9. Attach Pedals to Frame Assembly NOTICE: The Left Pedal is reverse-threaded. Be sure to attach Pedals on the proper side of the Bike. Orientation is based from a seated position on the bike. The Left Pedal has an “L”, the Right Pedal an “R”. Start the Pedals by hand, and then fully tighten them with the Pedal Wrench. The Pedals must be fully tightened. 14 (R) 13 (L)
- Page 17 10. Attach Water Bottle Holder to Frame Assembly...
- Page 18 11. Connect AC Adapter to Frame Assembly 12. Final Inspection Inspect your machine to ensure that all hardware is tight and components are properly assembled. Be sure to record the serial number in the field provided at the front of this manual. Do not use until the machine has been fully assembled and inspected for correct performance in accor- dance with the Owner’s Manual.
-
Page 19: Moving The Machine
BEFORE YOU START Moving the Bike The machine may be moved by one or more persons depending on their physical abilities and capacities. Make sure that you and others are all physically fit and able to move the machine safely. 1. R emove the power cord. -
Page 20: Leveling The Machine
Leveling the Bike Levelers are found on each side of the Rear Stabilizer and on the Frame Rail. On the Rear Stabilizer, turn the knob to adjust the stabilizer foot. To adjust the leveler on the Frame Rail: 1. L oosen the upper locking nut. 2. T urn the leveler to adjust the height. Do not adjust the levelers to such a height that they detach or unscrew from the machine. Injury to you or damage to the machine can occur. -
Page 21: Features
FEATURES Console Seat Adjustment Handle Handlebar, Upright Adjustable Seat Fully Shrouded Flywheel Water Bottle Holder Power Connector Contact Heart Rate (CHR) Sensors Transport Wheel Handlebar, Side Stabilizer Media Tray Pedal Bluetooth Heart Rate (HR) Receiver (not shown) ® Leveler Bluetooth Connectivity (not shown) ®... -
Page 22: Console Features
Console Features The Console provides important information about your workout and lets you control the resistance levels while you exercise. The Console features touch control buttons to navigate you through the exercise programs. Note: C ustomized selections made to the Console will not be remembered after a shut down. Connect Bluetooth button ® Keypad Functions DISPLAY button - Allows the user to select the units and other displayed values during a workout. Connect Bluetooth button - Makes the Console disconnect any previous connections, and look for a Bluetooth Heart ® ® Rate Chest Strap (quick push and release of the button) or a Bluetooth enabled device (push and hold down the button ®... - Page 23 Program Display Program Display The Program Display shows information to the User and the grid display area shows the course profile for the program. Each column in the profile shows one interval (workout segment). The higher the column, the higher the resistance level. The flashing column shows your current interval. Bluetooth App Connected icon - Display shows when the Console is paired with the App. ® Heart Rate Detected icon - Display shows when the Console receives a heart rate signal from the contact heart rate sensors or a Bluetooth Heart Rate Chest Strap. ® Bluetooth Heart Rate Chest Strap Connected icon - Display shows when the Console is paired with a ® Bluetooth Heart Rate Chest Strap. ® Heart Rate (Pulse) The Heart Rate display shows the beats per minute (BPM) from the heart rate monitor. When a heart rate signal is re- ceived by the Console, the icon will flash. Consult a physician before you start an exercise program. Stop exercising if you feel pain or tightness in your chest, become short of breath, or feel faint.
-
Page 24: Bluetooth ® Heart Rate Monitor
Updates to Your Machine using the “Schwinn Toolbox™” App This fitness machine is equipped with Bluetooth connectivity and can be wirelessly updated with the “Schwinn Toolbox™” ® App. Once the App is installed on your device, the App will inform you of when there is an update to your machine. 1. D ownload the free App, named Schwinn Toolbox . The App is available on the App Store and Google Play™. ™ Note: F or a complete list of supported devices, review the App on the App Store or Google Play™. 2. I nstall the App. When notified that there is an update to your fitness machine, follow the prompts on the App. Place the device that is running the App on the Media Tray. The App will update the software on the machine with the latest version. Do not remove your device from the Media Tray until the update is complete. The machine will return to the Welcome Screen when the update is completed. Workout with Other Fitness Apps This fitness machine has integrated Bluetooth connectivity which allows it to work with a number of digital partners. For ® our latest list of supported partners, please visit: www.nautilus.com/partners... - Page 25 • Some Electrocardiogram (EKG) signals generated by individuals are not strong enough to be detected by the sensors. • The proximity of other electronic machines can generate interference. If your heart rate signal ever seems erratic after validation, wipe off your hands and the sensors and try again. Heart Rate Calculations Your maximum heart rate usually decreases from 220 Beats Per Minute (BPM) in childhood to approximately 160 BPM by age 60. This fall in heart rate is usually linear, decreasing by approximately one BPM for each year. There is no indication that training influences the decrease in maximum heart rate. Individuals of the same age could have different maximum heart rates. It is more accurate to find this value by completing a stress test than by using an age related formula. Your at-rest heart rate is influenced by endurance training. The typical adult has an at rest heart rate of approximately 72 BPM, whereas highly trained runners may have readings of 40 BPM or lower. The Heart Rate table is an estimate of what Heart Rate Zone (HRZ) is effective to burn fat and improve your cardiovas- cular system. Physical conditions vary, therefore your individual HRZ could be several beats higher or lower than what is shown. The most efficient procedure to burn fat during exercise is to start at a slow pace and gradually increase your intensity until your heart rate reaches between 60 – 85% of your maximum heart rate. Continue at that pace, keeping your heart rate in that target zone for over 20 minutes. The longer you maintain your target heart rate, the more fat your body will burn. The graph is a brief guideline, describing the generally suggested target heart rates based on age. As noted above, your optimal target rate may be higher or lower. Consult your physician for your individual target heart rate zone. Note: A s with all exercises and fitness regimens, always use your best judgment when you increase your exercise time or intensity. FAT-BURNING TARGET HEART RATE 20-24 25-29 30-34 35-39 40-44 45-49 50-54 55-59 60-64 65-69 Maximum Heart Rate Target Heart Rate Zone (keep within this range...
-
Page 26: Operations
OPERATIONS What to Wear Wear rubber-soled athletic shoes. You will need the appropriate clothes for exercise that allow you to move freely. How Often Should You Exercise Consult a physician before you start an exercise program. Stop exercising if you feel pain or tightness in your chest, become short of breath, or feel faint. Contact your doctor before you use the machine again. Use the values calculated or measured by the machine’s computer for reference purposes only. -
Page 27: Manual (Quick Start) Program
Auto Shut-Off (Sleep Mode) If the Console does not receive any input in approximately 5 minutes, it will automatically shut off. The LCD display is off while in Sleep Mode. Note: T he Console does not have an On/Off switch. Manual (Quick Start) Program Summit Pass The Manual (Quick Start) program lets you start a workout without entering any information. During a Manual Workout, each column represents a 1 minute time period. The active column will advance across the screen every minute. If the workout lasts for more than 18 minutes, the active column will stay to the right where an additional column is added to the workout program. 1. Stand on the machine. 2. P ush the MANUAL button to select the Quick Start Program. 3. P ush START to begin the workout. Pikes Peak Ride in the Park T o change the resistance level, push the Resistance Increase/Decrease buttons. The current interval and future intervals are set to the new level. The default Manual resistance level is 4. The time will count up from 00:00. - Page 28 Easy Tour HIIT INTERVALS Summit Pass Easy Tour Ride in the Park HIIT INTERVALS Pikes Peak Easy Tour Pike’s Peak Stream Crossing Pikes Peak Cross Training Stream Crossing HEART RATE CONTROL Pyramids Summit Pass Pyramids Summit Pass Pikes Peak Easy Tour HEART RATE CONTROL HIIT INTERVALS Pyramids Uphill Finsih...
-
Page 29: Modify Display Of Workout Values
Modify Display of Workout Values Push the DISPLAY button to select the desired display configuration during your workout. The display configuration options can be cycled through until the workout ends. a.) S PEED- MPH / RPM (Default) b.) S PEED- MPH only c.) R PM only (miles) d.) S PEED- km/h / RPM e.) S PEED- km/h only f.) R PM only (kilometers) Note: I f the desired display is not the default, it will need to be selected after each power-up. Changing Resistance Levels Push the Resistance Level Increase() or Decrease() buttons to change the resistance level at any time in a workout program. -
Page 30: Maintenance
MAINTENANCE Read all maintenance instructions fully before you start any repair work. In some conditions, an assistant is necessary to do the necessary tasks. Equipment must be regularly examined for damage and repairs. The owner is responsible to make sure that regular maintenance is done. Worn, damaged or loose components must be repaired or replaced immedi- ately. Only manufacturer supplied components can be used to maintain and repair the equipment. If at any time the Warning labels become loose, unreadable or dislodged, replace the labels. -
Page 31: Maintenance Parts
Maintenance Parts Console Transport Wheel Console Cable, Lower Seat Back Stabilizer, Front Shroud, Right Seat Cover Heart Rate Cable, Lower Pedal, Right Water Bottle Holder Drive Pulley Power Connector Handlebar, Side Speed Sensor Magnet Shroud, Upper Seat Bottom Speed Sensor Shroud Cap Seat Adjustment Handle Crank Arm... -
Page 32: Troubleshooting
TROUBLESHOOTING Condition/Problem Things to Check Solution No display/partial display/ Check electrical (wall) Make sure unit is plugged into a functioning wall outlet. unit will not turn on outlet Check connection at front Connection should be secure and undamaged. Replace of unit adapter or connection at unit if either are damaged. Check data cable integrity All wires in cable should be intact. If any are visibly crimped or cut, replace cable. Check data cable Be sure cables at base of mast and at back of console are con- connections/orientation nected securely and oriented properly. Small latch on connec- tor should line up and snap into place. - Page 33 Condition/Problem Things to Check Solution Resistance does not Check data cable integrity All wires in cable should be intact. If any are visibly crimped or change (machine turns on cut, replace cable. and operates) Check data cable Be sure cable is connected securely and oriented properly. connections/orientation Reseat all connections. Small latch on connector should line up and snap into place. Check Servo Motor If magnets move, adjust until they are within the proper range. Replace Servo Motor if not functioning properly. (requires shroud removal) Check Console Check for visual sign that Console is damaged. Replace Con- sole if damaged. If the above steps do not resolve the problem, contact Cus- tomer Service (if inside US/Canada) or your local distributor (if outside US/Canada) for further assistance.
-
Page 35: Warranty (Us/Canada Only)
WARRANTY ( if purchased in US/Canada ) Who Is Covered This warranty is valid only to the original purchaser and is not transferable or applicable to any other person(s). What Is Covered Nautilus, Inc. warrants that this product is free from defects in materials and workmanship, when used for the purpose intended, under normal conditions, and provided it receives proper care and maintenance as described in the Product’s Assembly and Owner’s manual. - Page 36 ™ Nautilus Bowflex Schwinn ™ ™ ™ 8025746.060120.A...
Need help?
Do you have a question about the 230 and is the answer not in the manual?
Questions and answers