Advertisement
Advertisement

Related Manuals for Teradek CTRL.3


Summary of Contents for Teradek CTRL.3
- Page 1 CTRL.3 3-Axis Controller Quick Start Guide...
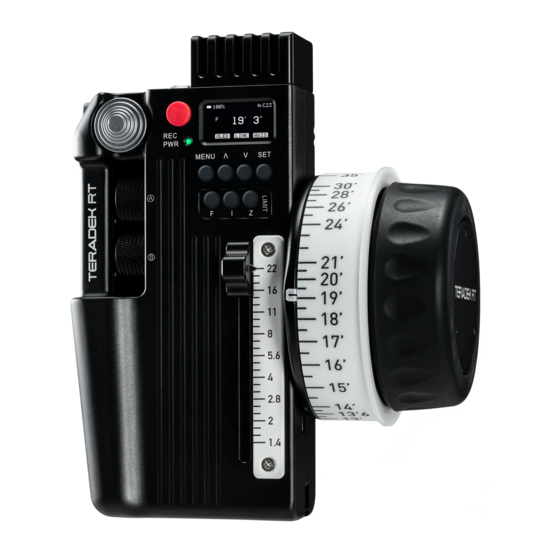
- Page 2 B: REC/PWR button H: Limit buttons C: Force joystick I: Slider D: Status LED J: Mini-USB E: A/B thumbwheels K: Lens ring F: OLED Menu screen L: Knob COMPATIBLE DEVICES The CTRL.3 controller is compatible with both Teradek RT and SmallHD devices.
-
Page 3: Table Of Contents
TABLE OF CONTENTS 3-Axis Controller ........2 Power and Connect ......... 3 Pair Controller and Receiver ..... 4 Camera Run/Stop ........5 Controller Menu Operation ...... 6 Lens Mapping ......... 7 FIZ Limits ..........9 Lens Data Overlay ......... 10... -
Page 4: 3-Axis Controller
3-AXIS CONTROLLER The CTRL.3 is a lightweight, ergonomic 3-axis lens controller with built-in lens mapping and data storage. When paired with any compatible SmallHD monitors with integrated Bolt receivers, the CTRL.3 can overlay lens focal distance directly on the monitor, creating the world’s first all-in-one wireless video &... -
Page 5: Power And Connect
POWER AND CONNECT Connect power to the receiver’s PWR port. Attach the motor(s) to the rods/lens. Connect the motor(s) to the receiver using a 4-pin connector. If connecting two or more motors, use a 4-pin to 4-pin connector to daisy-chain them together. The motor(s) will then begin calibrating. -
Page 6: Pair Controller And Receiver
PAIR CONTROLLER AND RECEIVER If the controller has not been paired to a receiver, you can use one of the following two methods to pair both devices. WIRELESS PAIRING Press the MENU button on the controller, then navigate to WIRELESS>FIND RECV to scan for active receivers and automatically pair. -
Page 7: Camera Run/Stop
CAMERA RUN/STOP Connect a camera cable from the CAM/Control port on the receiver to the camera, then navigate to MENU>CAMERA on the CTRL.3 to indicate which camera you have connected. Press the REC/PWR button on the controller to start/stop recording on the camera. -
Page 8: Controller Menu Operation
CONTROLLER MENU OPERATION Press the MENU button, then use the ▲, ▼ and SET button to navigate through the different menu options. POWER OFF - Turn OFF the controller BUTTONS - Assign functions to the buttons LENS - Configure lens mapping function RX CONFIG - Configure auxiliary controllers RANGE FNDR - Configure/Calibrate TOF.1 IO CONFIG - Configure communication mode... -
Page 9: Lens Mapping
LENS MAPPING CTRL.3 features built-in lens mapping, which allows users to auto-calibrate lenses to pre-marked focus rings with the touch of a button. Lens Mapping is included as a standard feature with the CTRL.3. CREATE A LENS MAP Navigate to LENS>LENSMAP>CREATE. - Page 10 Move the controller knob so that the motor adjusts the lens ring to the minimum stop. Using the ▲ and ▼ buttons on the controller, enter the corresponding mark, then select OK. NOTE: Entering every lens mark is not required, but it is recommended in order for the Lens Map to be more accurate.
-
Page 11: Fiz Limits
FIZ LIMITS CTRL.3 limit buttons allow you to set a limit range for either the Focus, Iris, or Zoom controls. Setting limits restricts the motor from adjusting the lens past a set limit. Move the input to the high or low end of the limit you want to set. -
Page 12: Lens Data Overlay
LENS DATA OVERLAY SmallHD monitors include a Lens Data Overlay feature that displays your CTRL.3 lens map on the monitor. Below are steps to enable Lens Data Overlay. Update your CTRL.3 controller and SmallHD monitor with the latest firmware. From the controller, navigate to LENS>LENSMAP and select one of the configured lens maps. - Page 13 Connect a cable from the controller’s wired mode connector to the monitor’s USB port. Tap the SmallHD monitor’s screen and navigate to ADD NEW TOOL>ADD ONS. Select TERADEK RT. The Lens Map Overlay will appear to the right and move according to the controller’s knob movements.
- Page 16 Teradek regularly releases new firmware versions to improve performance, add features, or fix vulnerabilities. teradek.com/pages/downloads contains all the latest firmware and software updates. Visit support.teradek.com for tips, information, and to submit help requests to Teradek’s support team.
- Page 17 © 2021 Teradek, LLC. All rights reserved.
Need help?
Do you have a question about the CTRL.3 and is the answer not in the manual?
Questions and answers