Table of Contents
Advertisement
Available languages
Available languages
Quick Links
WARRANTY CONDITION
This product is guaranteed for a period of 2 years from the date of purchase* against
any failure resulting from a manufacturing or material defect. This warranty does not
EN
cover defects or damage resulting from incorrect installation, improper use or abnormal
wear of the product.
*as shown on the sales receipt.
CONDITION DE GARANTIE
Ce produit est garanti pour une période de 2 ans à partir de la date d'achat*, contre
toute défaillance résultant d'un vice de fabrication ou de matériau. Cette garantie ne
FR
couvre pas les vices ou les dommages résultant d'une mauvaise installation, d'une
utilisation incorrecte ou de l'usure anormale du produit.
*sur présentation du ticket de caisse.
GARANTIEVOORWAARDEN
Dit product wordt gegarandeerd voor een periode van 2 jaar vanaf de aankoopdatum*,
voor elke storing die het gevolg is van een fabricagefout of het materiaal. Gebreken of
NL
schade door slechte installatie, onjuist gebruik of abnormale slijtage van het product
worden niet gedekt door deze garantie.
*op vertoon van kassabon.
CONDICIONES DE GARANTÍA
El certificado de garantía de este producto tiene una duración de 2 años a partir de la
fecha de compra* que se limita a los defectos de fabricación y averías del material.
ES
Se excluyen de la garantía deficiencias o daños originados por una mala instalación,
errores en la manipulación o por un uso inadecuado.
*previa presentación del comprobante de compra.
ELECTRO DEPOT
1 route de Vendeville
59155 FACHES-THUMESNIL - FRANCE
PN:16170000A92625
03/2022 - V3
2/2
Single-function microwave
Micro-ondes monofonction
Enkele functie microgolfoven
Microondas monofunción
973330 - BI MWO 20 X 343C
INSTRUCTIONS FOR USE
....................02
CONSIGNES D'UTILISATION
....................14
GEBRUIKSAANWIJZINGEN
....................26
INSTRUCCIONES DE USO
....................38
H
Advertisement
Table of Contents

Subscribe to Our Youtube Channel
Related Manuals for VALBERG BI MWO 20 X 343C


Summary of Contents for VALBERG BI MWO 20 X 343C
- Page 1 *op vertoon van kassabon. CONDICIONES DE GARANTÍA 973330 - BI MWO 20 X 343C El certificado de garantía de este producto tiene una duración de 2 años a partir de la fecha de compra* que se limita a los defectos de fabricación y averías del material.
- Page 3 Thanks! Th a n k yo u fo r c h o o s i n g t h i s VA L B E R G p ro d u c t . C h o s e n , t e s te d a n d re c o m m e n d e d by E L E C T R O D E P OT, VA L B E R G b r a n d e d p r o d u c t s a r e e a s y t o u s e , r e l i a b l e , a n d o f a n i m p e cc a b l e s t a n d a rd.
-
Page 4: Practical Information
able of conTenTs Appliance description Overview of the Appliance overview appliance Intended use Getting started Using the appliance Installation Operation Cleaning and maintenance Practical information Repair Earthing instructions Cooking utensils Bulb replacement... -
Page 5: Appliance Description
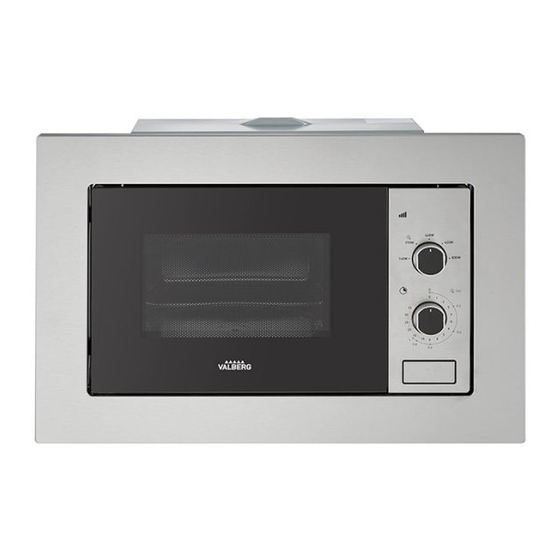
Preview of the appliance Appliance description Control panel Observation window Turntable shafts Door Set of roller rings Child safety lock Glass tray Power cord with plug Appliance overview • Unwrap the appliance. Remove all the labels from the product. Please check that there is nothing missing and that everything is in good condition. -
Page 6: Using The Appliance
Using the appliance Getting started • Disconnect the appliance. • Clean the appliance ( → Cleaning and maintenance). Installation CAUTION: • Never obstruct the vents of the cupboard or appliance. • The minimal height for integration amounts to 85 cm. Inserting the microwave in a cupboard To ensure that the appliance is sufficiently ventilated, behind the microwave oven, the cupboard should not have a rear wall. - Page 7 Using the appliance CAUTION: • Do not operate the appliance if the power cord is damaged. • The power cord should not pass underneath the appliance or over hot/sharp objects. • The plug should be easily accessible so that you may unplug it immediately in an emergency.
-
Page 8: Operation
Using the appliance Operation Connect the electric plug. Adjust the power and length of cooking. Adjust the power Setting Output Power Description 800W High 100% 620W M.High 440W Defrost 270W 140W Set the cooking time • The maximum cooking time is 35 minutes. •... - Page 9 Using the appliance Defrosting Defrosting Time (depending on the weight) 0.2 kg 3 min. 6 min. 0.4 kg 0.6 kg 9 min. 0.8 kg 10 - 15 min. 1 kg 15 min.
-
Page 10: Useful Information
Useful information Cleaning and maintenance • Before cleaning, unplug the appliance. • It should be cleaned after each use for hygiene reasons. Remove any food residue. CAUTION: Do not use abrasive cleaning products or steel wool to clean the appliance. Parts Cleaning method Cooking... - Page 11 Useful information Parts Cleaning method Casing Wipe with a dry, clean, soft cloth. Door seal Remove any stains with a damp cloth and (door and gentle detergent. Then wipe thoroughly and door frame) dry. • Set of roller Clean them with warm water and a gentle rings detergent, then rinse with clear water.
- Page 12 Useful information Repair Problem Cause Solution The plug is not correctly Remove the plug and insert inserted. it again after 10 seconds. The appliance will not start. There is a problem with the Have the socket checked by fuse in the socket. a qualified technician.
-
Page 13: Earthing Instructions
Useful information Earthing instructions • The power cord is fitted with an earthed plug which must be connected to a correctly installed and earthed socket. • It is recommended to have one circuit exclusively dedicated to the oven. High voltage is dangerous and can incur risks of fire and other accidents, causing damage or injury. WARNING: Incorrect connection of the earthing equipment could present a risk of electric shock. -
Page 14: Replacing The Light Bulb
Useful information Replacing the lightbulb Any replacement of the LED bulb (1.5 W) should be carried out by a professional repairer or similarly qualified person. - Page 15 Merci ! M e rc i d ’ a v o i r c h o i s i c e p ro d u i t VA L B E R G . Choisis, testés et recommandés par ELECTRO DEPOT, le s p ro d u i t s d e l a m a rq u e VA L B E R G v o u s a s s u re n t u n e u t i l i s a t i o n s i m p l e , u n e p e r f o r m a n c e f i a b l e e t u n e q u a l i t é...
- Page 16 Table de matières Description de l’appareil Aperçu de l’appareil Aperçu de l’appareil Utilisation prévue Avant la première utilisation Utilisation de Installation l’appareil Utilisation Fonctionnement Nettoyage et entretien Informations Dépannage pratiques Instructions relatives à la mise en terre Articles culinaires Remplacement de l’ampoule Les notices sont aussi disponibles sur le site http://www.electrodepot.fr/sav/notices/ http://www.electrodepot.be/fr/sav/notices...
-
Page 17: Description De L'appareil
Aperçu de l’appareil Description de l’appareil Panneau des commandes Hublot Arbre du port tournant Assemblage de la porte Ensemble de bagues de rouleau Verrouillage de sécurité pour enfants Plateau de verre Cordon d’alimentation avec fiche Aperçu de l’appareil • Déballez l’appareil. Retirer toutes les étiquettes du produit. Veuillez vérifier son exhaustivité et s’il est en bonne condition. -
Page 18: Utilisation De L'appareil
Utilisation de l’appareil Avant la première utilisation • Débranchez l’appareil. • Nettoyez l’appareil ( → Nettoyage et entretien). Installation ATTENTION : • Ne bloquez jamais les ouvertures d’aération du placard ou de l’appareil. • La hauteur minimale pour l’intégration s’élève à 85 cm. Intégrer le micro-ondes dans un placard Afin que l’appareil ait suffisamment d’aération, derrière le micro-ondes, le placard ne devrait pas avoir de paroi à... - Page 19 Utilisation de l’appareil Utilisation ATTENTION : • Ne faites pas fonctionner l’appareil en cas de cordon d’alimentation endommagé. • Ne faites pas passer le cordon d’alimentation sous l’appareil ou sur des objets chauds/tranchants. • La fiche d’alimentation doit être facilement accessible afin que vous puissiez la débrancher immédiatement de la prise de courant en cas d’urgence.
- Page 20 Utilisation de l’appareil Fonctionnement Branchez la fiche électrique. Réglez la puissance et la durée de cuisson. Régler la puissance Réglage Puissance de sortie Description 800W 100 % High 620W 77 % M.High 440W 55 % 33 % Defrost 270W 140W 17 % Régler la durée de cuisson •...
- Page 21 Utilisation de l’appareil Décongélation Décongélation Durée (selon le poids) 0,2 kg 3 mn 0,4 kg 6 mn 0,6 kg 9 mn 0,8 kg 10 - 15 mn 1 kg 15 mn...
-
Page 22: Informations Pratiques
Informations pratiques Nettoyage et entretien • Avant de procéder au nettoyage de l’appareil, débranchez la fiche d’alimentation de la prise de courant. • L’appareil doit être nettoyé après chaque utilisation pour des raisons d’hygiène. Éliminez tous les résidus d’aliments. ATTENTION : N’utilisez pas de produits de nettoyage abrasifs ou de la laine d’acier pour nettoyer l’appareil. - Page 23 Informations pratiques Pièces Méthode de nettoyage Joint d’étanchéité Éliminez les taches à l’aide d’un chiffon de la porte humide et d’un détergent doux. Ensuite, (porte et essuyez-les à fond et séchez-les. cadre de la porte) • Ensemble Nettoyez-les à l’eau tiède et au détergent de bagues de doux, puis rincez-les à...
-
Page 24: Dépannage
Informations pratiques Dépannage Problème Cause Solution Débranchez la fiche La fiche d’alimentation d'alimentation, puis n’est pas branchée branchez-la à nouveau au convenablement. bout de 10 secondes. L’appareil ne démarre pas. Il y a un problème avec Faites vérifier la prise de le fusible de la prise de courant par un technicien courant. - Page 25 Informations pratiques Instructions relatives à la mise en terre • Le cordon d’alimentation est équipé d’une fiche ayant une prise de terre, qui doit être branchée à une prise de courant installée et mise à la terre correctement. • Il est recommandé qu’un circuit distinct servant uniquement le four soit mis en place. La tension élevée est dangereuse et peut entraîner des risques d’incendie et d’autres accidents, provoquant des dommages ou blessures.
-
Page 26: Remplacement De L'ampoule
Informations pratiques Remplacement de l’ampoule Tout changement de l’ampoule LED (1,5 W) doit être effectué par un réparateur professionnel ou une personne de qualification similaire. - Page 27 Proficiat met uw keuze voor een product van VALBERG. De selectie en de testen van de toestellen van VALBERG g e b e u re n v o l le d i g o n d e r c o n t ro le e n s u p e r v i s i e v a n E L E C T R O D E P O T.
- Page 28 Inhoudstafel Omschrijving van het toestel Overzicht van het Beschrijving van de onderdelen toestel Doelmatig gebruik Voor ingebruikname Gebruik van het Installatie toestel Gebruik Werking Reiniging en onderhoud Praktische informatie Probleemoplossingen Instructies over de aarding Keukengerei Vervanging van de lamp...
-
Page 29: Overzicht Van Het Toestel
Overzicht van het toestel Omschrijving van het toestel Bedieningspaneel Kijkvenster As voor draaiplateau Deur Draairing Kinderslot Glazen draaiplateau Snoer en stekker Beschrijving van de onderdelen • Haal het apparaat uit de verpakking. Verwijder alle labels van het product. Controleer of alle onderdelen geleverd zijn en zich in een goede staat bevinden. -
Page 30: Gebruik Van Het Toestel
Gebruik van het toestel Voor ingebruikname • Haal de stekker uit het stopcontact. • Reinig het apparaat ( → Reiniging en onderhoud). Installatie OPGELET: • Blokkeer de ventilatieopeningen van de kast of van het apparaat nooit. • De minimale inbouwhoogte bedraagt 85 cm. Microwave in een kast inbouwen Er mag in de kast geen achterwand achter de microwave zijn om ervoor te zorgen dat het apparaat voldoende geventileerd wordt. - Page 31 Gebruik OPGELET: • Gebruik het apparaat niet als het snoer beschadigd is. • Leg het snoer niet onder het apparaat of op warme/ scherpe voorwerpen. • Het gebruikte stopcontact moet eenvoudig bereikbaar zijn zodat in een noodgeval de stekker onmiddellijk uit het stopcontact kan worden gehaald.
- Page 32 Werking Steek de stekker in een stopcontact. Stel het vermogen en de kooktijd in. Het vermogen instellen Instelling Uitgangsvermogen Beschrijving 800W 100 % High 620W 77 % M.High 440W 55 % 33 % Defrost 270W 140W 17 % De kooktijd instellen •...
- Page 33 Ontdooien Ontdooien Duur (naar gewicht) 0,2 kg 3 mn 0,4 kg 6 mn 0,6 kg 9 mn 0,8 kg 10 - 15 mn 1 kg 15 mn...
- Page 34 Reiniging en onderhoud • Haal altijd de stekker uit het stopcontact voordat u het apparaat schoonmaakt. • Uit veiligheidsoverwegingen, maak het apparaat na elk gebruik schoon. Verwijder alle etensresten. OPGELET: Maak het apparaat niet schoon met agressieve schoonmaakmiddelen of staalwol. Onderdelen Reinigingsmethode Ovenruimte...
- Page 35 Onderdelen Reinigingsmethode Dichting Verwijder vlekken met een vochtige doek van de deur en een mild schoonmaakmiddel. Veeg (deur en vervolgens af en droog volledig. deurframe) • Draairing R e i n i g m e t l a u w w a te r e n e e n m i l d •...
- Page 36 Probleemoplossingen Probleem Oorzaak Oplossing Haal de stekker uit het De stekker steekt niet juist stopcontact en steek het na in het stopcontact. 10 seconden opnieuw in. Het apparaat werkt niet. Er is een probleem met Laat het stopcontact door de zekering van het een vakbekwame technicus stopcontact.
- Page 37 Instructies over de aarding • Het snoer is uitgerust met een geaarde stekker, sluit het aan op een juist geaard stopcontact. • Het wordt aanbevolen om de oven op een afzonderlijk circuit aan te sluiten. • De hoogspanning is gevaarlijk en kan brandgevaar of andere ongevallen veroorzaken die tot schade of letsel kunnen leiden.
- Page 38 Vervanging van de lamp Elke vervanging van de ledlamp (1,5 W) dient uitgevoerd te worden door een professioneel reparateur of een persoon die een gelijkaardige scholing genoten heeft.
- Page 39 ¡Muchas gracias! M u c h a s g r a c i a s p o r h a b e r e le g i d o n u e s t ro p ro d u c t o VA L B E R G .
- Page 40 Índice Descripción del aparato Descripción del Descripción del dispositivo aparato Uso previsto Antes del primer uso Utilización del Instalación aparato Funcionamiento Información práctica Limpieza y mantenimiento Solución de problemas Conexión con puesta a tierra Utensilios de cocina Sustitución de la bombilla...
-
Page 41: Descripción Del Aparato
Descripción del aparato Panel de control Ventana Eje del puerto giratorio Montaje de la puerta Rodillo giratorio Bloqueo de seguridad para niños Plato de cristal Cable de alimentación con enchufe Descripción del dispositivo • Desembale el dispositivo. Retire todos los adhesivos del dispositivo. Controle que el dispositivo reúne todas las condiciones establecidas y se encuentra en perfecto estado. -
Page 42: Antes Del Primer Uso
Antes del primer uso • Desenchufe el aparato. • Limpie el dispositivo ( → Mantenimiento y limpieza). Instalación ATENCIÓN: • Nunca bloquee los orifi cios de ventilación del armario o del aparato. • La altura mínima de instalación es de 85 cm. Instalar el microondas en un armario. - Page 43 ATENCIÓN: • Si el cable de alimentación está dañado, no utilice el aparato. • No pase el cable por debajo del aparato o por encima de objetos calientes o cortantes. • Debe poder acceder al enchufe fácilmente para desconectarlo inmediatamente de la toma de corriente en caso de emergencia.
- Page 44 Funcionamiento Enchufe el cable. Ajuste la potencia y la duración de la cocción. Ajustar la potencia Controlo Potencia de salida Descripción 800W 100 % High 620W 77 % M.High 440W 55 % 33 % Defrost 270W 140W 17 % Ajustar el tiempo do cocción •...
- Page 45 Descongelación Descongelación Duración (según peso) 0,2 kg 3 mn 0,4 kg 6 mn 0,6 kg 9 mn 0,8 kg 10 - 15 mn 1 kg 15 mn...
-
Page 46: Utilización Del Aparato
Utilización del aparato Limpieza y mantenimiento • Antes de realizar la limpieza del aparato, desconecte el cable de alimentación de la toma de corriente. • Por motivos de higiene, el aparato debe limpiarse después de cada uso. Elimine todos los restos de alimentos. ATENCIÓN: No utilice productos de limpieza abrasivos o estropajos de acero para limpiar el aparato. - Page 47 Utilización del aparato Pieza Método de limpieza Junta hermética Retire las manchas con un paño húmedo y un de la puerta poco de detergente suave. A continuación, (puerta y lávela a fondo y séquela. marco de la puerta) • Rodillo Límpielo con agua tibia y detergente suave y giratorio aclárelo.
-
Page 48: Solución De Problemas
Utilización del aparato Solución de problemas Problema Causa Solución Desconecte el enchufe El enchufe no está y vuelva a conectarlo conectado correctamente. transcurridos 10 segundos. El aparato no se enciende. Existe un problema con Un técnico especializado el fusible de la toma de debería comprobar la toma corriente. -
Page 49: Utensilios De Cocina
Utilización del aparato Conexión con puesta a tierra • El cable de alimentación está equipado con un enchufe con conexión a tierra y debe conectarse a una toma de corriente correctamente instalada y con puesta a tierra. • Se recomienda la instalación de un circuito distinto para el horno. •... -
Page 50: Sustitución De La Bombilla
Utilización del aparato Sustitución de la bombilla La bombilla LED (1,5 W) solo debe ser sustituida por un reparador profesional o una persona de cualificación similar. - Page 51 Note/Notes/Notities/Notas...
- Page 52 Note/Notes/Notities/Notas...
- Page 53 Note/Notes/Notities/Notas...
- Page 54 Note/Notes/Notities/Notas...
Need help?
Do you have a question about the BI MWO 20 X 343C and is the answer not in the manual?
Questions and answers