
Subscribe to Our Youtube Channel
Related Manuals for Thermopatch NL-24 PRO


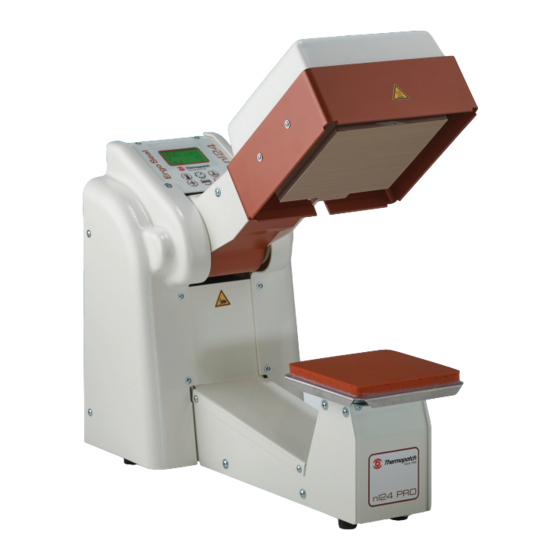
Summary of Contents for Thermopatch NL-24 PRO
- Page 1 U S E R M A N U A L NL-24 PR O ATTENTION! All persons involved in installation, commissioning, operation, maintenance and repair of this product should be made available to these instructions. v.1.0 - 08/22...
-
Page 2: Copyrights
ATTENTION! In order to make safe and optimal use of the NL-24 Pro, it is important to take note of - and understand the contents of this manual. BACK TO INDEX For more information about our products and how to contact us, please visit thermopatch.com... -
Page 3: Table Of Contents
Temperature ........................... Teflon cover ............................ Sealing pad ............................. Replacement of the Teflon protection and the sealing pad ............Air filter pressure regulator ......................BACK TO INDEX For more information about our products and how to contact us, please visit thermopatch.com... - Page 4 Technical annexes .......................20 Spare parts ..........................20 Electrical wiring diagram ......................21 Pneumatics diagram ........................22 End of life ..........................23 Declarations of conformity ....................23 Disclaimer ...........................24 BACK TO INDEX For more information about our products and how to contact us, please visit thermopatch.com...
-
Page 5: General Description
1. General Description The NL-24 Pro is a practical and universally applicable heat seal machine. This machine can be used to apply patches, textile emblems, heat seal transfers, in short all Thermopatch materials suited for marking and mending to textiles. 1.1 Levering The NL-24 Pro machines are supplied in a card board box. -
Page 6: Assembly And Installation
3.1 Assembly and installation 1. Electrical installation Take the NL-24 Pro from its box and place it on a stable work bench, near an earthed wall socket. Connect the machine with the supplied power cord to the electrical mains (230V alternating current). The NL-24 Pro is earthed and provided with two fuses (4A T (slow). -
Page 7: Operating Instruction
4.1 Operating the NL-24 Pro You can start operating the NL-24 Pro as soon as it is connected to both the electricity mains and to an airsupply which provides clean and dry compressed air set at a maximum of 6 Bar. Switch on the machine by pressing the on/off (I-0) switch, which is placed on the back of the machine, to “on (I)”. -
Page 8: Settings
By pressing the “AUTO” button the NL-24 Pro can be entered into and taken out of operational mode. Only when the NL-24 Pro is taken out of oprational mode, parameters can be altered and presets can be chosen (nr. 1 - 5) by pressing the + button. -
Page 9: Temperature Setting
The adjusted pressure setting will be on display. The NL-24 Pro has a pressure guard which is set to a minimum of 2,5 and a maximum of 6,0 bar. At too low or too high pressure the machine cannot be operated and a failure code will be on display(4 or 5). - Page 10 WARNING! Remove the plug from the wall socket before removing any screws and housing parts. BACK TO INDEX For more information about our products and how to contact us, please visit thermopatch.com...
-
Page 11: Interrupting The Work Cycle Of The Nl-24 Pro
2 = temperature sensor short circuit 3 = heating element defective 4 = pressure too low 5 = pressure too high 6 = safety frame activated BACK TO INDEX For more information about our products and how to contact us, please visit thermopatch.com... -
Page 12: Switching From Pedal Control To Manual Control From V 1.52
• Check the version number of the machine software (picture 1) • Machine is standard 'locked' (photo 2: lock closed) • Short press [AUTO] to release the machine. (photo 3: lock open) BACK TO INDEX For more information about our products and how to contact us, please visit thermopatch.com... - Page 13 • Then there is a hand symbol in the display that indicates that the manual function is working. (photo 5 hand: symbol) • Then briefly press [AUTO] again to 'lock' the machine again. (photo 6: lock closed) BACK TO INDEX For more information about our products and how to contact us, please visit thermopatch.com...
- Page 14 • To operate the machine manually, press the [PRESS] key for 2 seconds, until you hear 2 short beeps, then release. (photo 7) • The machine will start a press cycle. BACK TO INDEX For more information about our products and how to contact us, please visit thermopatch.com...
-
Page 15: Overview Of Safety Measures And Warnings
The safety frame The heating platen of the NL-24 Pro is protected by a safety frame. When this frame is touched the machine will interrupt the work cycle and open up immediately. In order to resume work switch off the machine and switch it on again. - Page 16 ATTENTION! Pull the fabrics tight around the lower platenn and ensure that your hands are away from the machine before operating the machine. BACK TO INDEX For more information about our products and how to contact us, please visit thermopatch.com...
-
Page 17: Technical Specifications
When the machine needs to be moved, Thermopatch recommends to use the original packaging. 7.2 Storage When the machine needs to be stored, Thermopatch recommends to use the original packaging. The machine should be stored on a pallet, off the floor, in dry conditions. -
Page 18: Maintenance
Sealing pad: Clean the sealing pad while still warm, with a clean lint free piece of cloth. Clean it as often as is necessary. Damaged or soiled sealing pads have to be replaced. These can be obtained through your Thermopatch supplier. -
Page 19: Air Filter Pressure Regulator
Replacing the fuses Ensure that the NL-24 Pro is disconnected from the electrical supply and the plug is unplugged from the wall socket. Replace the fuses 4 A (slow) (2) by taking them from the power entry which is mounted on the back of the machine. -
Page 20: Technical Annexes
SPAES-038 Front cylinder SPAES-039 Main cylinder SPA-FUSE-4T Fuse 4A T(slow) SPA106005 Air valve 24V SPAPEN-03-02 Thermostat 270 SPAES-04-08 Mainboard SPAMA-04-02 Display board https://www.thermopatch.com/en/products/spare-parts/ BACK TO INDEX For more information about our products and how to contact us, please visit thermopatch.com... -
Page 21: Electrical Wiring Diagram
9.2 Electrical wiring diagram BACK TO INDEX For more information about our products and how to contact us, please visit thermopatch.com... -
Page 22: Pneumatics Diagram
9.2 Pneumatics diagram BACK TO INDEX For more information about our products and how to contact us, please visit thermopatch.com... -
Page 23: End Of Life
Thermopatch B.V. Draaibrugweg 14 1332 Almere Netherlands Declare under our own responsability that the heat sealing machine: Thermopatch NL-24 Pro, which this declaration refers to, is in accordance with the conditions of the following Directive(s): 2014/30/EU (emc directive) 2006/42/EG (machinery directive) -
Page 24: Disclaimer
Thermopatch B.V., its subsidiaries, the directors, employees and agents cannot be held liable for the use and reliance of the opinions and findings in this document. - Page 25 Thermopatch BV Draaibrugweg 14 1332 AD Almere The Netherlands T +31 36 549 11 11 sales@thermopatch.nl www.thermopatch.com...
Need help?
Do you have a question about the NL-24 PRO and is the answer not in the manual?
Questions and answers