Table of Contents
Advertisement
Quick Links
Advertisement
Table of Contents

Subscribe to Our Youtube Channel
Related Manuals for MiTAC PH10CMU


Summary of Contents for MiTAC PH10CMU
- Page 1 MITAC Industrial MB PH10CMU Product Guide...
- Page 2 1. Block Diagram *Remark: The M.2 2280 M-key slot s with PCIe x4 lanes. If for using Intel Optane Memory H-series module (by 2 split PCIe x2), additional ME update is needed so as to support it.
-
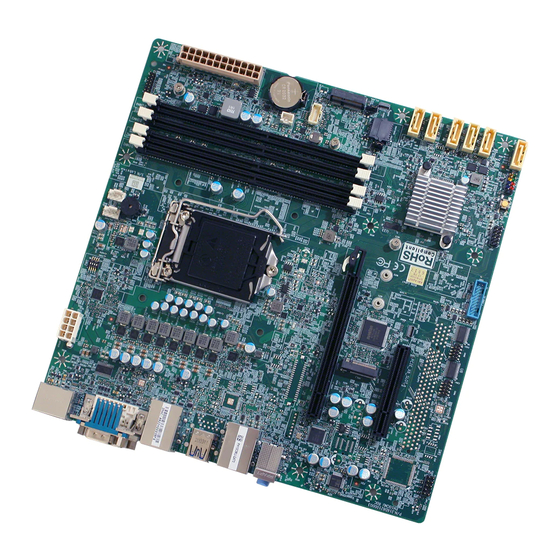
Page 3: Board Placement
2. Board placement... -
Page 5: Front Audio Header
3. Connector & Header Pin Definition J_HDA_1 Front Audio Header COM3 Termination Resistor Switch Pin Net name NRX3 NDCD3 NTX3 NDTR3 ON:PULL HIGH, OFF:NC... - Page 6 COM3 RS232/RS422/RS485 Header D,E COM1,COM2 RS232 Header...
- Page 7 FP_USB3_1 Dual USB3.0 Header Signal Signal +5V DC Key (no pin) 3.0 Data (negative) +5V DC 3.0 Data (positive) 3.0 Data (negative) Ground 3.0 Data (positive) 3.0 Data (negative) Ground 3.0 Data (positive) 3.0 Data (negative) Ground 3.0 Data (positive) 2.0 Data (negative) Ground 2.0 Data (positive)
-
Page 8: Front I/O Header
J_FIO Front I/O Header Signal Name Description Signal Name Description HDD_POWER_LE Pull-up resistor POWER_LED_MAI [Out] Front panel LED (750ohm) to +5V (main color) [Out] Hard disk activity [Out] Front panel LED HDD_LED# POWER_LED_ALT (alt color) GROUND Ground POWER_SWITCH# [In] Power switch RESET_SWITCH# [In] Reset switch GROUND... - Page 9 Signal Name Description Ground SATAHDR_TXP0_C SATA DATA Transmit (positive) SATAHDR_TXN0_C SATA DATA Transmit (negative) Ground SATAHDR_RXN0_C SATA DATA Receive (negative) SATAHDR_RXP0_C SATA DATA Receive (positive) Ground GND1 Ground GND2 Ground SPI_HDR1 SPI Programing Header(Debug) Signal Name P_Flash(3.3V) ROMWREN0_N SPI_MOSI_FLASH SPI_MISO_FLASH SPI_CLK_FLSH SPI_CS0_N_FLASH JPSON1...
- Page 10 Pins 2&3: NON-AT Mode AT/ATX Mode selection AT Mode NON-AT Mode M2E_1 M.2 KEY E Connector...
- Page 11 J_MAPI_1 MiAPI Header Pin Net name Pin Net name MAPI_GPIO1 MAPI_GPIO2 MAPI_GPIO6 MAPI_GPIO3 MAPI_GPIO7 MAPI_GPIO4 MAPI_GPIO8 MAPI_GPIO5 10 MAPI_GPIO9 11 WD_Time 12 MAPI_GPIO10 13 Power Button 14 SMBUS_DATA 15 UART_TX 16 SMBUS_CLK 17 UART_RX 18 5VSB 19 GND 20 NA TPM Header Pin Net name Pin Net name...
-
Page 12: Fan Header
14 VSB_3V3 U~V J_CPU_FAN1, J_FIO_FAN1 FAN Header PCI Express Bifurcation Switch Pin Net name CFG5 CFG6... - Page 13 ON:PULL LOW, OFF:NC PCIE_X4_NPIO NPIO Header(PCIEX4) Signal Signal Signal Signal REFCLK+ PERST# VCC 3.3V SMDAT REFCLK+ CLKREQ# SMCLK PERp1 PERp0 PETp1 PETp0 PERn1 PERn0 PETn1 PETn0 PERp3 PERp2 PETp3 PETp2 PERn3 PERn2 PETn3 PETn2...
- Page 14 Panel Power Option 3.3V Pin Net name Pin Net name Key (no pin) VCC3 +12V LCD_VCC_SEL Key (no pin) M2M_1 M.2 KEY M Connector...
- Page 15 LVDS Backlight Header...
- Page 16 3.3V/5V/12V Selectable LCD power output LVDS_DDC_SCL LVDS_DDC_SCL LVDS_DDC_SDA LVDS_DDC_SDA CABLE_ID1 VCC (reserve for MiTAC AIO CABLE_ID1, low enable) Ground TB0P LVDS Channel A diff data output - positive TA0P LVDS Channel A diff data output - positive TB0N LVDS Channel A diff data output - negative...
- Page 17 LVDS Channel B diff data output - negative TCK0N LVDS Channel A diff data output - negative Ground Ground NC (reserve for MiTAC selectable BKLT power output ) NC (reserve for MiTAC selectable BKLT power output ) 40-pin eDP connector pin-out Pin Signal Description VCC3 3.3V/5V/12V...
- Page 18 EDP_CPU_1+ MAIN LINK 10 EDP_CPU_0+ MAIN LINK 11 EDP_CPU_1- MAIN LINK 12 EDP_CPU_0- MAIN LINK 13 GND Ground 14 GND Ground 15 NC 16 NC 17 NC 18 NC 19 GND Ground 20 GND Ground 21 BKLT_EN BKLT_EN 22 PCH_BACKLIGHT_PWM PCH_BACKLIGHT_PWM 23 NC 24 NC 25 GND...
-
Page 19: Debug Header
37 GND Ground 38 GND Ground BKLT_PWR Selectable BKLT power output (12V) BKLT_PWR Selectable BKLT power output (12V) CLCMOS1 CMOS Reset Header Pins 1&2: jumper position for CMOS Reset Pins 2&3: Normal CMOS Clear Clear CMOS Normal A10 INTRUD_1 Intrusion Switch Header ... - Page 20 Signal Name ESPI_RST_N ESPI_CLK ESPI_CS0_N LAD_ESPI_IO_3 LAD_ESPI_IO_2 LAD_ESPI_IO_1 LAD_ESPI_IO_0 VCC3 3VSB...
-
Page 21: Bios Setup Menu
MITAC Industrial MB PH10CMU BIOS Set-up Menu... - Page 22 1. Main Page...
- Page 23 Field Name BIOS Vender Default Value American Megatrends Comment This field is not selectable. There is no help text associated with it. Field Name Core Version Default Value 5.17 Comment This field is not selectable. There is no help text associated with it. Field Name Compliancy Default Value...
- Page 24 Comment This field is not selectable. There is no help text associated with it. Field Name Processor Information Value Display the installed CPU brand. Comment This field is not selectable. There is no help text associated with it. Field Name Microcode Version Value Display the CPU microcode revision.
- Page 25 Value Display the installed SATA device model/size of port 5. Comment This field is not selectable. There is no help text associated with it. Field Name Serial ATA Port 6 (M.2) Value Display the installed SATA device model/size of port 6. Comment This field is not selectable.
- Page 26 2. Advanced Page Field Name Onboard Device Help Onboard Device Configuration. Comment Press Enter when selected to go into the associated Sub-Menu. Field Name CPU Configuration Help CPU Configuration Parameters. Comment Press Enter when selected to go into the associated Sub-Menu. Field Name Trusted Computing Help...
- Page 27 Comment Press Enter when selected to go into the associated Sub-Menu. Field Name S5 RTC Wake Settings Help Enable system to wake from S5 using RTC alarm Comment Press Enter when selected to go into the associated Sub-Menu. Field Name Network Stack Configuration Help Network Stack Settings.
- Page 28 Onboard Device Field Name Turbo Mode Default Value [Enabled] Possible Value Enabled Disabled Help Enable/Disable processor Turbo Mode (requires Intel Speed Step or Intel Speed Shift to be available and enabled). Field Name State After G3 Default Value [S5 State] Possible Value S0 State S5 State...
- Page 29 Help Select DVMT 5.0 Pre-Allocated (Fixed) Graphics Memory size used by the Internal Graphics Device. Field Name DVT Total Gfx Mem Default Value [256M] Possible Value 128M 256M Help Select DVMT5.0 Total Graphic Memory size used by the Internal Graphics Device. Field Name SATA Mode Selection Value...
- Page 30 Disabled Help Configure the DeepSx Mode configuration. Field Name Chassis Intrusion Default Value [Disabled] Possible Value Disabled Enabled Reset Help Configure Chassis Intrusion. Field Name LCD Panel Type Default Value [Auto Detect] Possible Value Auto Detect 800x480 eDP Help Select LCD panel used by Internal Graphics Device by selecting the appropriate setup item.
- Page 31 CPU Configuration Field Name Type Default Value [Intel CPU Brand String] Comment This field is not selectable. There is no help text associated with it. Field Name Default Value Displays CPU Signature Comment This field is not selectable. There is no help text associated with it. Field Name Speed Default Value...
- Page 32 Field Name L1 Instruction Cache Default Value L1 Instruction Cache Size Comment This field is not selectable. There is no help text associated with it. Field Name L2 Cache Default Value L2 Cache Size Comment This field is not selectable. There is no help text associated with it. Field Name L3 Cache Default Value...
- Page 33 Trusted Computing Field Name Firmware Version Default Value TPM module version. Comment This field is not selectable. There is no help text associated with it. Field Name Vender Default Value TPM module vender name. Comment This field is not selectable. There is no help text associated with it. Field Name Security Device Support Default Value...
- Page 34 Field Name Pending operation Default Value [None] Possible Value None TPM Clear Help Schedule an Operation for the Security Device. NOTE: Your Computer will reboot during restart in order to change State of Security Device.
- Page 35 Super IO Configuration Field Name Serial Port 1 Configuration Help Set Parameters of Serial Port 1 (COMA) Comment Press Enter when selected to go into the associated Sub-Menu. Field Name Serial Port 2 Configuration Help Set Parameters of Serial Port 2 (COMB) Comment Press Enter when selected to go into the associated Sub-Menu.
- Page 36 Serial Port 1 Configuration Field Name Serial Port Default Value [Enabled] Possible Value Disabled Enabled Help Enable or Disable Serial Port(COM) Field Name Device Settings Default Value Device Super IO COM1 Address and IRQ. Comment This field is not selectable. There is no help text associated with it. Field Name Change Settings...
- Page 37 Default Value [Auto] Possible Value Auto IO=3F8h; IRQ=4; IO=3F8h; IRQ=3,4,5,6,7,9,10,11,12; IO=2F8h; IRQ=3,4,5,6,7,9,10,11,12; IO=3E8h; IRQ=3,4,5,6,7,9,10,11,12; IO=2E8h; IRQ=3,4,5,6,7,9,10,11,12; Help Select an optimal settings for Super IO Device...
- Page 38 Serial Port 2 Configuration Field Name Serial Port Default Value [Enabled] Possible Value Disabled Enabled Help Enable or Disable Serial Port(COM) Field Name Device Settings Default Value Device Super IO COM2 Address and IRQ. Comment This field is not selectable. There is no help text associated with it. Field Name Change Settings...
- Page 39 Default Value [Auto] Possible Value Auto IO=2F8h; IRQ=3; IO=3F8h; IRQ=3,4,5,6,7,9,10,11,12; IO=2F8h; IRQ=3,4,5,6,7,9,10,11,12; IO=3E8h; IRQ=3,4,5,6,7,9,10,11,12; IO=2E8h; IRQ=3,4,5,6,7,9,10,11,12; Help Select an optimal settings for Super IO Device...
- Page 40 Serial Port 3 Configuration Field Name Serial Port Default Value [Enabled] Possible Value Disabled Enabled Help Enable or Disable Serial Port(COM) Field Name Device Settings Default Value Device Super IO COM3 Address and IRQ. Comment This field is not selectable. There is no help text associated with it. Field Name Change Settings...
- Page 41 Default Value [Auto] Possible Value Auto IO=3E8h; IRQ=7; IO=3E8h; IRQ=3,4,5,6,7,9,10,11,12; IO=2E8h; IRQ=3,4,5,6,7,9,10,11,12; IO=220h; IRQ=3,4,5,6,7,9,10,11,12; IO=228h; IRQ=3,4,5,6,7,9,10,11,12; Help Select an optimal settings for Super IO Device Field Name Mode Configuration Default Value [3T/5R RS232] Possible Value 1T/1R RS422 3T/5R RS232 1T/1R RS485 TX ENABLE Low Active 1T/1R RS422 with termination resistor 1T/1R RS485 with termination resistor TX ENABLE Low Active Disabled...
- Page 42 Serial Port 4 Configuration Field Name Serial Port Default Value [Enabled] Possible Value Disabled Enabled Help Enable or Disable Serial Port(COM) Field Name Device Settings Default Value Device Super IO COM4 Address and IRQ. Comment This field is not selectable. There is no help text associated with it. Field Name Change Settings Default Value...
- Page 44 Hardware Monitor Type Range CPU Temperature -20 ~ (By Processor Tjmax) °C CPU VR Temperature -20 ~ 120 °C DIMM Temperature -20 ~ 120 °C CPU Fan Speed There are many kinds of the fan could be installed into the system, so we could only set 0 RPM for the failed fan speed, and Front Fan Speed there is also no high RPM limitation.
- Page 45 Field Name Hardware Monitor Alert Enable Default Value [Disabled] Possible Value Enabled Disabled Help If Enabled, POST monitors voltage, temperature, and fan status. If these values are out of range, BIOS display warning message and turn on beep sound. Field Name System Fan Enable (Suppressed if Hardware Monitor Alert is Disabled)
- Page 46 S5 RTC Wake Settings Field Name Wake system from S5 Default Value [Disabled] Possible Value Disabled Fixed Time Help Enable or disable System wake on alarm event, Select FixedTime, system will wake on the hr::min::sec specified. Field Name Wake up hour(Show when Wake system from S5 set to Fixed Time) Default Value Possible Value 0-23...
- Page 47 Field Name Wake up second(Show when Wake system from S5 set to Fixed Time) Default Value Possible Value 0 - 59 Help Select 0 – 59 for Second...
- Page 48 Network Stack Configuration Field Name Network stack Default Value [Disabled] Possible Value Disabled Enabled Help Enable/Disable UEFI Network stack. Field Name Ipv4 PXE Support (Available when Network stack Enabled) Default Value [Disabled] Possible Value Disabled Enabled Help Enable/Disable Ipv4 PXE Boot Support. If disabled IPV4 PXE boot support will not be available.
- Page 49 Enabled Help Enable/Disable Ipv6 PXE Boot Support. If disabled IPV6 PXE boot support will not be available.
- Page 50 NVMe Configuration Field Name (Device) Comment Press Enter when selected to go into the associated Sub-Menu.
- Page 51 Intel (R) Rapid Storage Technology Field Name Create RAID Volume Help This page allows you to create a RAID volume Field Name Raid Volume Help Select to see more information about the RAID Volume. Field Name Non-RAID Physical Disks: Help Select to see more information about the disk.
- Page 52 3. Event Logs Field Name Change Smbios Event Log Settings Help Press <Enter> to change the Smbios Event Log configuration. Comment Press Enter when selected to go into the associated Sub-Menu. Field Name View Smbios Event Log Help Press <Enter> to view the Smbios Event Log records. Comment Press Enter when selected to go into the associated Sub-Menu.
- Page 53 Change Smbios Event Log Settings Field Name Smbios Event Log Default Value [Enabled] Possible Value Enabled Disabled Help Change this to enable or disable all feature of Smbios Event Logging during boot. Field Name Erase Event Log Default Value [No] Possible Value No / Yes, Next reset / Yes, Every reset Help...
- Page 54 View Smbios Event Log Field Name DATE / TIME / ERROR CODE / SEVERITY / COUNT Default Value MM/DD/YY HH:MM:SS Smbios 0x16 N/A N/A Possible Value By Events. Help By Events.
- Page 55 4. Security Page Field Name Administrator Password Help Set Administrator Password Field Name User Password Help Set User Password. Field Name HDD Security drive Help HDD Security Configuration for selected drive Comment Press Enter when selected to go into the associated Sub-Menu. Field Name Secure Boot Help...
- Page 56 Help BIOS Update support Comment Press Enter when selected to go into the associated Sub-Menu.
- Page 57 HDD Security Field Name Set User Password Help Set HDD User Password. *** Advisable to Power Cycle System after Setting Hard Disk Passwords ***.Discard or Save changes option in setup does not have any impact on HDD when password is set or removed. If the 'Set HDD User Password' option is hidden, do power cycle to enable the option again...
- Page 58 Secure Boot Field Name Secure Boot Default Value [Enabled] Possible Value Enabled Disabled Help Secure Boot feature is Active if Secure Boot is Enabled,Platform Key(PK) is enrolled and the System is in User mode.The mode change requires platform reset Field Name Secure Boot Mode Default Value [Standard]...
- Page 59 Field Name Reset to Setup Mode Help Delete all Secure Boot key databases from NVRAM Field Name Key Management Help Enables expert users to modify Secure Boot Policy variables without full authentication Comment Enables expert users to modify Secure Boot Policy variables without full authentication...
- Page 60 Key Management Field Name Factory Key Provision Default Value [Disabled] Possible Value Enabled Disabled Help Install factory default Secure Boot keys after the platform reset and while the System is in Setup mode Field Name Restore Factory Keys Help Force System to User Mode. Install factory default Secure Boot key databases Field Name Reset to Setup Mode Help...
- Page 61 Help Allow the image to run in Secure Boot mode. Enroll SHA256 Hash certificate of a PE image into Authorized Signature Database (db) Field Name Remove ‘UEFI CA’ from DB Help Device Guard ready system must not list 'Microsoft UEFI CA' Certificate in Authorized Signature database (db) Field Name Restore DB defaults...
- Page 62 Default Value Size:0, Keys:0, Key source: No Keys Help Enroll Factory Defaults or load certificates from a file: 1.Public Key Certificate: a)EFI_SIGNATURE_LIST b)EFI_CERT_X509 (DER) c)EFI_CERT_RSA2048 (bin) d)EFI_CERT_SHAXXX 2.Authenticated UEFI Variable 3.EFI PE/COFF Image(SHA256) Key Source: Factory,External,Mixed comment Press Enter when selected to go into the associated Sub-Menu. Field Name Authorized TimeStamps Default Value...
- Page 63 BIOS Update Field Name Path for ROM Image Help Enter the path to the BIOS update option...
- Page 64 5. Boot Page Field Name Setup Prompt Timeout Default Value Possible Value 1~65535 Help Number of seconds to wait for setup activation key. 65535(0xFFFF) means indefinite waiting. Field Name Bootup NumLock State Default Value [Off] Possible Value Help Select the keyboard NumLock state...
- Page 65 Field Name Boot Option #1 Default Value [USB Floppy] Possible Value USB Floppy, CD/DVD, USB CD/DVD, Hard Disk , USB Key, USB Hard Disk , NVME, Network, Disabled Help Sets the system boot order Field Name Boot Option #2 Default Value [CD/DVD] Possible Value USB Floppy, CD/DVD, USB CD/DVD, Hard Disk , USB Key, USB...
- Page 66 Help Specifies the Boot Device Priority sequence from available UEFI USB Floppy Drives. Comment Press Enter when selected to go into the associated Sub-Menu. Field Name UEFI CDROM/DVD ROM Drive BBS Priorities Help Specifies the Boot Device Priority sequence from available UEFI CDROM/DVD Drives.
- Page 67 (List Boot Device Type) Drive BBS Priorities Field Name Boot Option #1 Default Value Possible Value Boot Device Name 1 of this type, Disable Help Sets the system boot order...
- Page 68 6. Save & Exit Page Field Name Save Changes and Reset Help Reset the system after saving the changes. Field Name Discard Changes and Rest Help Reset system setup without saving any changes. Field Name Restore Defaults Help Restore/Load Default values for all the setup options.
- Page 69 Quick Troubleshooting Guide...
-
Page 70: Troubleshooting Procedures
Troubleshooting 1.1 Troubleshooting Procedures Use the following procedures to troubleshoot your system. If you have followed all of the procedures below but still problems, please contact us to apply RMA or more technical support. First Check: 1. Check that the power connector is connected to your power supply. 2. - Page 71 If Memory Errors: 1. Confirm that the DIMM modules are properly and fully installed. 2. Confirm that you are using the correct memory. In addition, it is recommended that you use the same memory type and speed for all DIMMs in the system. 3.
-
Page 72: Battery Removal And Installation
3. Minimum configuration for troubleshooting: Remove all unnecessary components (starting with add-on cards first), and use the minimum configuration (but with a CPU and a memory module installed) to identify the trouble areas.Identify bad components by isolating them: If necessary, remove a component in question from the chassis, and test it in isolation to make sure that it works properly.
Need help?
Do you have a question about the PH10CMU and is the answer not in the manual?
Questions and answers