
Related Manuals for Kane KANE101


Summary of Contents for Kane KANE101
- Page 1 KANE101 Indoor Air Quality Analyser Stock No: 20103 October 2018 © Kane International Ltd...
-
Page 2: Table Of Contents
CONTENTS Page KANE101 OVERVIEW ANALYSER LAYOUT & FEATURES BATTERIES BEFORE USING THE ANALYSER FOR THE FIRST TIME BEFORE USING THE ANALYSER EVERY TIME USING THE ANALYSER AND ITS FOUR BUTTONS 10-11 USING THE ROTARY DIAL (starting from Menu) 12-23 6.1 MENU 12-15 6.2 STATUS... - Page 3 14. ANALYSER ANNUAL SERVICE & RECERTIFY 35-38 14.1 SERVICE-CALIBRATE-RECERTIFY 35-36 14.2 RETURNING YOUR ANALYSER TO KANE 14.3 WHERE TO SEND YOUR ANALYSER 15. COLD WEATHER PRECAUTIONS 16. SPECIFICATION 17. ELECTROMAGNETIC COMPATIBILITY APPENDIX PRODUCT REGISTRATION 43-44 Page 3...
-
Page 4: Kane101 Overview
The KANE101 can store up to 142 store locations – 40 AUX, 40 Ambient CO2/CO, 40 IAQ, 2 Timed Logs up to 240 tests and 20 Room test. The KANE101 is powered by internal re-chargeable NiMH batteries. The internal battery will power the analyser for about 6Hr, from full charge. - Page 5 NOTE: Fresh air is referred to in this manual. Sometimes it may be convenient to use thin flexible tubing (min ID. 3mm.) to supply fresh outside air, if a tube is used ensure that the inlet is at least 1 meter away from any possible source of CO such as an open window.
-
Page 6: Analyser Layout & Features
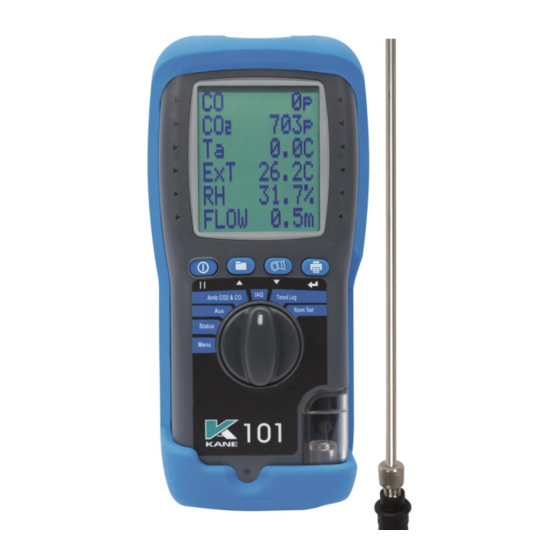
1. ANALYSER LAYOUT & FEATURES INSTRUMENT FEATURES AND KEYPAD Infra-red Printer emitter Display Function Keys Rotary Switch Water Trap & Particle Filter External Anemometer Connection Gas Inlet Charging Socket Scroll key when using the ON / OFF Menu Turns analyser ON and PUMP Turns pump ON and OFF ... -
Page 7: Batteries
BATTERIES Battery Type This analyser has been designed for use with disposable alkaline batteries or rechargeable Nickel Metal Hydride (NiMH) batteries. No other battery types are recommended. WARNING The battery charger unit must only be used when NiMH batteries are fitted. Do not mix NiMH cells of different capacities or from different manufacturers. -
Page 8: Before Using The Analyser For The First Time
Battery Disposal Always dispose of depleted batteries using approved disposal methods that protect the environment BEFORE USING THE ANALYSER FOR THE FIRST TIME: Set the correct time, date etc, after it is switched on and calibrated – See USING THE ROTARY DIAL below. These are stored when the analyser is switched off. - Page 9 SAFETY WARNING This analyser can be used to extract combustion gases that may be toxic in relatively low concentrations. These gases are exhausted from the back of the instrument. This analyser must only be used in well- ventilated locations by trained and competent persons after due consideration of all the potential hazards.
-
Page 10: Using The Analyser And Its Four Buttons
5. USING THE ANALYSER AND ITS FOUR BUTTONS: Switching ON the Press the button to switch the unit ON outside in fresh air. This allows the analyser’s sensors to be analyser calibrated. This will set CO to zero and CO to around 400 ppm . - Page 11 Switching on and off Press for about 2 sec. and release to switch backlight on or off. backlight. Note: use of the backlight increases the drain on the battery. Printing Data Press to start the analyser printing. The analyser displays "PRINTING" until this is completed. Make sure the printer is switched on, ready to accept data and its infrared receiver is in line with the emitter on top of the analyser.
-
Page 12: Using The Rotary Dial (Starting From Menu)
6. USING THE ROTARY DIAL (starting from Menu): Rotor positions are: • Menu the MENU options are listed below Status display time, date, time ambient temp, days before CAL due, battery level . • 6 lines of user defined parameters Amb CO + CO2 displays CO and CO reading in ppm with... - Page 13 Set Time Set current time Set Date Set date format and current date. Printer Choose KM IRP, KANE IRP-2, SERIAL or WIRELESS Passkey Default is 1 1 1 1 Pump flow Set flow rate 1 to 4. ppm or mg/m3...
- Page 14 SCREEN Contrast Adjust screen contrast. Default = 14 Backlight Adjust backlight switch off time 0 to 300 secs Choose which parameter to display on the 6 lines of the screen Back REPORT View or delete AMBIENT View or delete View or delete TIMED LOG View or delete ROOM TEST...
- Page 15 REPORT Functions With the rotor pointing to MENU use the keys to select REPORT and press keys can then be use to select which report you want to view. Press ENTER to make a selection. Use ENTER to toggle the change mode. With the side pointer flashing you can use UP/DOWN to change that line’s display.
-
Page 16: Menu
6.2 STATUS STATUS DISPLAY Select “Status” on the dial to view the following: 14:56:29 → Current time. Can be re-set via the “Menu” 11/03/06 → Current date. Can be re-set via the “Menu” 23.8C → Ambient temperature of the analyser →... -
Page 17: Ambient Co2 & Co
6.4 AMB CO2 + CO → Current CO reading 1234p → Current CO2 reading → Average CO reading CO2a 945p → Average CO2 reading → Maximum CO reading CO2m 3456p → Maximum CO2 reading These instantaneous readings can be held, stored or printed. 6.5 IAQ →... -
Page 18: Timed Log
6.6 TIMED LOG TIMED LOG SELECT LOGGING PERIOD HOUR Logging period can be adusted from 1 hour up to 24 hours. 240 measurements are stored. Only two sets of 240 measurements are retained in memory. Always ensure that there is enough charge in the batteries to cover the full test time or plug in the battery charger. -
Page 19: Room Test
ROOM TEST Select “Room Test” to measure and record CO and CO2 readings for up to 30 minutes. SELECT ROOM TEST → Use to select the test type from the following: TEST TYPE GENERAL TEST TYPES GENERAL: 15 minute test with results LIMIT = 10ppm stored every minute ALARM = 30ppm... - Page 20 TYPE B BOILER OPEN 15 minute test with results LIMIT = 10ppm FLUE: stored every minute ALARM = 30ppm TYPE A COOKER: 30 minute test with results LIMIT = 30ppm stored every minute ALARM = 90ppm TYPE A WATER 5 minute test with results LIMIT = 10ppm HEATER: stored every minute...
- Page 21 At the end of the test the display shows: LOG No. 08:49:51 TEST 1234p PRINT Viewing / printing a logged Room test Select MENU / REPORT / ROOM / VIEW When LEDs are not flashing Use the keys to change line on the display Press to cause the LEDs on that line to flash.
- Page 22 With no LEDs flashing Use the keys to move the lit LEDs to the line you want. You can change the LOG number and the TEST number so that you can view individual test results. Press to select the line you want and the LEDs will start to flash. Now use the keys to change the number (the TEST number or the LOG number)
- Page 23 ROOM TEST TYPICAL PRINTOUTS Page 23...
-
Page 24: Measuring Gases
7. MEASURING GASES After the countdown is finished and the analyser is correctly set up sampling can take place either by using a sampling tube/probe to reach into ducts or flues or simply by taking a direct ambient air measurement without a probe or hose connected. -
Page 25: Example Printout In Ambient Air
8. EXAMPLE PRINTOUT IN AMBIENT AIR The standard printouts are: Manually logged print Instant print press via VIEW stored data Page 25... -
Page 26: When You Finish Using The Analyser
9. WHEN YOU FINISH USING THE ANALYSER Always try to switch the analyser off in fresh air. The analyser counts down from 5 before switch off with the pump running to self clean its sensors. If the measured CO level is more than 30 ppm do not switch off the analyser. -
Page 27: Maintenance
MAINTENANCE 10.1 EMPTYING AND CLEANING THE INTEGRAL WATER TRAP The water trap should be checked and emptied on a regular basis. Water vapour will condense in the probe line, which may cause the water trap to fill suddenly if the probe is moved. Care should be taken at all times. Emptying of the water trap is detailed below: - Carefully unscrew the red bung from the bottom of the water-trap housing. -
Page 28: Changing The Particle Filter
10.2 CHANGING THE PARTICLE FILTER This is a very important part of the analyser and should be changed regularly. It prevents dust and dirt particles from entering the pump and sensors that will cause damage. The filter MUST be changed when it appears discoloured. -
Page 29: Problem Solving
PROBLEM SOLVING If any problems are not solved with these solutions, contact us or an authorised repair centre. Fault symptom Causes / Solutions • Batteries not holding • Batteries exhausted. charge. • AC charger not giving correct output. • Fuse blown in charger plug. •... -
Page 30: Kane Dashboard
12. KANE DASHBOARD We really want you to register your Kane analyser at www.kane.co.uk to create your dashboard - your personal online analyser portal Benefits include: An automatic reminder when it's time to Service - Calibrate – Recertify Our new simple online booking in procedure ensures you receive the fastest turnaround times possible Easy access to your analyser's calibration certificates &... - Page 31 An out of calibration analyser may mean your combustion reports are invalid. Page 31...
-
Page 32: Online Booking Procedure
13. ONLINE BOOKING PROCEDURE @ www.kane.co.uk To organise your Kane analyser’s Service & Recertification online it must be registered. To register, click If you have already registered, click to sign in From your dashboard, click for the analyser you wish to organise Service &... - Page 33 Book your service/recertification & order any additional spare parts you need Once happy with your order just confirm & pay Page 33...
- Page 34 See your order & print out the return to Kane label Don’t forget to put the label on your package and send it to us Page 34...
-
Page 35: Analyser Annual Service & Recertify
Welwyn Garden City in Hertfordshire Tel: 01707-375550 (the primary service centre for non-UK customers). By sending your analyser back to Kane for an annual fixed price service (check www.kane.co.uk for details) you have the opportunity to extend the warranty on your analyser to 5 years. - Page 36 Kane analysers ✓ You can organise your Kane analyser’s Service & Recertification online via your Dashboard on www.kane.co.uk, send it or call us to arrange a pre-booked while-you-wait service, saving you time & potential lost revenue We pride ourselves on our fast turnaround for a fixed price, which includes: - Inspecting your analyser &...
-
Page 37: Returning Your Analyser To Kane
Before sealing your package, please ensure you followed our procedure above & have clearly marked your box for the Kane Service Team If you do not have an account with a courier company, take your package to your local Post Office –... -
Page 38: Where To Send Your Analyser
14.3 WHERE TO SEND YOUR ANALYSER Northern Customer Service Southern & International Customer Service Kane International Ltd Kane International Ltd Gibfield Park Avenue Kane House, 11 Bessemer Road Atherton, Welwyn Garden City Manchester Hertfordshire M46 0SY, UK AL7 1GF, UK... -
Page 39: Specification
Output: 12V dc. @ 800 mA. Max. Compatibility KANE LIVE Android printer App KANE WIRELESS Printer App IOS Using dry gases at STP with the instrument not subjected to sudden changes of temperature, position or severe vibration... -
Page 40: Electromagnetic Compatibility
EN 61000-6-3 : 2001 EN 61000-6-1 : 2001 and is certified to be compliant Specification EC/EMC/KI/KANE 101 details the specific test configuration, performance and conditions of use. Please Note: Batteries used in this instrument should be disposed of in accordance with current legislation and local guidelines. -
Page 41: Appendix
APPENDIX Carbon Monoxide: Current World Health Organisation recommended maximum exposure levels to Carbon Monoxide: 15 minutes 89ppm 100mg/m 30 minutes 53ppm 60mg/m 60 minutes 27ppm 30mg/m 8 hours 9ppm 10mg/m Carbon Dioxide: British Standards BS6896, BS6230 and BS5990 confirm CO concentration should not exceed 2800ppm where people are working. - Page 42 Page 42...
-
Page 43: Product Registration
PRODUCT REGISTRATION Please register your Kane analyser at www.kane.co.uk or complete, detach and return to: Kane International Ltd, Kane House, 11 Bessemer Road, Welwyn Garden City, Hertfordshire, AL7 1GF Your Details Name: Job Title: Company Name: Company Address 1: Address 2:... - Page 44 Why did you buy a Kane Product? (Select all that apply) Kane Brand Previous Owner Dealer Recommendation Our Fixed Price Servicing Programme Made in the UK Value for Money Not your Decision...
- Page 45 Page 45...
- Page 46 Page 46...
- Page 47 Page 47...
- Page 48 Thank you for buying this analyser. Before use, please register on our website www.kane.co.uk Scan the QR code to go directly to Register your Product on-line or complete, detach and return the Product Registration form in this manual. Page 48...
Need help?
Do you have a question about the KANE101 and is the answer not in the manual?
Questions and answers