
Related Manuals for Pyle PDWM2700


Summary of Contents for Pyle PDWM2700
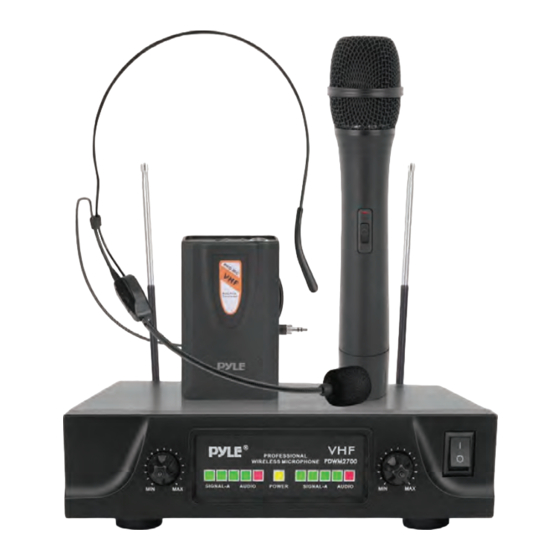
- Page 1 PDWM2700 Two Channel VHF Wireless Microphone System Handheld Microphone, Headset Microphone and Belt Pack Transmitter...
- Page 2 We strongly suggest that you carefully study these instructions before attampting to operate the system. We also recommend that you keep this manual in a safe and handy place for future reference. PRECAUTIONS • Avoid expose of the system to rain or moisture. •...
-
Page 3: Handheld Microphone
HANDHELD MICROPHONE 1. Unscrew the battery cover at the end of the microphone. Install the provided 9 volt battery and then close the cover. Make sure to connect with the correct polarity. 2. Move power switch to ON position. Power LED indicator will flash once and then go off. This indicates correct operation. -
Page 4: Bodypack Transmitter
BODYPACK TRANSMITTER 1. Slide up the battery cover in the front of the body pack as per above sketch. Install the provided 9 volt battery and the battery cover. Make sure to connect with the correct polarity. 2. Move power switch to ON position. Power LED indicator will flash once and then go off. This indicates correct operation. If power LED Indicator lights red, this Indicates the battery is low. - Page 5 RECEIVER 1. Switch on the wireless microphone receiver unit by pressing the POWER switch and the POWER light will illuminate to show the receiver unit Is working. 2. Fully extend the antenna to the maximum length. 3. Switch ON the transmitter. Power LED indicator will flash once the turned off. When the microphone is ON, the receiver RF indicator will light.
-
Page 6: Installation
INSTALLATION To connect the wireless microphone to your ampli er system: • Refer to above installation diagram. • Using the supplied 6.35mm to 6.35mm lead, connect the AF OUT jack of the receiver to the MIC INPUT socket on your amplifier. •... -
Page 7: Troubleshooting
TROUBLESHOOTING Please read and check the following points before asking for service. The wireless microphone is not work: • Check the microphone battery by switching the microphone ON. If power LED indicator lights red, replace the battery. • Check the POWER Indicator on the receiver unit Is ON. If not, check the power adapter if firmly plugged into a working electricity socket. -
Page 8: Specifications
SPECIFICATIONS A. Overall system 1. Oscillation mode: Quartz Control 2. Carrier Frequency Range: VHF 160-270MHz 3. Frequency Stability: +1-0.005% 4. Max Deviation: +1-56KHz with level limiting 5. Dynamic Range: >110dB 6. S/N Rate: >100dB 7. T.H.D: <0.5dB 8. Frequency Response: 100Hz-15KHz 9. - Page 9 C.Transmitter 1. Mike capsule: Handheld: dynamic Headset or lavalier MIC: condenser Built-in housing (Handheld MIC) 2. Antenna: External (Belt pack) 3. RF Output: <10mW <-40dBC 4. Spurious: 9V battery 5. Power Supply: www.PyleUSA.com...
- Page 10 Questions? Issues? We are here to help! Phone: (1) 718-535-1800 Email: support@pyleusa.com...
Need help?
Do you have a question about the PDWM2700 and is the answer not in the manual?
Questions and answers