Advertisement
Quick Links
MYPIN
LC Series Peak Weight Indicator
Instruction Manual
MYPIN
Thanks a lot for selecting
product!
Before operating this instrument, please carefully read this manual and
fully understand its contents. If any probroms, please contact our sales or
distributors whom you buy from. This manual is subject to change without
prior notice.
Application
The instrument provides isolated load cell power.(regulaly one 12V/40mA),
connect with load cell directly,up to 6 outputs controll for groups of batching
or single ;Data/Peak value holding function for choice.RS485 communication
interface provides remote link with computer/PLC.Besides,you can Start/Pause/
Accumulate/Clear tare weight/average/clear zero,etc. with external control
terminal.
Code Illustration
L □ - □□□□□□□
Input Signal: load cell, mA,V,mV,or others
Communication interface : Blank:none
2:R232 4:R485
Auxiliary Power:A: DC +12V /40mA
B: DC +24V/40mA
AL3: R:relay S: SSR/LOGIC
N:none
AL2: R:relay S:SSR/LOGIC
N:none
AL1: R:relya S:SSR/LOGIC
N:none
Analogue : Blank: none
I : DC 4-20mA
V: 0-10V
Power Supply: Blank: 80-265V AC/DC
E: 15-30V AC/DC
L series Weighing Controller
Dimemsion:
LC8: 4 digits, 48H*96W*80L mm LC85: 5 digits, 48H*96W*100Lmm
LC10: 4 digits, 80H*160W*70Lmm LC15: 5 digits, 80H*160W*70Lmm
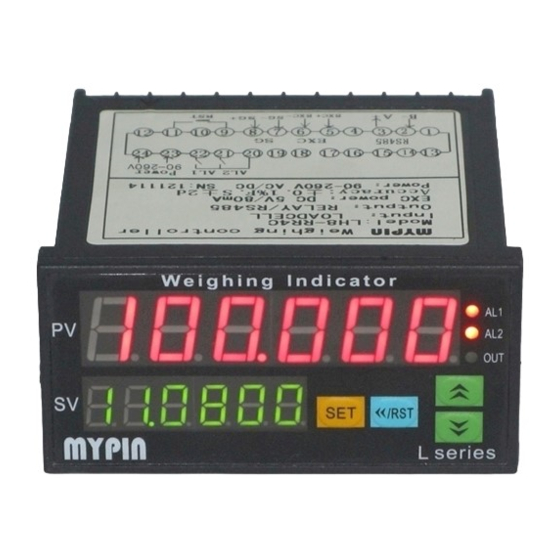
Panel
①
AL1
AL2
PV
OUT
SV
SET
< < / R s t
↑
↑ ↑
②
④
⑤
①
Measuring value / Parameter code display
②
Peak value / Parameter value display
③
Alarm 1 /2/3 / output lamp
④
Parameters Select / Confirm key
⑤
Shift key / tare weight Clear key
⑥
⑦
Increase key
Discrease key
Specifications
Power
90-260V AC/DC OR 15-30V AC/DC
≤5VA
Power Consumpsion
Accuracy
0.1%F.S±2digit
Sampling speed
LC85:≤16times/sec LC86: 16-128 times/sec
Open contact 250V AC 3A or 30V DC 3A COS
Relay
Input
Regular: mV(Load cell) Others:mA/V or special order
Analog output
4-20mA/0-10V DC
Auxiliary Power Supply
5V DC / Max 100mA
Communication
RS232 or RS485 MODBUS RTU protocol
Mounting dimemsions: 91+0.5X45+0.5mm
Parameters setting
1.Parameter setting:
A. In displaying estate, press and hold SET key>3s, enter /quit the menu.
B. Press <</Rst key, LED flashes,
C. Press Up / Down key to modify,
D. Press SET key to confirm and read the following parameters one by one.
2.Adjustment:
C: 12V/150mA
a. well connected wires and sensor,turn the power on,
b.Parameter 5EL setting. press UP and DOWN key >3s to enter the menu
set the data in hundredth bit to 0. press SET key to confirm.
b. Set USP=Standard weight(suggest more than 20% load cell scale)
set PVF= 0000.
c.Without any weight on the instument,press DOWN key >5s until OK
flashes. That's to set the zero point and it displays 0.0;
d. Add the weight equal to setted USP,press UP key>5s until OK flashes.
That's to set the high value.and it displays the added weight.
e. Should big error happens,just repeat the above operation.
f. After finish the above operation, press<</Rst key >2 s. to clear tare weight.
g. Parameter 5EL setting. press UP and DOWN key >3s to enter the menu
set the data in hundredth bit to 1. press SET key to confirm..
3: Clear tare weight :In displaying state, press <</Rst key >2s to clear,
then displays 0.
4. Clear Peak value: Press the back terminals RST key to clear the last peak
value and display current peak value.
5.The instrument will return to the measuring estate without any operation
for 25 seconds.
←
③
6.Decimal point setting for parameter AL1,AL2,AL3,HY1,HY2,PVF,USP
tRL,rRH:
←
⑥
a. press <</Rst key,LED flashes,
b, one hand to hold SET key, and the other hand to press UP key to shift the
←
⑦
decimal point.
c. Press SET key again to confirm and save.
Operation process
Self check
Power ON
all LED on
Parameter setting(pressSET for 3 seconds to enter or quit)
↓
SET>3S
Alarm 1 setting,range
0≤AL1≤USP
↓
SET
Alarm 1 mode setting
H:High output
¢=1
↓
SET
Hysteresis value setting for AL1 alarm.
Range: ±50.0
↓
SET
Alarm 2 setting,range
LSP≤AL2≤USP,factory setting: 70.0
↓
SET
Alarm 2 mode setting
H: High output
↓
SET
Hysteresis value setting for AL2 alarm.
Range: ±50.0
↓
SET
Alarm 3 setting(Hiden when no AL3)
range:LSP≤AL3≤USP
↓
SET
Alarm 3 mode setting(Hiden when no AL3)
H: High output
↓
SET
Compensation on drop,
Net weight(PV)=the actual weight +PVF.
↓
it's used when there's a delay in weighing/drop
SET
The added value when making adjustment,
Range:0-9999 or 0-99999
↓
SET
Decimal point display setting:0-3
0:0000 1:000.0
2:00.00 3:0.000,
UHH reserve
↓
SET
Unit setting,(for 5 digits indicator only)
:gram
↓
SET
Response for 4mA/0V output low value
setting,range:0≤trH≤USP
↓
SET
Response for 20mA/10V output high value
setting,range:0≤trH≤USP
↓
SET
communication adress :000-200, Brud rate:
regular: 9.6KBIT(hidden when there is no output)
↓
SET
Filter rate, range: 0-4. The larger the value, the
slower is the sampling speed
↓
SET
Measuring value display
LCK=010,is for read only.
Peak value display
LCK=000 means the parameter can be momodified.
Password selection,range:0-200
Connections
(If any changed, refer the label on the meter).
Rst
SG
9
8
1 1
1 0
1 2
START
2 0 1 9 1 8
2 3
2 2 2 1
2 4
L: Low output
90-260V
AL1
AL2
LC8 6 digits display, 48*96*80mm size
EXC-5V
SGmV
-
-
1 0 9
8
7
L: Low output
RST
LC8 5 digits display, 48*96*100mm size
Application examples
1、Used with LOAD cell . The instrument can supply DC 5V/40mA
auxiliary power, and the sensor output is about 2mV/V. 4 loadcells at
most connected at the same time.
L: Low output
Black Red
Green
White
Complete products contains
★1 copy of user manual,
★1 inspection QC label,
★2 installing brachets,
We are responsible for the overal repairment for the failure of
manufactorying quality within 12 months since the date of purchase.Repair
:kilogram
: ton
fee will be charged accordingly for demage caused by improper use.The
product has life-long warranty.
EXC 5V
A + B -
-
-
6
5
4
3
2
1
7
RS485
1 4
1 3
1 7
1 6 1 5
-
4-20mA
AL3 AL4
80-260V AC
6
4
3
2
1
5
4~20mA/0-10V
Advertisement

Subscribe to Our Youtube Channel
Related Manuals for MYPIN LC Series


Summary of Contents for MYPIN LC Series
- Page 1 MYPIN Parameter setting(pressSET for 3 seconds to enter or quit) Connections (If any changed, refer the label on the meter). Specifications LC Series Peak Weight Indicator ↓ SET>3S EXC 5V A + B - Alarm 1 setting,range Instruction Manual Power 90-260V AC/DC OR 15-30V AC/DC 0≤AL1≤USP...
- Page 2 On displaying estate,press UP and DOWN key for more than 3 seconds to access to parameter SEL setting.The operation steps are the same as the other settings. After setting, press UP and DOWN key to quit. This operation is to modify SEL value ONLY.Other parameters are fixed by manufactor.Please do not make any changement. If SEL=XXX1XX, that means the user can’t do on-site weight adjustment by pressing UP/DOWN key.
Need help?
Do you have a question about the LC Series and is the answer not in the manual?
Questions and answers