Advertisement
Available languages
Available languages
Quick Links
USER GUIDE
USER GUIDE
MANUEL DE L'UTILISATEUR / BEDIENUNGSANLEITUNG /
MANUEL DE L'UTILISATEUR / BEDIENUNGSANLEITUNG / GUIDA UTENTE / GUÍA DEL
GUIDA UTENTE / GUÍA DEL USUARIO /
USUARIO / ANVÄNDARHANDBOK
ANVÄNDARHANDBOK
USER GUIDE
MANUEL DE L'UTILISATEUR / BEDIENUNGSANLEITUNG / GUIDA UTENTE / GUÍA DEL
www.yuasa.com/ycx
USUARIO / ANVÄNDARHANDBOK
1
www.yuasa.com/YCX
1
Advertisement

Subscribe to Our Youtube Channel
Related Manuals for gs yuasa Yuasa YCX 1.5


Summary of Contents for gs yuasa Yuasa YCX 1.5
- Page 1 USER GUIDE USER GUIDE MANUEL DE L’UTILISATEUR / BEDIENUNGSANLEITUNG / MANUEL DE L’UTILISATEUR / BEDIENUNGSANLEITUNG / GUIDA UTENTE / GUÍA DEL GUIDA UTENTE / GUÍA DEL USUARIO / USUARIO / ANVÄNDARHANDBOK ANVÄNDARHANDBOK USER GUIDE MANUEL DE L’UTILISATEUR / BEDIENUNGSANLEITUNG / GUIDA UTENTE / GUÍA DEL www.yuasa.com/ycx USUARIO / ANVÄNDARHANDBOK www.yuasa.com/YCX...
-
Page 2: Table Of Contents
Contact us / Contactez-nous / Kontaktieren Sie uns / Contattaci / Ponte en contacto con nosotros / Kontakta oss www.yuasa.com GS Yuasa Battery Sales UK Ltd. Hunts Rise, South Marston Industrial Estate, Swindon SN3 4TG +44 (0) 1793 833555 info@gs-yuasa.uk GS Yuasa Battery France S.A.S. -
Page 3: English
English Safety warning READ ALL SAFETY INFORMATION AND INSTRUCTIONS BEFORE USING THIS PRODUCT. Failure to follow these correctly may result in ELECTRIC SHOCK, EXPLOSION, FIRE, INJURY, DEATH or PROPERTY DAMAGE. • Designed to charge 6V and 12V conventional lead acid batteries (WET, MF, SMF, CaCa, AGM and GEL) and compatible lithium (lithium-ion and LiFePO4) batteries only. - Page 4 has been selected. Connecting the charger to your battery If the battery is out of the vehicle: Connect the red lead from the charger to the positive (+) battery terminal. Connect the black lead from the charger to the negative (-) battery terminal. If battery is in the vehicle: The below is a guide, please consult your vehicle’s owner manual for information and procedures on your specific vehicle.
- Page 5 Dual clamp to eyelet conversion The charger is supplied with clamps that feature integrated eyelets. To convert the clamp into an eyelet, simply remove the retaining screw and washer. To reattach the clamps, follow this process in reverse (image 1). The eyelets can be used for permanent connection to a battery whilst it is fitted in a vehicle.
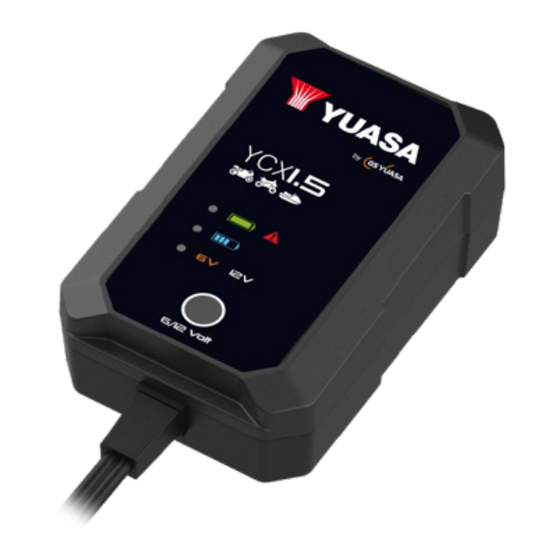
- Page 6 Status Descriptions 6V LED Amber ON 6V battery mode selected 12V LED White ON 12V battery mode selected 6V or 12V Blinking In eco mode Flash In soft start In charging cycle, bulk charge or absorption charge In float and maintenance mode or fully charged Charging process Voltage (VOLTS) Current...
- Page 7 LED warning indicators Status Descriptions Flash Battery weak or sulphated Flash Charging timer timed out Reverse polarity connection, output short circuit or battery cell shorted Fast flash Charger overheating Troubleshooting Types of Indication Possible Suggested problems causes solution Charger does No indicator No mains power.
- Page 8 No charging LED fault Battery is Check the battery current. indicator is ON severely condition, age etc. and charging sulphated. percentage LED Battery may need bar flashing Battery has a replacement. or blinking in damaged cell. sequence. Check the battery capacity. No charging LED fault Overheat...
- Page 9 Technical specifications and features Model Number YCX1.5 Type Smart Input Voltage range 100-240Vac Input frequency 50/60Hz Output 1.5A @ 6V / 12V Start Voltage 8.0V (1.0V for 6V mode) Battery capacity 2-30Ah (2-13Ah for 6V mode) Charging Voltage Max 14.5V (7.25V for 6V mode) Float Voltage 13.6V (6.8V for 6V mode) Size (L x W x H) mm...
- Page 10 The power LED light will flash red to indicate eco mode is on. Disposal and warranty information WEEE marking (disposal) All GS Yuasa products shipped from 13 August 2005 that are subject to the WEEE directive are compliant with the WEEE marking requirement. Such products are marked with the WEEE symbol (shown right) in accordance with European Standard EN50419.
- Page 11 Resellers may underwrite and offer extended warranties to end-users. Pleaseconsult your place of purchase for further details. The warranty period commences on the date shown on the proof of purchase. The warranty is valid only for the purchaser of the battery charger and is not transferable. If a replacement battery charger is offered, the warranty period runs from the date of purchase of the original battery charger.
-
Page 13: Français
Français Avertissement de sécurité : VEUILLEZ LIRE TOUTES LES INFORMATIONS DE SÉCURITÉ ET LES INSTRUCTIONS AVANT D’UTILISER CE PRODUIT. Le non-respect de ces instructions présente un risque de CHOC ÉLECTRIQUE, D’EXPLOSION, D’INCENDIE, de BLESSURES, de MORT ou de DOMMAGES MATÉRIELS. •... - Page 14 Vérification du niveau de précharge et d’électrolytes Vérifiez le niveau d’électrolytes de la batterie (non requis sur les batteries scellées et sans maintenance). Si nécessaire, retirez les bouchons d’aération et ajoutez de l’eau distillée afin que leur niveau se retrouve entre les lignes de remplissage supérieure et inférieure. Vérifiez le bouton de sortie de tension sur le chargeur et assurez-vous que la tension correcte a bien été sélectionnée. Connexion du chargeur à votre batterie Si la batterie est hors du véhicule : Connectez le câble rouge du chargeur à...
- Page 15 Si la batterie est dans le véhicule : Éteignez l’appareil et débranchez-le de la prise secteur et attendez au moins cinq minutes avant de débrancher les câbles de charge. Retirez le câble du châssis du véhicule. Retirez le câble de la batterie. Vérifiez les niveaux d’électrolytes si possible. Vous aurez peut-être besoin d’ajouter de l’eau distillée après la charge.
- Page 16 Indicateurs LED de charge Clignotement rapide = voyant allumé 0,2 s et éteint 0,2 s Clignotement intempestif = voyant allumé 0,2 s et éteint 1,8 s Clignotement = voyant allumé 0,5 s et éteint 0,5 s État Description Voyant fixe LED 6 V Mode batterie 6 V sélectionné...
- Page 17 3) Masse – Réduit le temps de charge en fournissant une charge maximale jusqu’à ce que la batterie atteigne une tension définie. 4) Absorption 1 – Utilise une tension constante et garantit que la batterie reçoit une charge sans être surchargée. 5) Absorption 2 – Augmente la tension constante et garantit que la batterie reçoit une charge complète sans être surchargée.
- Page 18 Le chargeur n’a L’indicateur La sortie est Vérifiez la pas de sortie LED de défaut court-circuitée. connexion CC entre s’allume. le chargeur et la Connexion de batterie et assurez- polarité inversée vous qu’il n’y a pas à la batterie. de court-circuit. Vérifiez que les pinces crocodiles ne sont pas...
- Page 19 L’indicateur L’indicateur La capacité Vérifiez que les de charge LED de défaut de la batterie spécifications complète/ clignote. La est trop élevée du chargeur flottante ne barre LED de pour le réglage correspondent à s’allume pas pourcentage de de charge de la capacité de la ou l’indicateur charge s’allume la batterie et...
- Page 20 Poids 390 g Normes CE, EMC, UKCA, RoHS Plage de fonctionnement -10 à 40 °C Température de stockage -25 à 85 °C Plage d’humidité de fonctionnement 95 % HR max Indice IP IP51 Protection contre la surchauffe interne Si le chargeur surchauffe, le courant de charge diminuera automatiquement. Une fois la température baissée, le chargeur reprendra la charge normale. Protection par minuterie Le chargeur gère la durée maximale de charge pour chaque étape de charge.
- Page 21 Informations sur la mise au rebut et la garantie Marquage DEEE (mise au rebut) Tous les produits GS Yuasa expédiés depuis le 13 août 2005 qui sont régis par la directive DEEE sont conformes aux exigences de marquage DEEE. Ces produits sont marqués du symbole DEEE (illustré...
-
Page 23: Deutsch
Deutsch Sicherheitshinweis LESEN SIE ALLE SICHERHEITSINFORMATIONEN UND ANWEISUNGEN, BEVOR SIE DIESES PRODUKT VERWENDEN. Die Nichtbeachtung dieser Hinweise kann zu STROMSCHLÄGEN, EXPLOSIONEN, BRÄNDEN, VERLETZUNGEN, TODESFÄLLEN oder SACHSCHÄDEN FÜHREN. • Nur für die Ladung von herkömmlichen 6-Volt und 12-Volt-Bleisäurebatterien (WET, MF, SMF, CaCa, AGM und GEL) und kompatiblen Lithium(Lithium-Ionen- und LiFePO4)-Batterien konzipiert. - Page 24 Kontrolle vor dem Aufladen und des Elektrolytstands Prüfen Sie den Elektrolytstand der Batterie (nicht erforderlich bei verschlossenen und wartungsfreien Batterien). Nehmen Sie gegebenenfalls die Entlüftungsdeckel ab und füllen Sie destilliertes Wasser ein, bis der Füllstand auf halbem Weg zwischen der oberen und unteren Fülllinie liegt.
- Page 25 Das Batterieladegerät von der Batterie trennen Wenn sich die Batterie außerhalb des Fahrzeugs befindet: Schalten Sie das Gerät aus, ziehen Sie den Netzstecker aus der Steckdose und warten Sie mindestens fünf Minuten, bevor Sie die Ladekabel abziehen. Entfernen Sie zunächst das schwarze und dann das rote Kabel. Prüfen Sie wenn möglich den Elektrolytstand.
- Page 26 YCX1.5 Ladestrom 1,5 A Ladung 2-30 Ah Instandhaltung bis zu 130 Ah LED Ladeanzeigen Schnelles Aufleuchten = 0,2s AN und 0,2s AUS Blinken = 0,2s AN und 1,8s AUS Aufleuchten = 0,5s AN und 0,5s AUS Status Beschreibungen 6V LED Gelb AN 6V Batteriemodus eingestellt 12V LED...
- Page 27 Ladeverfahren Spannung (VOLT) Strom (AMPERE) 1) Qualifizierung - Überprüft den Ausgangszustand der Batterie, um festzustellen, ob eine Softstartladung oder eine Ladung im Recoverymodus erforderlich ist. 2) Softstart – Verlängert die Lebensdauer Ihrer Batterie, indem die Batterie sanft bis zum Erreichen einer eingestellten Spannung geladen wird. 3) Hauptladephase –...
- Page 28 Fehlerbehebung Fehlerquellen Anzeige Mögliche Vorgeschlagene Ursachen Lösung Ladegerät Keine Keine Prüfen Sie die funktioniert nicht. Kontrollleuchten Stromversorgung. Stromversorgung, und vergewissern Sie sich, dass der Strom eingeschaltet ist. Ladegerät hat keinen LED- Ausgang ist Prüfen Sie die Gleichstromausgang. Störungsanzeige kurzgeschlossen. Gleichstromverbindung ist AN.
- Page 29 Voll/Schwebe- LED- Die Batteriekapazität Prüfen Sie, dass die Leuchte geht nicht Störungsanzeige ist zu groß für Spezifikation des an oder Voll LED leuchtet auf. Die die eingestellte Ladegeräts mit der leuchtet auf. LED-Ladeforts- Batterieladung Batteriekapazität chrittsanzeige und die Zeit ist übereinstimmt. leuchtet auf oder abgelaufen oder ist AN.
- Page 30 Betriebstemperatur -10 bis 40°C Lagerungstemperatur -25 bis 85°C Betriebsluftfeuchtigkeit 95 % RH max Schutzart IP51 Interner Überhitzungsschutz Wenn das Ladegerät überhitzt, sinkt der Ladestrom automatisch. Wenn die Temperatur sinkt, nimmt das Ladegerät den normalen Ladevorgang wieder auf. Zeitschalterschutz Das Ladegerät managed die maximale Ladezeit für jede Ladestufe. Sobald die Zeit abgelaufen ist, stoppt das Ladegerät den Ladevorgang, um Ihre Batterie zu schützen, und die LED-Fehleranzeige blinkt rot.
- Page 31 Information zur Entsorgung und Garantie WEEE-Kennzeichnung (Entsorgung) Alle ab dem 13. August 2005 gelieferten GS Yuasa- Produkte, die der WEEE-Richtlinie unterliegen, halten die WEEE-Kennzeichnungsanforderungen ein. Diese Produkte sind gemäß DIN EN 50419 mit dem WEEE-Symbol (siehe rechts) markiert. Alle alten Elektrogeräte können recycelt werden. Werfen Sie bitte keine Elektrogeräte, auch nicht mit diesem Symbol gekennzeichnete, in Ihren...
-
Page 33: Italiano
Italiano Avviso di sicurezza LEGGERE TUTTE LE INFORMAZIONI E ISTRUZIONI DI SICUREZZA PRIMA DI USARE IL PRODOTTO. Il mancato rispetto di tali procedure potrebbe risultare in SCOSSE ELETTRICHE, ESPLOSIONI, INCENDI, LESIONI, MORTE o DANNI MATERIALI. • Progettato per caricare solo batterie al piombo acido tradizionali da 6V e 12V (WET, MF, SMF, CaCa, AGM e GEL) e batterie al litio compatibili (agli ioni di litio e LiFePO4). - Page 34 Pre-carica e controllo del livello di elettrolita Controllare il livello di elettrolita della batteria (non richiesto per batterie sigillate e che non richiedono manutenzione). Se necessario, rimuovere i tappi di sfiato e aggiungere acqua distillata per portare i livelli a metà fra le linee di riempimento minima e massima. Controllare il pulsante di uscita della tensione sul caricabatterie e assicurarsi di aver selezionato la tensione corretta.
- Page 35 Se la batteria è all’interno del veicolo: Spegnere e rimuovere la presa di corrente dalla spina e attendere almeno cinque minuti prima di scollegare i cavi per la ricarica. Rimuovere il cavo dal telaio del veicolo. Rimuovere il cavo dalla batteria. Se possibile controllare i livelli di elettrolita.
- Page 36 Spie LED di ricarica Lampeggiamento veloce = 0,2 sec. ACCESA e 0,2 sec. SPENTA Intermittenza = 0,2 sec. ACCESA e 1,8 sec. SPENTA Lampeggiamento = 0,5 sec. ACCESA e 0,5 sec. SPENTA Stato Descrizioni LED a 6 V Accesa e gialla Selezionata modalità...
- Page 37 3) Principale – Riduce i tempi di ricarica fornendo la massima carica finché la batteria non raggiunge una determinata tensione. 4) Assorbimento 1 – Usa una tensione costante e assicura che la batteria riceva la carica senza sovraccaricarsi. 5) Assorbimento 2 – Aumenta la tensione costante e assicura che la batteria riceva la carica completa senza sovraccaricarsi. 6) Analisi –...
- Page 38 Il caricabatterie Spia LED di L’uscita è in Controllare il non ha un’uscita guasto accesa. cortocircuito. collegamento CC fra il caricabatterie Connessione a e la batteria e polarità invertite assicurarsi che alla batteria. non siano presenti cortocircuiti. Verificare che le pinze a coccodrillo non siano fuoriuscite dalla batteria.
- Page 39 La spia ricarica/ La spia LED La capacità Verificare che le di mantenimento di guasto della batteria specifiche del non si accende lampeggia. La è troppo caricabatterie oppure la spia barra LED della elevata per corrispondano LED ricarica percentuale l’impostazione alla capacità della lampeggia.
- Page 40 Temperatura d’esercizio Da -10 °C a 40 °C Temperatura di stoccaggio Da -25 °C a 85 °C Intervallo di umidità di esercizio 95% RH max Classificazione IP IP51 Protezione da surriscaldamento interno Se il caricabatterie si surriscalda, la corrente di carica diminuisce in automatico. Quando la temperatura diminuisce, il caricabatterie riprende la ricarica normale.
- Page 41 Informazioni su smaltimento e garanzia Marcatura RAEE (smaltimento) Tutti i prodotti GS Yuasa spediti a partire dal 13 agosto 2005 soggetti alla direttiva RAEE sono conformi ai requisiti di marcatura RAEE. Tali prodotti riportano il simbolo RAEE (a destra) in conformità con lo standard europeo EN50419.
-
Page 43: Español
Español Advertencia de seguridad LEE TODAS LAS INSTRUCCIONES E INFORMACIÓN DE SEGURIDAD ANTES DE USAR ESTE PRODUCTO. Si estas instrucciones no se siguen correctamente, se pueden provocar DESCARGAS ELÉCTRICAS, EXPLOSIONES, INCENDIOS, LESIONES, LA MUERTE o DAÑOS A LA PROPIEDAD. • Diseñado exclusivamente para cargar baterías de plomo ácido de 6V y 12V convencionales (WET, MF, SMF, CaCa, AGM y GEL) y baterías de litio compatibles (iones de litio y LiFePO4). - Page 44 Comprobación de nivel del electrolito y precarga Comprueba el nivel del electrolito (esto no se requiere en baterías selladas y libres de mantenimiento). Si fuera necesario, quita las tapas de ventilación y añade agua destilada para que los niveles se encuentren hacia la mitad entre las líneas superior e inferior de llenado. Comprueba el botón de potencia de voltaje del cargador y asegúrate de que se haya seleccionado el voltaje adecuado.
- Page 45 Comprueba los niveles del electrolito si es posible. Puede que se necesite rellenar con agua destilada tras la carga. Si la batería se encuentra en el vehículo: Apaga y desenchufa el enchufe de la alimentación eléctrica y espera al menos cinco minutos antes de desconectar los cables de carga. Desconecta el cable del chasis del vehículo. Desconecta el cable de la batería.
- Page 46 Indicadores LED de carga Se enciende de forma rápida e intermitente = 0,2 s encendido y 0,2 s apagado Parpadeo = 0,2 s encendido y 1,8 s apagado Se enciende de forma intermitente = 0,5 s encendido y 0,5 s apag Estado Descripciones LED de 6 V...
- Page 47 3) Carga masiva: reduce el tiempo de carga suministrando la carga máxima hasta que la batería alcanza el voltaje establecido. 4) Absorción 1: utiliza un voltaje constante y garantiza que la batería reciba la carga sin sobrecargarse. 5) Absorción 2: aumenta el voltaje constante y garantiza que la batería reciba la carga completa sin sobrecargarse.
- Page 48 El cargador no Se enciende el Cortocircuito de la Comprueba la tiene potencia indicador LED potencia. conexión CC entre de fallo. el cargador y la Conexión opuesta batería, y asegúrate de la polaridad en de que no haya la batería. ningún cortocircuito. Comprueba que las pinzas no se hayan caído de la batería.
- Page 49 No se El indicador La capacidad Comprueba que la enciende LED de fallo de la batería especificación del la luz de se enciende es demasiado cargador coincida completo o de forma grande para la con la capacidad de en flotación intermitente. configuración la batería.
- Page 50 Aprobaciones CE, EMC, UKCA, RoHS Temperatura de funcionamiento De -10 a 40 °C Temperatura de almacenamiento De -25 a 85 °C Rango de humedad en 95 % de HR máx. funcionamiento Valor de IP IP51 Protección frente al sobrecalentamiento interno Si el cargador se sobrecalienta, la corriente de carga disminuirá...
- Page 51 Información sobre la garantía y el desechado Marcado de RAEE (desechado) Todos los productos de GS Yuasa enviados a partir del 13 de agosto de 2005 que estén sujetos a la directiva de RAEE cumplen con los requisitos de marcado de RAEE. Estos productos están marcados con el símbolo de RAEE (que...
-
Page 53: Svenska
Svenska Säkerhetsvarning LÄS ALL SÄKERHETSINFORMATION OCH ALLA SÄKERHETSANVISNINGAR INNAN DU ANVÄNDER PRODUKTEN. Om du inte följer dessa kan det leda till ELSTÖTAR, EXPLOSIONER, BRÄNDER, PERSONSKADOR, DÖDSFALL eller EGENDOMSSKADOR. • Utformad för att ladda blybatterier på 6V och 12V (WET, MF, SMF, CaCa, AGM och GEL) och endast kompatibla litiumbatterier (litiumjon och LiFePO4). - Page 54 Om nödvändigt tar du bort påfyllningskorkarna och tillsätter destillerat vatten så att nivåerna är halvvägs mellan den övre och nedre påfyllningslinjen. Kontrollera spänningsmatningsknappen på laddaren och se till att du har valt rätt spänning. Ansluta laddaren till ditt batteri Om batteriet befinner sig utanför fordonet: Anslut den röda kabeln från laddaren till den positiva batteripolen (+).
- Page 55 Kontrollera elektrolytnivåerna om det är möjligt. Du kan behöva fylla på med destillerat vatten efter laddning. Omvandling från klämma till ringkabelskor Laddaren är utrustad med klämmor med integrerade ringkabelsko. Ta bara bort fästskruven och brickan för att omvandla klämman till en ringkabelsko. Utför processen i omvänd ordning för att sätta tillbaka klämmorna (bild 1).
- Page 56 Status Beskrivningar 6 V LED Orange PÅ 6 V batteriläge valt 12 V LED Vit PÅ 12 V batteriläge valt 6 V eller 12 Blinkar I eco läge V LED Blinkar I mjukstart I laddningscykel, bulkladdning eller PÅ absorptionsladdning PÅ I underhållsläge eller fulladdat Laddningsprocess Spänning...
- Page 57 7) Underhållsspänningsläge – Ser till att batteriet hela tiden har 100 % laddning. LED-varningsindikatorer Status Beskrivningar Blinkar Batteri dåligt eller sulfaterat Blinkar Laddningstimer har nått tidsgräns Ansluten med omvänd polaritet, PÅ kortsluten utgång eller battericell kortsluten Blinkar snabbt Laddaren överhettas Felsökning Typer av problem Indikering...
- Page 58 Ingen laddström. LED-indikatorn Batteriet är allvarligt Kontrollera för fel är PÅ och sulfaterat. batteritillstånd, LED-fältet för ålder osv. laddningsprocent Batteriet har en blinkar eller skadad cell. Batteriet kan blinkar i behöva bytas ut. sekvenser. Kontrollera batteriets kapacitet. Ingen laddström. LED-indikatorn Läge för skydd mot Flytta batteri och för fel blinkar...
- Page 59 Underhåll Laddaren är underhållsfri. Använd inte laddaren om strömsladden är skadad. Höljet bör rengöras emellanåt. Laddaren får inte vara ansluten till ström när den rengörs. Tekniska specifikationer och funktioner Modellnummer YCX1.5 Smart Inspänningsområde 100-240Vac Ingångsfrekvens 50/60 Hz Utgång 1,5 A vid 6 V/12 V Startspänning 8,0V (1,0V för läget 6V) Batterikapacitet...
- Page 60 LED-lampan för ström blinkar rött för att indikera att eco läget är på. Kassering och garantiinformation WEEE-märkning (kassering) Alla GS Yuasa-produkter som skickas från 13 augusti 2005 och som omfattas av WEEE-direktivet är kompatibla med WEEE-märkningskravet. Sådana produkter är märkta med WEEE-symbolen (visad till höger) i enlighet med den...
- Page 61 inköpsdatumet för originalbatteriladdaren.
Need help?
Do you have a question about the Yuasa YCX 1.5 and is the answer not in the manual?
Questions and answers