Table of Contents
Advertisement
Quick Links
Advertisement
Table of Contents

Related Manuals for Playcore GameTime VistaRope 5960SP


Summary of Contents for Playcore GameTime VistaRope 5960SP
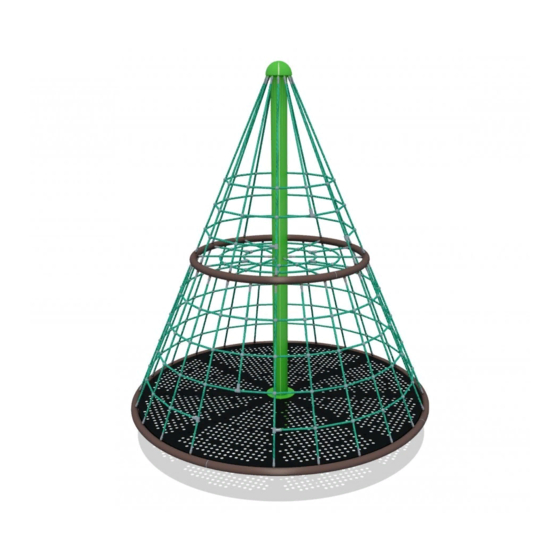
- Page 1 5960SP PAGE 1 INSTALLATION MANUAL Date:04/13/22...
- Page 2 5960SP FOOTERS AND USE ZONE Ø22'-10" Ø10'-10" Top of Surfacing ASTM Use Zone 5'-0" Packed Soil or Gravel Fill Foundation Construction: 1. Follow Instructions to Assemble Base and Nets 2. Carefully Lift Assembly into excavated hole. 3. Level and backfill with gravel or hard-packed soil. 4.
- Page 3 5960SP PAGE 3 UPPER NET ASSEMBLY Upper Net Upper Net M6 Barrel Nut and M6 Barrel Nut and Bolt Bolt Post Assembly Post Assembly M6 Barrel Nut and M6 Barrel Nut and Bolt Bolt 1. If working on exposed soil, spread out a large tarp to keep the equipment and nets clean.
- Page 4 5960SP PAGE 4 UPPER RING ASSEMBLY M6 Barrel Nut and M6 Barrel Nut and Bolt Bolt 1. Assemble the Upper Ring. 2. Attach the Upper Ring to the Upper Net and the Spider Net. Ring Section Ring Section Plastic Joint Plastic Joint Sleeve Sleeve...
-
Page 5: Base Assembly
5960SP PAGE 5 BASE ASSEMBLY 1. Attach the Lower Net to the Ring. 2. Assemble the Base Plate and Angle Braces to the Post Assemblty M12 X 35 Bolt, M12 X 35 Bolt, nut, washer nut, washer Angle Brace Angle Brace Base Plate Base Plate... -
Page 6: Install Base
5960SP PAGE 6 INSTALL BASE 1. Carefully lift the Assembly and place in the foundation hole 2. Level the Post Assembly and backfill with hard packed soil or gravel. Sand is not recommended. - Page 7 5960SP PAGE 7 LOWER RING AND FLOOR ASSEMBLY GENERAL PROCEDURE See the Next Page for Tips for these steps 1. Assemble the Lower Ring on the Lower Net. 2. Assemble the Deck sections between the Bottom Flange and the Lower Ring. Use the M8 X 55 Bolts in the Top Flange to help align the Deck sections.
- Page 8 5960SP PAGE 8 LOWER RING AND FLOOR TIPS • Keep all fasteners loose until assembly is complete. • When assembling the Lower Ring on the Net, leave several ropes disconnected to facilitate inserting the Floor Decks. • Use the M8 X 55 Bolts to align the Floor Decks on the Post before installing the Top Flange.
-
Page 9: Cap Assembly
5960SP PAGE 9 CAP ASSEMBLY Eyebolt Eyebolt 1. IMPORTANT: After placement, be sure to remove the Eyebolt. 2. Install the Post Cap with 3 M8 Bolts. Post Cap Post Cap M8 Bolts M8 Bolts... -
Page 10: Parts List
5960SP PAGE 10 PARTS LIST 1 Outer Post Inner Post Upper Net Lower Net Spider Net Upper Ring Lower Ring Eyebolt Post cap 10. M8 Bolt... - Page 11 5960SP PAGE 11 PARTS LIST 2 11. M8 X L70 Bolt 19. Angle Brace 12. M12 X L35 Bolt 20. M12 X L35 Bolt 13. M12 Nut, Washer 21. M12 Nut and Washer 14. M8 X L55 Bolt 22. Upper Flange 15.
- Page 12 5960SP PAGE 12 AFTER INSTALLATION, BEFORE OPENING FOR PLAY, RECOMMENDATIONS Inspect Equipment for Correct Installation If the equipment has not been installed correctly, do not open for play and take necessary precautions to keep closed until installation is correct, complete and re-inspect- Protective Surfacing Make sure appropriate playground surfacing has been installed to meet applicable standards.
-
Page 13: Maintenance
5960SP PAGE 13 MAINTENANCE This equipment should be installed, inspected for proper Loose hardware installation, maintained and operated in accordance with Loose hardware can cause quality problems and put safety applicable safety standards. at risk. Therefore, loose hardware should always be tight- ened, and checks carried out to ensure that there are no Regular maintenance is necessary on all park and play- missing parts.
Need help?
Do you have a question about the GameTime VistaRope 5960SP and is the answer not in the manual?
Questions and answers