Table of Contents
Advertisement
Quick Links
Advertisement
Table of Contents

Subscribe to Our Youtube Channel
Related Manuals for Luxinar SR AOM Series


Summary of Contents for Luxinar SR AOM Series
- Page 1 SR AOM series USER MANUAL Sealed CO laser sources with integrated AOM...
- Page 2 This manual is copyrighted with all rights reserved. Under copyright laws, this manual may not be copied in whole or part or reproduced in any other media without the express permission of Luxinar Ltd. Permitted copies must carry the same proprietary and copyright notices as were affixed to the original. Under law, copying includes translation into another language.
- Page 3 Tel.: +86 21 6106 9917 www.luxinar.com/zh-CN Luxinar Inc (USA) 51047 Celeste Dr Shelby Township MI 48315 Tel.: +1 (0)586 291 2709 www.luxinar.com Warranty shipments, returns and adjustments Warranty claims must be made promptly and must be received by Luxinar during the applicable warranty period.
- Page 4 If it becomes necessary to return a product for repair and/or adjustment, authorisation from Luxinar for the return and instructions as to how and where these products should be shipped must be obtained from Luxinar Aftersales. Service and repair Servicing or calibration of the system can only be carried out by trained Luxinar service engineers or customers who have undertaken and passed a Luxinar approved service training course.
-
Page 5: Table Of Contents
Table of contents Preface Audience Other publications How to use this manual Admonitions Connector labels and signal names Safety................................1.1. General safety information......................... 1.2. Laser radiation safety standards......................1.3. Equipment safety standards........................2 1.4. Intended use for the laser equipment....................1.5. Radiation hazards for CO lasers...................... - Page 6 4. Diagnostics and troubleshooting......................4.1. Status indicator diagnostics — PSU, interlocks & cooling..............4.2. Status indicator diagnostics — AOM module..................19 4.3. Status indicator diagnostics — Control modes................. 5. Routine maintenance..........................5.1. General cleaning..........................21 5.2. Pre-ioniser and AOM fuse replacement.................... 5.3. Cooling system contamination......................5.4.
-
Page 7: Other Publications
Read this manual carefully before operating the laser for the first time. Pay special attention to the Safety chapter. The SR AOM series is designed and sold for use in Original Equipment Manufacturer (OEM) systems and is not to be used as a stand-alone laser. The OEM is responsible for compliance with all applicable safety regulations. - Page 8 Preface 906-0227-00 REV 1...
-
Page 9: Safety
1.2. Laser radiation safety standards The European standard for the Radiation Safety of Laser Products is EN60825-1:2014. Luxinar lasers are designated as Class 4 and as such, the user should appoint a Laser Safety Officer who should be familiar with the content of EN60825-1:2014. -
Page 10: Equipment Safety Standards
Class 1 laser machine as defined in the EN60825-1 or 21 CFR 1040.10 laser safety standards. SR AOM series lasers are provided as components to be integrated into OEM systems therefore overall responsibility for compliance resides with the OEM manufacturer/installer of the final machine. -
Page 11: Eye Protection
Luxinar Ltd, does not accept liability for any damage or injury howsoever caused or arising. In addition, Luxinar Ltd, does not accept liability for any damage or injury howsoever caused or arising where the laser equipment has been modified without the prior written permission of Luxinar Ltd. -
Page 12: Skin Protection
• Misuse of the laser • Unauthorised use of the laser 1.6. Other hazards 1.6.1. Airborne noise emissions Depending on the mode of operation, Luxinar CO lasers may generate airborne noise emissions higher than those identified in 2006/42/EC section 1.7. WARNING... -
Page 13: Fume And Vapour Hazard
• When cutting plastics, filter the cutting vapours downwards. 1.6.4. Electrical hazards Any installation, service or repair work must be undertaken by qualified Luxinar personnel or by skilled engineers after consultation with the relevant local Luxinar Aftersales department. If in doubt contact the Aftersales department at the phone number given at the beginning of this manual. -
Page 14: Training
EN60825-1:2014 section 6.3. 1.9.3. Safety shutter A safety shutter can be incorporated into SR AOM series lasers. The shutter prevents accidental laser emission. It blocks or dumps the laser output beam using a reflective mechanical blade. The shutter assembly contains sensors for monitoring the Shutter Open and Shutter Closed positions. -
Page 15: Safety Warning Labels
1.11. Safety warning labels In accordance with the requirements of EN60825-1:2014, appropriate warning labels are positioned in specific locations on the system to indicate conditions under which the user could be exposed to laser radiation. In addition, for systems supplied into the USA the product identification label carries a statement on the requirements of 21 CFR 1040.10. -
Page 16: Labels
1.13. Labels Figure 3 - Label A — Laser hazard AVOID EXPOSURE VISIBLE & INVISIBLE LASER RADIATION IS EM ITTED FROM THE APERTURE Figure 4 - Label B—Laser aperture CAUTION LASER DIODE FITTED (Wa ve le n gt h 6 25-6 9 0 n m Ou t p u t Po we r <4m W) VISIBLE &... -
Page 17: Maximum Permissible Exposure And Nominal Ocular Hazard Distance
Made in the UK by Luxinar Ltd. Meadow Road, Bridgehead Business Park, Kingston upon Hull, HU13 0DG +44 (0) 1482 650088 www.luxinar.com PATENT/ Brevet déposé / brevettato: www.luxinar.com/patents Imported into the EU by Luxinar GmbH, Röntgenstrasse 6, 21465 Reinbek, Germany Model number Part number Serial number... -
Page 18: Aom Module Cover Interlock
Important! There are no user serviceable parts within the AOM module. The cover should only be removed by trained Luxinar service personnel. With the cover removed and the interlock overridden, full power laser emission is present within the AOM module even if there is no laser emission at the output window and no demand signal is active. -
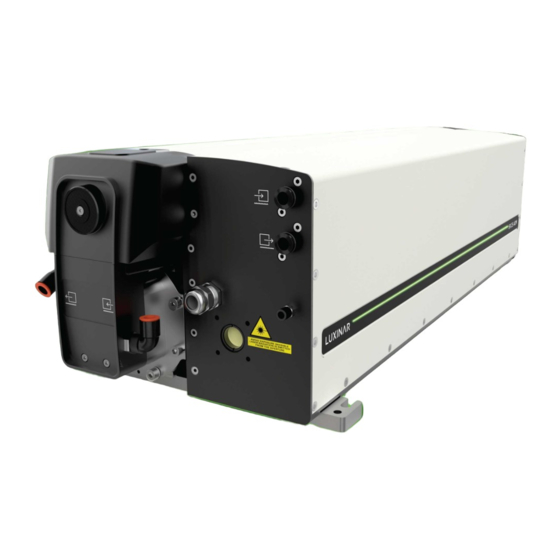
Page 19: General Description
1. Luxinar recommends using a DC power supply with a maximum current output at least 20% higher than these values. 2. Luxinar recommends using a DC power supply with a maximum average power rating at least 20% higher than these values. -
Page 20: Dimensions
2.3.2. Dimensions Table 3 - External dimensions (including RF power supply) Model SR 10 AOM SR 25 AOM Standard laser (LxWxH) (mm) 885x290x226 947x290x226 2.3.3. Weights Note: All weights are approximate. Table 4 - Weight (including RF power supply) Model SR 10 AOM SR 25 AOM Standard laser... -
Page 21: Optics Purge Gas
Table 6 - Coolant specification — laser Model SR 10 AOM SR 25 AOM Minimum flow rate (L/min) Recommended flow rate (L/min) ≥ 6 ≥ 6 Maximum pressure 6bar Dissipation Required refrigeration capacity > 3kW > 5kW Coolant temperature (laser) 18–25°C ±... -
Page 22: Performance
2.3.7. Performance Table 10 - SR AOM output characteristics Model SR 10 AOM SR 25 AOM 9.3µm Output wavelength 0–75W 0–150W Rated average power range ± 2% Typical long term stability Peak power 150W > 75W > 150W Minimum shipment power Pulse frequency 0–240kHz Pulse energy... -
Page 23: Operation
Luxinar does not accept liability for any damage or injury howsoever caused or arising. -
Page 24: Shut-Down
Verify that all interlocks are closed. Switch on mains power to the laser and controller. Set the operating parameters on the machine controller. Enable the RF power supply. DANGER Laser radiation hazard Avoid exposure to direct and scattered radiation. Enable the shutter. Apply a Laser enable signal. -
Page 25: Diagnostics And Troubleshooting
Check the modulation signal. See Chapter VSWR fault. • If the indicator is intermittently red, check the pre-ioniser fuse. See section 5.2. • If the problem persists, contact Luxinar Aftersales. RF power supply error. Contact Luxinar Aftersales. 906-0227-00 REV 1 4. Diagnostics and troubleshooting... - Page 26 Indicator display Status Action Coolant flow is below the required Provide the required minimum coolant minimum. flow rate to the system. See section 2.3.4. No interlock signal. Check for open machine interlocks. • No interlock signal. • Check for open machine interlocks. •...
-
Page 27: Status Indicator Diagnostics - Aom Module
Normal system operation for External • Diode pointing laser disabled. Modulation mode. • Shutter open. DIOD SHTR • Diode pointing laser enabled. Contact Luxinar Aftersales. • Shutter fault. DIOD SHTR • Internal Modulation mode • Apply a high (5–24V) signal to U1, pin selected. - Page 28 Action Internal mode selected. Normal operating status for AOM lasers. Service or external PWM mode selected. Service use only. AOM status OK. Normal operating status for AOM lasers. AOM fault. Contact Luxinar Aftersales. 4. Diagnostics and troubleshooting 906-0227-00 REV 1...
-
Page 29: Routine Maintenance
5. Routine maintenance The SR AOM has been designed to be low maintenance. Internal routine maintenance procedures are not required. The system's sealed construction and limited number of moving parts ensures trouble free and reliable operation. 5.1. General cleaning WARNING Laser radiation and electrical hazards Use of controls or adjustments or performance of procedures other than those specified herein may result in hazardous laser radiation exposure. -
Page 30: Cooling System Contamination
Remove the cover (2) from the rear end of the laser by unscrewing the fixing screw (1). Remove the faulty fuse (PI). Fit a replacement fuse of the same size and type. Fuse specification: 20mm, T1A250V (Luxinar part number 552-0007-00) Replace the cover and secure it with the fixing screw. AOM fuse Disconnect the equipment from the mains electrical supply. -
Page 31: Installation
• A flat surface with prepared fixing locations to match the laser mounting feet. See section 6.2.1. • A DC power supply supplied by Luxinar or sourced locally. • A beam delivery system and supports with a prepared connection for the laser output window mounting point. -
Page 32: Unpacking, Mounting And Connections
WARNING Hazardous laser radiation Always wear protective eyewear matched to the emission wavelength and output power of the laser. Instruct all personnel in the vicinity to wear identical protective eyewear. Mount the beam delivery and connect it to the laser output window using the prepared connector. See section 6.2.6. -
Page 33: Laser Output Aperture Location
WARNING Risk of optical damage and shutter failure To ensure correct operation of the laser and shutter, the laser must be mounted in one of the approved orientations identified by check marks in the following figure. All other orientations are prohibited. - Page 34 Important! If the optional Luxinar DC power supply is fitted, the coolant must flow through the power supply before the laser resonator. Scenario 1 — Single chiller All modules are connected to a single chiller. The AOM module is cooled using a branch circuit fitted with a pressure regulator.
- Page 35 Scenario 2 — Dual chillers Separate chillers are provided for the laser resonator/DC power supply and for the AOM module. Coolant in — laser/DC power supply Coolant out — laser DC power supply DC power supply Coolant in — AOM module Coolant out —...
- Page 36 Figure 17 - AOM module pressure regulator Figure 18 - Coolant and gas purge connections AOM module fuse AOM module coolant inlet AOM module coolant outlet Optics purge gas inlet Beam delivery mounting position Laser resonator/DC power supply coolant inlet Laser resonator/DC power supply coolant outlet Coolant inlet and outlet connectors are marked with the following symbols (direction depends on the label location):...
-
Page 37: Beam Delivery Optics Purge Gas
6.2.5. Electrical power connections The laser requires a 50V DC power supply, either supplied locally or available from Luxinar. For specifications refer to section 2.3.1. The connecting cable cross-section depends on the laser model and cable length. Refer to the following table for cable selection. - Page 38 DANGER Risk of electric shock or severe damage to the equipment Ensure that the equipment is disconnected from the mains supply before making this connection. Respect the polarity of the terminals on the power supply and the laser. To connect the cables to the laser: Remove the cover (2) from the rear end of the laser by unscrewing the securing screw (1).
-
Page 39: Beam Delivery
6.2.6. Beam delivery CAUTION Risk of damage to the laser output window mount The laser output window mount is not capable of supporting a beam delivery. Always provide strong and stable mechanical support for the beam delivery and other external optics. Important! Remove the blanking cap from the output window before attempting to attach the beam delivery. - Page 40 6. Installation 906-0227-00 REV 1...
-
Page 41: Transport And Recommissioning
7. Transport and recommissioning Before transporting the laser, observe the following precautions: • Completely drain the laser cooling system to prevent damage during shipping. Use clean compressed air, at a maximum pressure of 2bar, to blow out all traces of coolant in the cooling system pipework. Failure to remove coolant from the system prior to transport can cause damage to the laser. - Page 42 7. Transport and recommissioning 906-0227-00 REV 1...
-
Page 43: Interfacing
8. Interfacing User interface connections for SR AOM lasers are made through the 25-pin and 15-pin connectors on the rear panel. Pin connections depend on the laser version. Important! Under certain conditions, it may be possible for power cables carrying high voltages and currents to emit electrical noise levels that may interfere with control cable signals. - Page 44 Pin N° Function I/O type Signal + VSWR status RS422 output (+) 0.5–3.5V - VSWR status RS422 output (-) 3.5–0.5V RS232 output -6 to +6V External interlock return Input 5–24V External interlock Output 5V @ 50mA Diode enable Opto-isolated input 5–24V RS232 input -6 to +6V...
- Page 45 Status monitoring signals ZXMS6004FF DC_VOLTAGE_OK 50mA ACPL-247 2K7 0603 ZXMS6004FF SHUTTER_OPEN 50mA ACPL-247 2K7 0603 ZXMS6004FF SHUTTER_CLOSED1 50mA ACPL-247 2K7 0603 ZXMS6004FF SHUTTER_CLOSED2 50mA ACPL-247 2K7 0603 ZXMS6004FF USER_INDICATOR 50mA ACPL-247 2K7 0603 Monitoring input and VSWR status +VSWR_STATUS -VSWR_STATUS DS8921M 10K 0603 180R 0603...
- Page 46 Enable signals LM317LZ RF_ENABLE Vout 120R 0603 ACPL-247 LM317LZ DIODE_ENABLE Vout 120R 0603 ACPL-247 LM317LZ SHUTTER_ENABLE Vout 120R 0603 ACPL-247 • RF enable (pin 12) Pull the input high (5–24V) to enable the laser. • Diode enable (pin 21) Pull the input high (5–24V) to switch on the pointing laser. •...
-
Page 47: Minimum Interface Connections For Laser Output
RF forward and reflection signal monitoring MC34072DG REFLECTED_RF MC34072DG FORWARD_RF • RF forward output (pin 11, analogue) Signal proportional to the forward RF voltage. • RF reflected output (pin 10, analogue) Signal proportional to the reflected RF voltage. Overmodulation OVER_MODULATION ACPL-227 10K 0603 Active low output indicating overmodulation... -
Page 48: Rs232 Serial Interface
Important! The Laser enable signal must be switched to ground to enable laser operation but must not be permanently connected to ground. If laser operation is interrupted, a transition in the Laser enable signal must be received for in order to restart the laser. •... -
Page 49: Control Signal Timings
5-24V Inactive: 5–24V Active: 0V Figure 23 - Typical open drain output connection 8.4. Control signal timings The following control signal timings must be respected when starting up and operating SR AOM lasers. 100ms 200ms 300ms 400ms DC power Interlocks User shutter enable Shutter position RF enable... -
Page 50: Status Indicators
100ms 200ms 300ms 400ms DC power Interlocks User shutter enable Shutter position RF enable Laser enable Output power AOM demand Figure 25 - Startup timing — Interlocks and RF pre-enabled Table 19 - Parameter settling times Parameter Description Previous required input Minimum settling time Minimum time for soft-start of the DC power... -
Page 51: Shutter Reset
Figure 26 - Laser with power feedback and shutter status indicators Indicator name Status monitored DC PSU Interlock Coolant flow Modulation Operation mode DIOD Diode laser SHTR Shutter 8.5.1. Shutter reset If an SR AOM laser experiences DC, Interlock, Coolant Flow, Shutter Fault or AOM Fault errors, laser output will terminate and the shutter will close. - Page 52 8. Interfacing 906-0227-00 REV 1...
-
Page 53: Appendix A. Dimensional Drawings
Appendix A. Dimensional drawings SR 10 AOM 87.3 10.0 763.25 38.2 15.0 3 x M8 SR 25 AOM 87.3 10.0 825.25 37.8 15.0 3 x M8 906-0227-00 REV 1 A. Dimensional drawings... - Page 54 A. Dimensional drawings 906-0227-00 REV 1...
-
Page 55: Appendix B. Coolant Requirements And Additives
<1000cfu/ml The pH value, conductivity and dissolved solids levels can be measured with a portable meter and the bacteria level can be checked with a test kit. For more information contact your local Luxinar Aftersales office. B.2. Suspended particle removal To remove particulate contamination, an in-line filter with a pore size of 100µm must be fitted as close... - Page 56 • Disposal of used material Ensure that the disposal of all the materials used in this product is conducted according to all local and national regulations. • Instructions for use Completely empty both inhibitor bottles which are included with the NALCO kit into the cooling water reservoir tank.
-
Page 57: Appendix C. Cooling System Pressure Drop Curves
Appendix C. Cooling system pressure drop curves SR 10 AOM resonator and power supplies Flow (litres/min) SR 25 AOM resonator and power supplies Flow (litres/min) AOM module Note: This pressure drop graph shows the drop through the AOM module with a 3bar pressure limiting regulator fitted to the inlet of the AOM coolant circuit. - Page 58 SR 10 DC power supply Flow (litres/min) SR 25 DC power supply Flow (litres/min) C. Cooling system pressure drop curves 906-0227-00 REV 1...
-
Page 59: Appendix D. Dc Power Supply Options
Appendix D. DC power supply options Note: This equipment is designed for overvoltage category II as defined within EN 61010-1:2010+A1:2019. D.1. SR 10 AOM single-phase DC power supply D.1.1. General description The SR 10 AOM is a 3U, 19” rack mountable, DC 3kW power supply. (PSU) Figure 27 - SR 10 AOM single-phase DC power supply D.1.2. -
Page 60: Installation
Table 22 - Electrical specifications SR 10 AOM Input voltage range 230VAC ± 10% Mains input frequency range 50–60Hz Mains input fuse rating AC inrush current (max.) Output voltage (DC) Output current (max.) 62.5A Power factor >0.90 at full power Power consumption (max.) 3kW at pulsed full power D.1.3. - Page 61 To replace the cable: Remove the access panel on the rear of the power supply by unfastening the four fixing screws. AC mains input Coolant inlet Coolant outlet DC output to laser Figure 30 - AC mains connection point Remove the supplied cable from the connector. and replace it with the longer cable in either single or bi-phase configuration.
-
Page 62: Operation
TO LASER (RF PSU) +50VDC Figure 31 - DC cable connections DC power cables of the correct specification can be supplied by Luxinar. Cooling system connections The power supply requires a liquid cooling source. It is recommended that it is connected in series with the laser system cooling circuit. - Page 63 Indicator Status definition No AC voltage AC input OK AC voltage out of range PSU disabled PSU ENABLED PSU enabled DC module off DC module OK DC module fault FANS Internal fans off Internal fans OK Internal fans fault Temperature OK TEMPERATURE Temperature too high Humidity sensor not fitted...
-
Page 64: Dc Sr 25 Single-Phase Dc Power Supply
D.2. DC SR 25 single-phase DC power supply D.2.1. General description The DC SR 25 is a free-standing DC power supply. (PSU) Figure 33 - DC SR 25 single-phase DC power supply D.2.2. Specification Table 23 - Dimensions, weight and cooling Dimensions (mm) LxWxH 511x371x176 Weight... -
Page 65: Installation
Figure 34 - Overall dimensions Table 24 - Electrical specifications DC SR 25 Input voltage range 230VAC ± 10% Mains input frequency range 50–60Hz Mains input fuse rating AC inrush current (max.) Output voltage (DC) 50 ± 1V Output current 120A Power factor —... - Page 66 + 50VDC Terminal 2 (black) 0VDC DC power cables of the correct specification can be supplied by Luxinar. Cooling system connections The power supply requires a liquid cooling source. It is recommended that it is connected in series with the laser system cooling circuit. The coolant connections are located on the front panel. See section 6.2.3.
- Page 67 — To control the power supply from an external controller, link pins 13 and 14 via volt-free contacts, such as a relay. To permanently enable the power supply, fit the link provided (Luxinar part number 011-0172-00). Open drain status outputs require a pull-up resistor and voltage source (5 – 24V) to be connected to the monitored output.
-
Page 68: Operation
D.2.4. Operation The power supply has no user controls apart from the external enable option. When powered up, it will automatically carry out diagnostic checks. If no faults are detected, the DC output is enabled. If faults are detected, one or more status indicators will be off or displaying red/amber. Disconnect and reconnect the mains supply to restart the power supply. -
Page 69: Dc Sr 25 Three-Phase Dc Power Supply
D.3. DC SR 25 three-phase DC power supply D.3.1. General description The DC SR 25 three-phase power supply is a 3U, 19” rack mountable, DC power supply. (PSU) Figure 37 - DC SR 25 three-phase DC power supply D.3.2. Specification Table 26 - Dimensions, weight and cooling Dimensions (mm) LxWxH 430x443x135 (3U rack height) -
Page 70: Installation
D.3.3. Installation INTERFACE Umax-SET OUTPUT+ VOLTAGE-SENSE L1 L2 L3 OUTPUT- MAINS INPUT Water out Water in 15-pin D-type auxiliary interface connector Voltage sense connector DC output connectors Coolant connectors Three-phase mains supply connector Figure 38 - Rear panel connections Mains AC power connections Important! Under certain conditions, it may be possible for high voltage and current cables to emit noise energy levels that may interfere with control signal cables. - Page 71 + 50VDC Output - (black) 0VDC DC power cables of the correct specification can be supplied by Luxinar. Voltage sense connector Voltage feedback must be provided between the buffer capacitor assembly and the power supply. Connect the provided voltage sense cable (part number 093-0115-0060) from the capacitor assembly to the voltage sense connector.
- Page 72 Uok = low To control the power supply from an external controller, link pins 2 and 6 via volt-free contacts, such as a relay. To permanently enable the power supply, fit the link provided (Luxinar part number 011-0172-00). Umax-SET connector This connector is reserved for Luxinar trained service personnel and must not be used.
-
Page 73: Operation
Auxiliary interface Voltage sense cable Laser DC connections Buffer capacitor assembly Coolant connections Three-phase mains supply without neutral Figure 41 - Connection overview D.3.4. Operation The LED indicators on the front panel provide information about the power supply operating status. READY Uok TEMPW. - Page 74 Once the PSU Enable signal is applied, the DC output will turn on. The output voltage is internally compared to the set reference voltage. If this is correct, the Uok indicator will turn on. Note: If the external voltage is not correct, the DC output is turned off and the FAULT indicator turns on.
- Page 75 Avoid eye or skin exposure to direct or improvement, the information, figures, illustrations, tables, specification scattered radiation. and schematics contained herein are subject to change without notice. Luxinar Ltd Tel: +44 1482 650088 Meadow Road sales.uk@luxinar.com Bridgehead Business Park www.luxinar.com...
Need help?
Do you have a question about the SR AOM Series and is the answer not in the manual?
Questions and answers