
Related Manuals for Decorelex F106SIX-RO

Summary of Contents for Decorelex F106SIX-RO
- Page 1 Built-In Oven Model: F106SIX-RO Important Safety Instructions READ AND SAVE THESE INSTRUCTIONS WARNING: Page 1 of 17...
-
Page 2: Proper Installation And Maintenance
When properly cared for, your new appliance has been designed to be safe and reliable. Read all instructions carefully before use. These precautions will reduce the risk of burns, electric shock, fire and injury to persons. When using kitchen appliance, basic safety precautions must be followed, including those in the following pages. Proper Installation and Maintenance Important –... -
Page 3: Burn Prevention
WARNING: TO REDUCE THE RISK OF PERSONAL INJURY IN THE EVENT OF A GREASE FIRE, OBSERVE THE FOLLOWING: SMOTHER FLAMES with a close-fitting lid, cookie sheet, or metal tray, then turn off the burner. EXERCISE CAUTION TO PREVENT BURNS. If the flames do not go out immediately, EVACUATE AND CALL THE FIRE DEPARTMENT. -
Page 4: Cleaning Safety
backsplash. Children climbing on an appliance to reach items could be seriously injured. Cleaning Safety CAUTION: Do not clean the appliance while it is still hot. Some cleaners produce noxious fumes when applied to a hot surface. Wet cloths or sponges can cause burns from steam. Do Not Use Oven Cleaners –... -
Page 5: Close-Up View
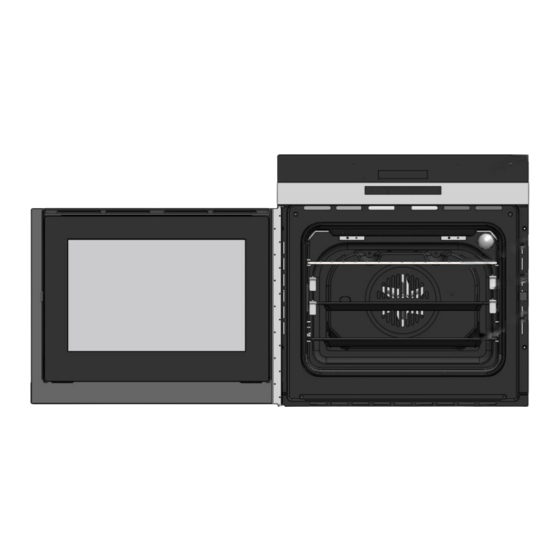
Instructions for installation and use Close-up view A. Control Panel G. Oven Rack H. Guides for sliding the racks or dripping in and out F. Dripping Pan or Baking Sheet Page 5 of 17... -
Page 6: How To Use Your Oven
How to use your oven This multi-function oven combines the advantages of traditional convection ovens with those of the more modern fan assisted models in a single appliance. It is an extremely versatile appliance that allows you to choose easily and safely between different cooking modes. -
Page 7: Memory Function
General instructions · Always switch the appliance on first by pressing the On/Off button. · When the selected function is lit, the oven begins to heat up or the time set begins to count down. · When the selected temperature is reached, an audible signal sounds. ·... - Page 8 · After a clock function has been selected, the corresponding symbol flashes for approx. 5 seconds. During this time, the desired times can be set or modified using the button. · When the desired times has been set, the symbol continues to flash for approx. 5 seconds. After this the symbol lights up.The set Countdown begins to count down.
-
Page 9: Child Safety Device
Other Functions Switching off the display You can save energy by switching off the display. Switching off the display 1. If required, Switch off the appliance using the On/Off button. 2. Press the Clock Functions button and the button at the same time until the display goes out. As soon as the appliance is switched on again, the display comes on automatically When the appliance is next switched off, the display goes out again. - Page 10 constant and uniform throughout the oven ,the air cooks and browns food uniformly over its entire surface. With this mode ,you can also cook various dishes at the same time ,as long as their respective cooking temperatures are the same .A maximum of 2 racks can be used at the same time ,following the instructions in the section entitled:“Cooking On More Than One Rack ”.
-
Page 11: How To Keep Your Oven In Shape
The fan located on the bottom of the oven makes the air circulate at room temperature around the food .This is recommended for the defrosting of all types of food ,but in particular for delicate types of food which do not require heat ,such as for example :ice cream cakes ,cream or custard desserts ,fruit cakes .By using the fan ,the defrosting time is approximately halved .In the case of meat ,fish and bread ,it is possible to accelerate the process using the “Baking”... -
Page 12: Practical Cooking Advice
Oven door structures 3 remove and assemble procedure: · The glass panels on the door can be removed to assist in cleaning. · Depending on the appliance model,the over door can be opened from the right or the left. · The glass panel can be removed in this way for doors which open from the right or the left. ·... - Page 13 on the 2nd rack from the bottom and the more delicate food on the 4th rack from the bottom. · When cooking foodstuffs that require differing times and temperatures ,set a temperature that is somewhere between the two temperatures required ,place the more delicate food on the 4th rack from the bottom and take the food requiring less time out of the oven first .
- Page 14 the oven after having preheated it for at least 10 minutes . Cooking Fish and Meat When cooking white meat ,fowl and fish ,use temperature setting from 180℃to 200℃. For red meat that should be well done on the outside while tender and juicy in the inside ,it is a good idea to start with a high temperature setting (200℃-220℃)for a short time ,then turn the oven down afterwards.
-
Page 15: Installation Of Built-In Ovens
7 Baking Tarts 20-30 Fruit cakes 40-45 Fruitcake 40-50 Sponge cake 25-30 Stuffed pancakes) on 2 racks) 30-35 Small cakes (0n 2 rakes) 20-25 Cheese puffs (on2 cakes) 15-20 Cream puffs (on 3 cakes) 1-3-5 20-25 Biscuits (0n 3 racks) 1-3-5 20-25 Meringues (0n 3 racks) -
Page 16: Electrical Installation
Oven door structures 2 or 3 N. B :Installation in compliance with the consumption declaration In order to ensure adequate ventilation ,the back panel of the cabinet unit must be removed .Installing the oven so that it rests on two strips of wood is preferable .If the oven rests on a continuous ,flat surface ,there must be an aperture of at least 45×560mm . -
Page 17: Technical Specifications
Cable from Junction box power supply Black wires Red wires Green wires Cable from oven Grounded Neutral U.L.-Listed conduit connector · Connect red wire from oven to red wire injunction box. · Connect black wire from oven to black wire in junction box. ·...
Need help?
Do you have a question about the F106SIX-RO and is the answer not in the manual?
Questions and answers