
Related Manuals for Precisionary RF-1000


Summary of Contents for Precisionary RF-1000
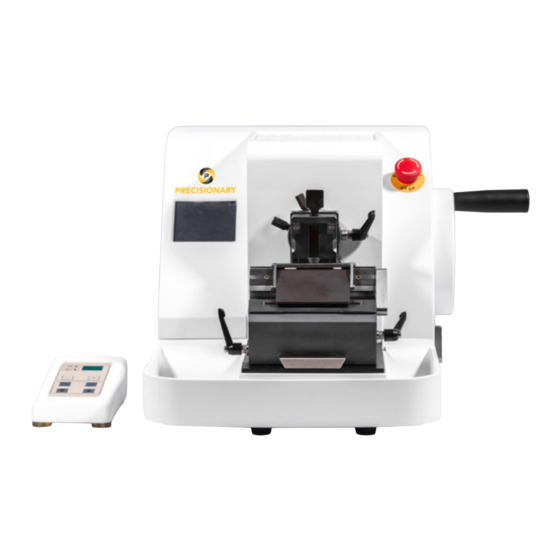
- Page 1 PRECISIONARY INSTRUMENTS ROTARY MICROTOME RF-1000 Fully Automated Microtome For Research & Clinical Studies User Manual...
-
Page 2: Table Of Contents
Instrument Type & Use ........................4 Intended Use of the Instrument ......................4 Safety Devices ............................. 4 Model Description ..........................5 RF-1000 Rotary Microtome General Information ................5 Technical Specifications ........................5 RF-1000 Rotary Microtome Components .................... 6 RF-1000 Rotary Microtome Anatomy ....................7 RF-1000 Specimen Head Clamp Anatomy .................. -
Page 3: Thank You
Caution! Follow the accompanying documentation. This user manual is a key part of the Precisionary Rotary Microtome RF-1000, therefore make sure to keep it on hand and as close as possible to the instrument itself for future reference. -
Page 4: Instrument Type & Use
Please only refer to this user manual when handling the Precisionary RF-1000 rotary microtome. The Precisionary RF-1000 is meant to be used by trained laboratory personnel only and is intended only for professional use. Please read this manual thoroughly and understand all instructions BEFORE operating this instrument. -
Page 5: Model Description
Model Description RF-1000 Rotary Microtome General Information The Precisionary RF-1000 rotary microtome is a fully automatic model that is ideal for routine and high-throughput histology tissue sectioning. This microtome provides high precision cutting and stability, which gives you reproducible, high-quality wax-embedded and fixed tissue sections. -
Page 6: Rf-1000 Rotary Microtome Components
RF-1000 Rotary Microtome Components The Precisionary RF-1000 is delivered with everything you need to get started right away to use your new rotary microtome for cutting experiments. The following items are included with your RF-1000 rotary microtome: Item Name Quantity Part Number (Catalog Number) -
Page 7: Rf-1000 Rotary Microtome Anatomy
RF-1000 Rotary Microtome Anatomy Name Function Foot Pedal Controls Start/Stop functions for automated cutting. Side Control Panel Allows for adjusting cutting parameters and cutting modes displayed on the touchscreen. LCD Touchscreen Panel Displays cutting parameters, numbers, and controls. Microtome Storage Surface Flat surface for easy storage of accessories and consumables while cutting. -
Page 8: Rf-1000 Specimen Head Clamp Anatomy
RF-1000 Specimen Head Clamp Anatomy Name Function Specimen Head X-Axis Allows for changing the specimen head angle in the X-axis. Adjustment Knob Specimen Head Y-Axis Allows for changing the specimen head angle in the Y-axis. Adjustment Knob Sample Clamp Allows cassettes to be inserted and tightly clamped for slicing. -
Page 9: Installation
The Precisionary Rotary Microtome RF-1000 is delivered with all safety precautions using freight shipment. Your rotary microtome will be delivered in a secure wooden crate that will require disassembly before installation of the instrument. -
Page 10: Operation
Step 2. Install the removeable waste tray After unpacking the removable waste tray, slide it onto the base of the RF-1000 rotary microtome from the front. The grooves in the removable waste tray will fit perfectly into the underside of the microtome... -
Page 11: Step 3. Switch On The Rotary Microtome
Step 3. Switch on the rotary microtome 1. Begin by plugging in the rotary microtome power cord (with any appropriate surge protectors) directly into the wall. 2. Next, plug in the cord for the foot pedal. 3. Finally, plug in the cord for the side control panel. 4. -
Page 12: Step 5. Install The Knife Holder Base Onto The Microtome Base Unit
Starting from the bottom-most piece, here is what each component does: Knife Holder Base Component Movement & Function Base Component The base component has a groove opening on the bottom that allows it to slide onto the microtome unit. The handle on the right side of the base component allows the angle of the knife holder base to be adjusted for cutting. -
Page 13: Step 6. Adjust The Knife Block Cutting Angle
Adjust the knife block cutting angle Step 6. The cutting angle can be adjusted on the RF-1000 Rotary Microtome by moving the middle component of the knife block. To do so, loosen the middle component of the knife block by turning the handle on the right side (red arrow below). -
Page 14: Cutting Sections With The Rotary Microtome
Cutting Sections with the Rotary Microtome This section covers the operational procedures of the Precisionary Rotary Microtome RF-1000. Always remember to wear safety gloves while operating the instrument. Step 1. Insert a cassette or tissue block into the specimen head clamp Begin by pushing the specimen clamp lever towards you, then insert the cassette block. -
Page 15: Step 3. Insert A Rotary Microtome Cutting Blade
RF-1000 rotary microtome. The RF-1000 has a blade safety feature installed on the cutting stage. There is a blade guard (red arrow): This guard covers the entire length of the cutting blade to protect users. -
Page 16: Exchanging Clamp Heads In The Specimen Head Holder
The RF-1000 Rotary Microtome has a specimen head that works with two different types of specimen clamps: 1. Cassette Clamp: This clamp is included on all RF-1000 units and can fit a typical plastic cassette with tissue embedded in wax. -
Page 17: Using The Touchscreen Control Panel
Main Control Panel, here are the specific buttons and selections: Using the Side Control Panel The RF-1000 Rotary Microtome also has a separate side control panel to allow for easy access and control during cutting sessions. To help explain the functions in the Side Control Panel,... -
Page 18: Using The Foot Pedal
Using the Foot Pedal The RF-1000 comes with a foot pedal that allows for control of the automated cutting feature on the microtome. The foot pedal can be used as follows: Summary of Common Useful Functions This section summarizes how to operate the RF-1000 Rotary Microtome based on commonly used functions. -
Page 19: How To Change Between Trimming And Sectioning Modes
There are two (2) ways to change between trimming and sectioning modes on the RF-1000 Rotary Microtome: How to change the slice thickness There is one (1) main method to changing the slice thickness setting on the RF-1000 Rotary Microtome:... -
Page 20: How To Start And Stop Automated Cutting
How to wake the microtome from sleep mode After the RF-1000 is turned on but is not used for a long period of time, the rotary microtome will enter a “Sleep Mode.” When this occurs, the touchscreen Main Control Panel will go dark. To turn the RF-1000 Rotary Microtome back on, simply touch the Main Control Panel and resume. -
Page 21: Cleaning & Maintenance
Remove paraffin residues with a dry cloth or paper towel. Troubleshooting Are you the proud owner of a Precisionary Instruments Rotary Microtome RF-1000, but are having problems? This is our “Troubleshooting Guide,” which we wrote to help you troubleshoot the most commonly encountered issues. Jump right in! If you cannot find the solution below, or... - Page 22 Your knife may be too dull, so change to a new cutting blade. After turning on the This results from a damaged power cord or fuse. Contact rotary microtome, the Precisionary Instruments for ordering a replacement power cord LCD screen is off and/or instructions on replacing the fuse.
-
Page 23: Warranty & Services
Precisionary. The Precisionary terms of warranty apply exclusively to your purchase of the Rotary Microtome RF-1000. There is a one (1) year warranty for the Precisionary Rotary Microtome RF-1000. Additional years of the Annual Service Plan are available for purchase. Consumables, shipping fees, handling costs, and training plans are non-refundable.
Need help?
Do you have a question about the RF-1000 and is the answer not in the manual?
Questions and answers